Page 9;&(%$*4.8"4,7%<'*#$"&8#=%/7*,#*%4,77%>?@@@?@AA?BCDC1Item 63299
EF;6GHIJ6KFGLIMNFLMG6MFMO6 E6GPJ
I/*(,$"&8
F%EJFK`%M6FK%SFGG6KH%NFH%OFPE6%SFGG6KH%6aJTIELIM1%%
GI%K6UPO6%KLE`%I;%F%EJFK`%M6FK%SFGG6KH%;ITTIQ%GV6E6%LMEGKPOGLIME%6aFOGTH1
GI%JK6!6MG%E6KLIPE%LM]PKH-%
Q*,(%FMEL?,//(&^*9%#/7,#.?(*#"#$,8$%#,2*$Y%3&337*#%,89%.*,^Y?9'$Y%('++*(%)&(_%
37&^*#%).*8*^*(%4&88*4$"83=%9"#4&88*4$"83=%&(%)&(_"83%8*,(%+,$$*(Y1%%%
S,$$*(Y%,4"9%4,8%4,'#*%/*(5,8*8$%+7"898*##1
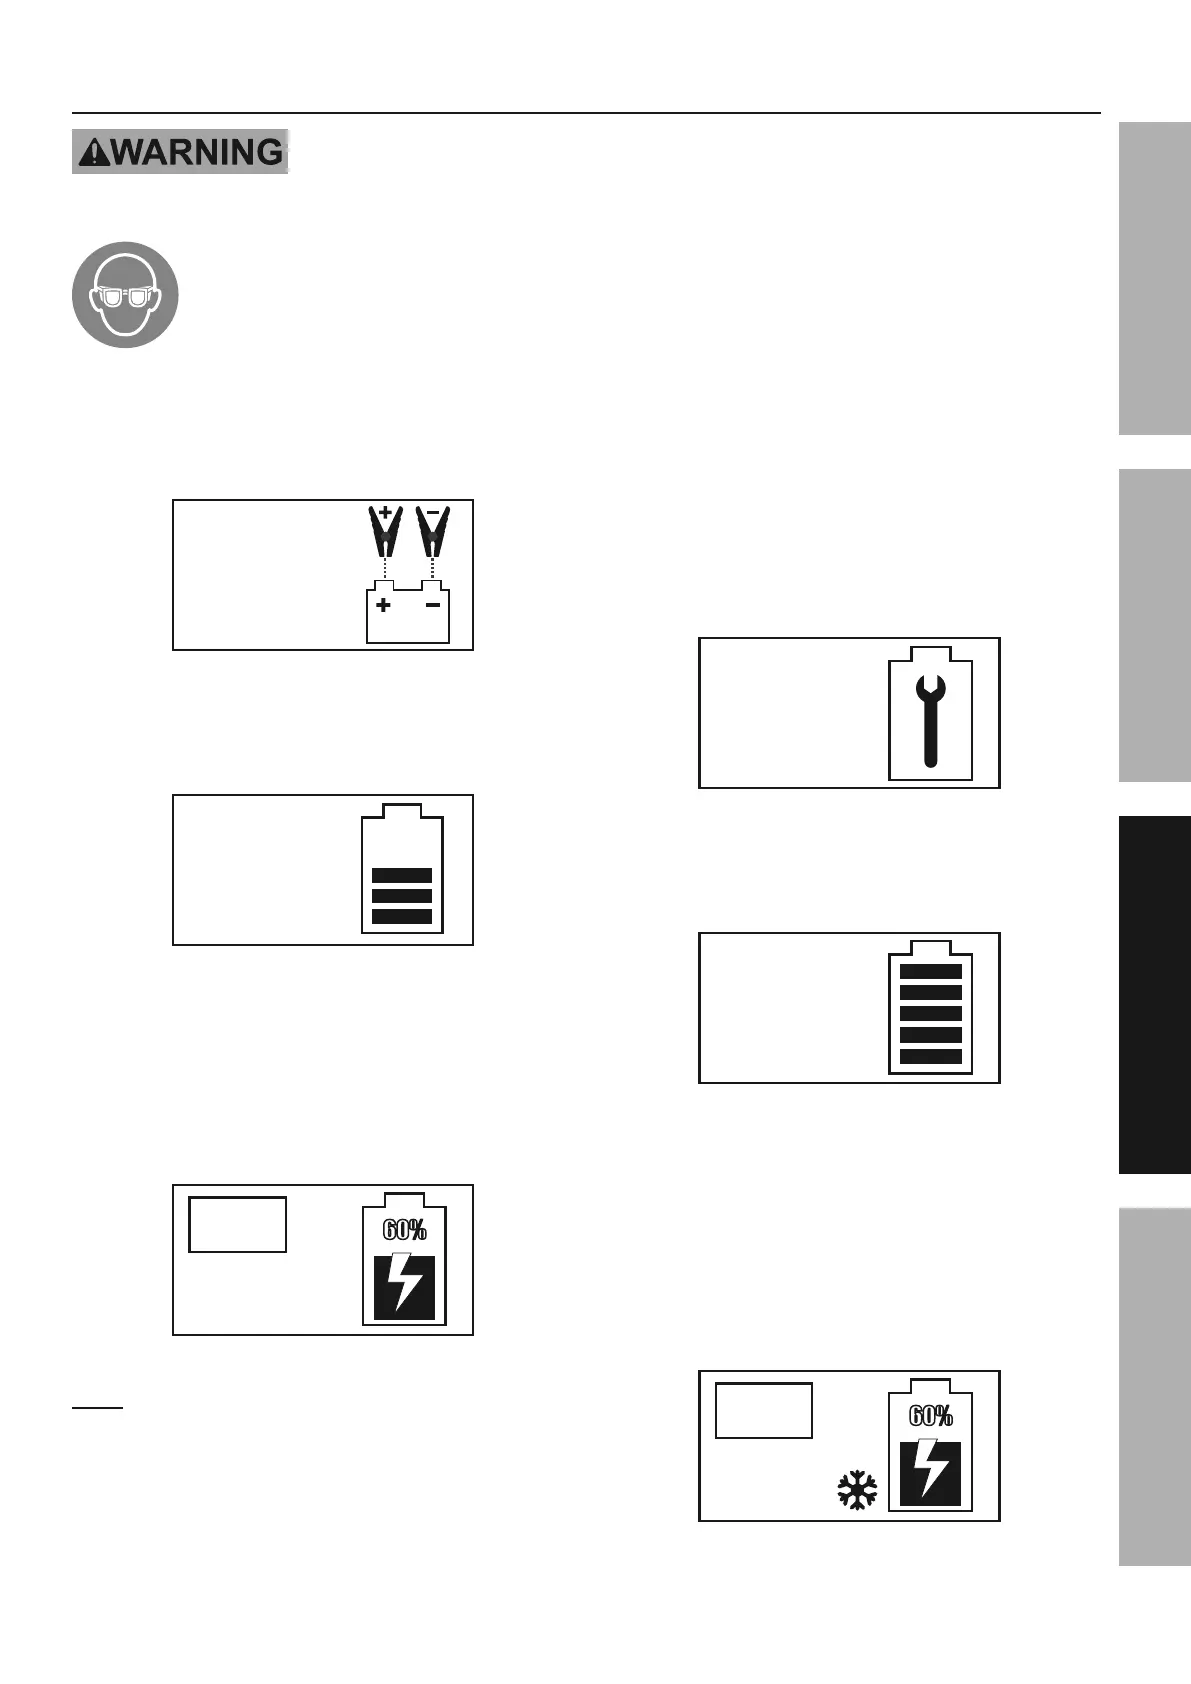
1. Follow directions on page 8 to connect Charger
to battery, then plug the Power Cord into a
properly grounded outlet. If the cable clamps
are not connected or the connection is loose, the
LCD screen will display as shown in Figure A.
PLEASE
PUT THE
CLAMPS ON
;"3'(*%F%
2. When a good connection has been made, the
LCD screen will display the battery capacity
and voltage. See example in Figure B.
CAPACITY :
60%
12.8V
VOLTAGE:
;"3'(*%S%
3. Press the “AMP” button to choose the desired
charging rate – if unsure select the automatic
charging rate. Press the “BATTERY TYPE”
button to select battery type – for GEL batteries
select “STD” – then press the “CHARGE” button
to start charging. The LCD screen will display
the settings. See example in Figure C.
AUTO
STANDARD
BATTERY
;"3'(*%O%
M&$*- If user does not select the charging amp and
battery type settings within 30 seconds, Charger
will start charging the battery using the default
setting – automatic charging rate for standard battery.
4. Once the battery is fully charged the
Charger automatically switches to a
float charge/maintenance mode.
5. For weak/sulfated batteries or batteries that have
been unused for long periods of time, the battery
reconditioning function may be used to recover
the battery from deep discharge and help the
battery last longer. Press the “RECONDITION”
button to activate this function. The LCD
screen will display as shown in Figure D.
BATTERY IN
REPAIR NOW
;"3'(*%U
6. When the reconditioning process is finished, the
LCD screen will display as shown in Figure E and
the Charger will return to normal charge mode.
REPAIR
COMPLETED
;"3'(*%6%
7. The winter charging mode may be used for
specialized battery charging in winter weather
conditions. To enter this mode, press the “WINTER”
button at any stage in the charging process.
A snowflake icon will appear in the LCD
screen display indicating Charger is in the
winter charging mode. See example in
Figure F. Pressing the “WINTER” button
again will exit the winter charging mode.
AUTO
STANDARD
BATTERY
;"3'(*%;%
 Loading...