TWO ELEMENT BAKING/
CONVECTION BAKING / CONVECTION COOKING
Preheating
Preheating the oven is not necessary when using temperatures below 250 F.
For best results, it isextremely important that you preheat the oven when
baking cakes and other items that have critical baking temperatures. After
the temperature control has been set, the Oven Indicator light goes out
when the oven reaches that temperature. Preheating takes no longer than
10 -15 minutes. Preheat times will be greater in those areas in which the
electrical supply is less than 240 volts.
Two Element Baking
Conventional baking/roasting isparticularly suitable for dishes which require
a high temperature. Many cookbooks contain recipes to be cooked in the
conventional manner. This bake setting is only recommended for single
rack baking.
Convection Baking
Convection baking isthe process of cooking food with a flow of heated air
circulating throughout the oven cavity. The even circulation of this air
equalizes the temperature throughout the oven cavity and eliminates the
hot and cold spots found in conventional ovens. This feature can make a
significant difference in foods prepared in the oven. A major benefit of
convection baking is the ability to prepare food in quantity. The uniform air
circulation makes this possible.., a feature not possible in a standard oven.
With this heating system, the air is distributed evenly throughout the oven
by the convection fan. The heat therefore reaches the food to be baked or
roasted more quickly. With this heating method, foods can be baked and
roasted at the same time with minimal taste transfer, even when different
dishes are involved, such ascakes, fish or meat. The hot air system is
especially economical when thawing frozen food.
TruConvec TM Cooking
InTruConvecTM cooking, the rear element only operates at full power. There
is no direct heat from the bottom or top elements. The heated air is
circulated by the motorized fan in the rear of the oven. Breads, cookies,
and other baked goods come out evenly textured with golden crusts. No
special bakeware is required.
14
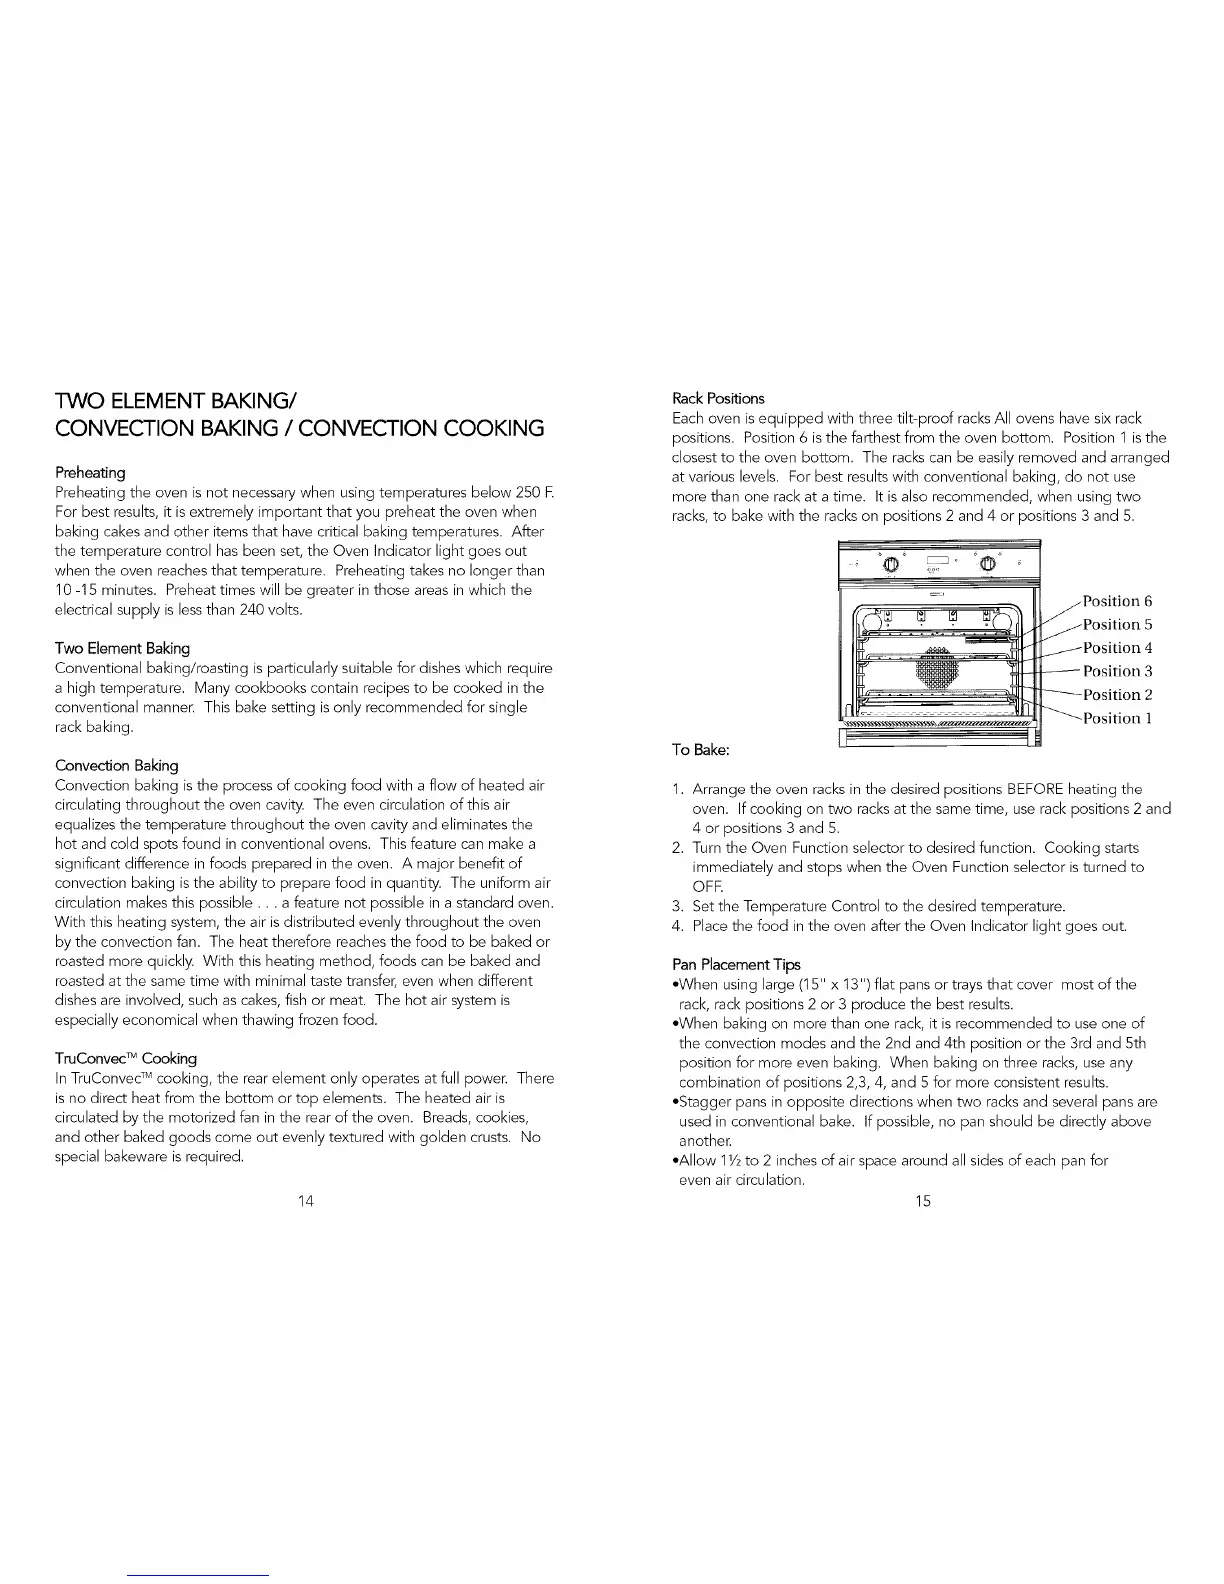
Rack Positions
Each oven is equipped with three tilt-proof racksAll ovens have six rack
positions. Position 6 isthe farthest from the oven bottom. Position 1 isthe
closest to the oven bottom. The racks can be easily removed and arranged
at various levels. For best resultswith conventional baking, do not use
more than one rack at a time. It is also recommended, when using two
racks, to bake with the rackson positions 2 and 4 or positions 3 and 5.
To Bake:
_sition 2
1
1. Arrange the oven racks in the desired positions BEFORE heating the
oven. If cooking on two racksat the same time, use rack positions 2 and
4 or positions 3 and 5.
2. Turn the Oven Function selector to desired function. Cooking starts
immediately and stops when the Oven Function selector isturned to
OFE
3. Set the Temperature Control to the desired temperature.
4. Placethe food in the oven after the Oven Indicator light goes out.
Pan Placement Tips
*When using large (15" x 13") flat pans or trays that cover most of the
rack, rack positions 2 or 3 produce the best results.
*When baking on more than one rack, it is recommended to use one of
the convection modes and the 2nd and 4th position or the 3rd and 5th
position for more even baking. When baking on three racks, use any
combination of positions 2,3, 4, and 5 for more consistent results.
*Stagger pans in opposite directions when two racksand several pans are
used in conventional bake. If possible, no pan should be directly above
another.
*Allow 11/2to 2 inches of air space around all sides of each pan for
even air circulation.
15


 To Next Page