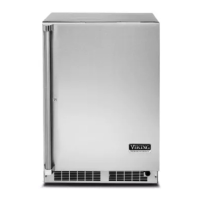
This document serves as the installation manual for the Viking 5 Series 15" W. / 24" W. Undercounter Refrigeration units, covering various models including VRCI5240G, CVRCI5240G, VRCO5240D, CVRCO5240D, VRDI5240D, CVRDI5240D, VRDO5240D, CVRDO5240D, VBCI5150G, CVBCI5150G, VBCI5240G, CVBCI5240G, VWCI5150G, CVWCI5150G, VWC15240G, and CVWCI5250G. It provides essential information for the safe and proper installation, operation, and maintenance of these undercounter refrigeration appliances.
The primary function of these units is to provide undercounter refrigeration, designed for integration into kitchen cabinetry or as freestanding appliances. They are intended for residential use, offering a convenient and space-saving solution for storing food and beverages at controlled temperatures. The manual emphasizes the importance of proper installation to ensure optimal performance, safety, and longevity of the appliance.
Key usage features highlighted in the manual include the importance of proper door swing clearance, particularly for models with pull-out shelves or drawers. For 15" wide models (VBCI/VWCI), a 94.0° door swing is required for full pull-out shelf clearance, necessitating a minimum of 15-25/32" (40.1 cm) clearance for the door swing and 2-3/16" (5.6 cm) from a corner. Similarly, for 24" wide models (VRCI/VRCO/VBCI/VWCI), a 94.0° door swing is also required for pull-out shelf clearance, with a minimum of 24-25/32" (40.1 cm) clearance for the door swing and 2-27/32" (5.6 cm) from a corner. For 24" wide drawer models (VRDI/VRDO), a 40" (102.0 cm) clearance is indicated for the drawer swing. These clearances are crucial to allow full access to the interior and prevent damage to the unit or surrounding cabinetry. The units are designed to be installed under a countertop, and the manual advises supporting the countertop with a structure other than the refrigerated cabinet itself to prevent damage.
The manual also details critical safety features and warnings. A significant emphasis is placed on the anti-tip brackets, which are supplied with the unit and must be properly installed. These brackets are designed to secure the rear legs of the unit, preventing it from tipping forward, especially if loaded racks or shelves are pulled out simultaneously. This is a crucial safety measure to prevent injury. The electrical requirements specify a 115V, 60Hz, 15 amp dedicated circuit with a properly grounded 3-prong outlet. The use of a Ground Fault Interrupter (GFI) is recommended if required by local codes, and specific criteria for GFI installation are provided to ensure proper functionality and avoid warranty issues. The manual strictly prohibits the use of extension cords and advises against removing the round grounding prong from the plug, underscoring the importance of proper electrical grounding to prevent electrocution hazards.
Maintenance features are also addressed to ensure the unit's long-term performance. A critical maintenance instruction is the regular cleaning of the condenser every three months. Failure to do so can cause the unit to malfunction and may void the warranty. The kickplate, located at the bottom front of the unit, is designed to be slotted and must remain unobstructed to allow for proper air circulation. It is also removable for servicing. The manual advises against installing the unit behind closed doors, as this could impede airflow and lead to malfunction. Before any cleaning or servicing, the power on/off switch (located behind the air grille on the top right side) must be turned to the OFF position.
The installation process involves several steps, including uncrating the unit carefully to avoid damage, moving it to the installation site, and ensuring the installation area is level and properly prepared. The unit's leveling legs are for fine-tune adjustment only and should not be used to compensate for floor differences exceeding 1/2 inch. The rear leveling legs must engage under the anti-tip devices when the cabinet is slid into position. The front of the unit should be shimmed to be flush with surrounding cabinetry, and the front legs adjusted to support the countertop. Proper installation of shelving and drawers is also emphasized, ensuring they slide smoothly and actuate the slide stop mechanism.
The manual concludes with an installation checklist to ensure all critical steps have been completed, including the removal of shipping materials, proper anti-tip bracket engagement, level positioning, correct electrical connection, and removal of protective films. It also advises allowing the unit to operate for at least 24 hours before loading products or adjusting temperature settings, allowing the refrigeration system to stabilize. This comprehensive guide aims to empower installers and users with the knowledge necessary for a safe and effective setup and ongoing care of their Viking undercounter refrigeration unit.