6
Configurazione manuale parametri dell’unità elettronica
Eseguire la seguente procedura con le targhe alimentate e dopo aver as-
sociatoilcodiceIDtarga.Questaproceduraèvalidapertutteletarghe,
sia Master che Slave.
Durantelaprogrammazionelatargaènellostatodioccupatoenonpuòes-
sere usata per il funzionamento normale dell’impianto. Nell’unità elettronica
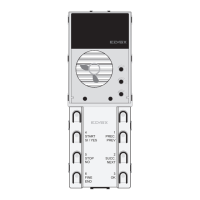
complessivamente sono presenti 8 tasti e 6 LED verdi.
Per la programmazione vengono utilizzati i 6 tasti in basso (tasti serigrafati)
e i 4 LED verdi in basso.Quest’ultimi fungono da indicatore per la varia-
zione dei parametri di base. Per comodità i 4 LED verdi li denominiamo
DL3, DL4, DL5, DL6 (vedi figura 5) . Durante la fase di programmazione 6
tasti assumeranno il significato:
PREC. PREV =tornaallasequenzaprecedente
SUCC. NEXT=prosegueallasequenzasuccessiva
OK=perpassaredalmenùdisequenzainmodificaparametro
START SI/YES=funzionedipendentedaltipodiparametro
STOP NO=funzionedipendentedaltipodiparametro
FINE END=serveperusciredamodificaparametrooperusciredalla
programmazione (dipende se all’interno di modifica parametro o se nella
fase“sequenza”
Procedura di configurazione dei parametri dell’unita’ elettronica attra-
verso i tasti (diagramma delle fasi a pagina 8 e 9):
- Premere e rilasciare il tasto RST (reset).
- Premere il tasto PRG mantenendolo premuto, premere anche il tasto in
alto a destra e mantenere premuti i due tasti.
- Dopo 2 s, l’ unità elettronica emetterà un tono acuto.
- Inserirelapassword,premendoinsequenzaitasti6-5-4-3-2-1(Default).
SelapasswordècorrettaiLEDdiilluminazionesispegneranno,altri-
menti l’unità elettronica emetterà un tono basso che indica l’uscita dalla
fase di programmazione.
- Utilizzarei6tastiserigrafati,permodificareilvaloredeiparametri.ILED
di illuminazione indicano la funzione corrente, i tasti PREC. e SUCC.
selezionano il parametro, il tasto OK entra nella fase di modifica del
parametro, il tasto FINE esce dalla fase di modifica del parametro.
L’uscita dalla fase di modifica, avviene anche per timeout (30 s) evidenziato
dall’emissionediuntonobasso.Iltempoditimeoutvieneprolungatodi30
s ad ogni pressione di un tasto.
Per uscire dalle fasi di programmazione premere in ogni momento il tasto
FINE.
Manual configuration parameters of the electronic unit
Perform the following procedure with the panels powered and after assi-
gningtheentrancepanelIDcode.Thisprocedureappliestoallpanels,
Master and Slave.
During programming, the entrance panel is in engaged status and cannot
beusedfornormalsystemoperation.Thereare8buttonsand6green
LEDs in total on the electronic unit.
The6(screenprinted)buttonsatthebottomareusedforprogramming,
along with the 4 green LEDs at the bottom. Which function as indicators
for the variation of standard parameters. For convenience, we call the 4
green LEDs DL3, DL4, DL5, DL6 (see figure 5). During programming the 6
buttons assume the functions:
PREC. PREV=returntotheprevioussequence
SUCC. NEXT=movetothenextsequence
OK=tomovefromthesequencemenutoparametermodification
START SI/YES=functiondependsontheparametertype
STOP NO=functiondependsontheparametertype
FINE END=usedtoexitparametermodificationortoexitprogramming
(dependswhetheryouareinparametermodificationorthe“sequence”
phase).
Electronic unit parameter configuration procedure using the keys
(diagram of the steps on pages 10 and 11):
- Press and release the RST (reset) button.
- Press and hold the PRG button and the top right-hand button simultane-
ously.
- After 2 s, the electronic unit will emit a sharp tone.
- Enter the Password by pressing the buttons 6-5-4-3-2-1 (Default) in se-
quence.
Ifthepasswordiscorrect,theLEDswillswitchoff,otherwisetheelectronic
unit will emit a low tone to indicate its exit from programming mode.
-Usethe6screenprintedbuttonstoadjusttheparametervalues.The
LEDs indicate the current function, the PREV. and NEXT buttons select the
parameter, the OK button enters parameter modification mode, the END
button exits parameter modification mode.
Modification mode is also exited due to a timeout (30 s), indicated by the
emissionofalowtone.Thetimeoutperiodisextendedby30severytime
a button is pressed.
For rapid exit from the programming phases, press the END button at any
time.
Procedura di assegnazione automatica identicativo ID secondario
posti interni
7) Procedere come indicato nei punti 1 e 2 (pag.5)
8) Entro 5 minuti circa deve essere iniziata la procedura di programmazio-
neIDsecondariodelpostointerno(perlaproceduradiprogrammazione
del posto interno, fare riferimento alle istruzioni di prodotto dello stesso).
9) L’unità elettronica comunica con il posto interno in programmazione, ed
invia una chiamata.
10)Allachiamataè possibilerispondereolasciareche terminiilciclodi
chiamata.Aquestopuntol’identicativoèattribuito.
11)Procederedalpunto8inpoi,perl’assegnazionedell’identicativose-
condario degli altri dispositivi (posti interni).
Nota:iltimeoutèdicirca5minutirinnovabiliadognitermineoperazione.
Nota:L’assegnazionediidenticativoIDsecondario,èpossibilesolodopo
avereffettuatol’assegnazionediIDprimariomediantelaproceduradescrit-
ta nel paragrafo precedente (punti 1, 6).
Nota:laprogrammazionesibloccasenell’impiantoèpresenteunposto
internoconl’identicativoIDgiàassociatochesitrovaall’internodella-
nestra di attribuzione. Se ad esempio nell’unità elettronica viene premuto
iltasto riferitoall’identicativo tasto ID= 5 enell’impianto sono presenti
deipostiinterniacuiègiàstatoattribuitounnumerodiIDinferiorea5la
procedura automatica non avrà problemi . Nel caso in cui sia presente nell’
impiantounpostointernoacuiprecedentementeèstatoattribuitol’ID=9,
la programmazione attribuirà 5, 6, 7, 8 e poi si bloccherà non riuscendo ad
attribuire il 9 in quanto già presente. Per proseguire con l’attribuzione au-
tomatica si dovrà procedere con una nuova attribuzione inserendo questa
voltaalpunto8dellaprocedura,l’identicativoID=10.
Nota:IlnumeromassimodiIDsecondariautomaticiconquestaprocedura
perogniIDprimariorimane3.
Nota: Nel caso che un identicativo ID secondario sia già utilizzato (ad
esempioilprimosecondariodiID=1corrispondea51e51siagiàstato
attribuito,gliverràassegnatoilprimoidenticativosecondariodisponibile.
Automatic secondary ID assignment procedure for indoor stations
7) Proceed as indicated in steps 1 and 2 (page 5).
8) Within about 5 minutes, the system should begin the procedure for pro-
grammingthesecondaryIDnumberoftheindoorunit(theprocedurefor
programming the indoor unit is explained in the instructions supplied with
the product).
9)Theelectronicunitcommunicateswiththeindoorunitbeingprogram-
med, and sends a call.
10)Thecallcaneitherbeanswered,orleftunanswereduntilthecallcycle
terminates.AtthispointtheIDnumberhasbeenallocated.
11) Repeat the procedure from step 8 onwards, to complete the secondary
IDnumberallocationforotherdevices(indoorunits).
Note: the timeout setting is approximately 5 minutes, renewable at the end
of each operation.
Note:SecondaryIDassignmentcanonlytakeplaceafterthemainIDhas
been assigned in accordance with the procedure described above (steps
1, 6).
Note: the programming will lock up if there is an indoor unit in the system
alreadyhavinganassociatedIDnumberlocatedinternallyoftheallocation
window.Forexample,ifID=5isselectedbywayoftheelectronicunitand
thereareindoorunitsthathavealreadybeenallocatedanIDnumberlower
than 5, there will be no problem running the automatic procedure. Should
there be an indoor unit in the system that has previously been allocated
thenumberID=9,theprogrammingfunctionwillallocate5,6,7,8,and
then lock up, due to the fact that 9 already exists and therefore cannot be
allocated.Tocontinuewithautomaticallocation,theusermustcorrectthe
sequence manually, in this instance at step 8 of the procedure, by entering
thenumberID=10.
Note:ThemaximumnumberofsecondaryIDs,automaticwiththisproce-
dure,foreachmainIDisalways3.
Note:IntheeventthatasecondaryIDnumberisalreadyinuse(forexam-
pletherstsecondarynumberofID=1happenstobe51and51hasalrea-
dybeenallocated,theunitwillbeallocatedtherstsecondaryIDavailable.
 Loading...