l!r.o.g:r:amming_S'j.Stemle.atu,
lli.L_
--,-~---
r he System Features Learn
Rout
in
e
dic
tates
how
the unit operates It
is
possib le
to
access
and
ch
ange
most
of
the
fe
ature settings using the
Contro
l button.
Open a door
Turn
the
ignition
on,
the
n o
ff
Select
a Menu.
Press
and
hold the Contr
ol
bu
tt
on_
The
numbe
r
of
si
ren
chirps
indicates the menu number. 1 chir p indicates menu 1, 2 ch irps · menu 2
and
3 chirps
fo
r menu 3.
4 When
the
desired
menu
chi
r
ps
are heard, release t
he
Co
nt
ro
l
button
5.
Select
a
Fe
a
ture
.
Press
and
release
the
Con
trol
bu
tt
on
th
e n
umber
of ti
mes
correspond
in
g to the
featu
re
you
wish
to
change.
Then
press
and
hold
one
mo
re
time
to
select
the
fea
t
ures.
6 Program
rhe
Featu
re
.
Wh
i
le
holding
th
e Control bu
tto
n,
you can program t
he
feature using the remote control .
For
features
with
only
tvvo
opt
ions; Q
=op
tion 1 w hile •
=opt
ion 2.
For features with m
ore
th
an
tvv
o options; Q selects the op
ti
ons in ascending order,
while
•
se
lects them
in
descending
orde
r.
Note
: Pressing
{:)
button resets the feature to the factory default.
Once
o feature
is
programmed
:
Othe
r
fe
a
tu
r
es
can
be
programmed
wi
thin the same menu
Ano
th
er menu
can
be
selected
The learn routine
con
be
exit
ed
if prog ramming
is
comple
te
To
access
another
feature
in
the some menu:
1.
Press
and
release the Control button the number
of
times necessary to advance
from the feature you
jus
t
prog
r
ammed
to the next
one
you
wont
to pr
og
ram.
2.
Then press
th
e
Cont
rol button o n
ce
more
and
hold
it
To
select
another
menu:
1 Press
an
d
hold
the
Con
trol button.
2.
Aher 3 seconds, the unit advances to the next menu
and
the siren chirps, indi·
ea
ti
ng
which
menu has been accessed
The
learn
routine
exits
if
any
of
the
following
occurs:
The o
pe
n
doo
r
is
closed
The i
gn
iti
on
is
turned
On
There is no a ctivity lor
30
seconds
The
Control button
is
pressed too
many
times
Bitwriler-
Oni¥Jlptions
____
_____
_
H
If pr
og
ro
m.ming
wit.h
the Bitwrit
er®
, the learn
rout.
in
e ca n
be
locked or
un-
locke
d.
If the learn rout
in
e has p reviously been locked, it must
be
un
l
oc
ked
w ith Bitvvnter®
·th
ts
canno
t
be
done
manual
ly
w
tt
h
th
e Control button.
The
Bitvvriter®
11!1
gives
yo
u
acce
ss
to o
wide
r ran
ge
of
system
op
tio
ns.
These
fe
atures
and
the
adj
ustments that may
be
programmed
are described
in
the tab
le
below. Default settings a re
in
bold
C
2012Directed.A
I
Irig~1sReserved.
*
On
ly
av
a
ilable
on remote controls w ith d
is
p
lay
screens
Feature
Menus
Default settings a re
in
bold
type.
New
features
are
bold
w i
th
grey
background
Menu
2 -
Convenience
Menu
3 -
Remote
stort
Remote
!airing
______ _
Prepare the vehicle system
to
be
Paired
with
a
new
remote
1.
Open
a door.
2.
Turn the key to the
ON
position
3. W i
th
in 5 seconds press
and
release the
Cont
rol button on the system's
Contro
l
Cen
ter
one
time.
W i
th
in 5 seconds, press
and
hold
the
Con
trol button on the
Cont
rol Center.
The stat
us
LED w i
ll
fl
a
sh
one
lime
and
the siren w ill chirp on
ce
to confirm the
system
is
r
eady
for
re
mote
pair
in
g.
Release the
Cont
rol button
and
pr
oceed
below.
Note: If no r
emo
te pairing resul
ts
, the
sys
tem will exit aher
60
seconds.
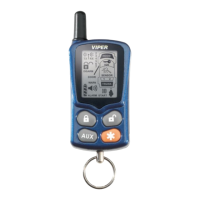
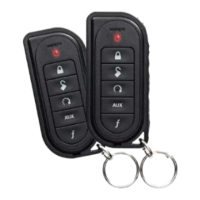
Prepare the
new
remote to
be
Paired
with
the system
Ma
ke sure the L
C3
remote is
set
fo
r the desired
Car
1 (Default) or
Cor
2
opera·
lion.
1.
Press
and
hold
the f button for 8 seconds
un
til the main menu
appe
ar
s.
2 Press
and
release the
{:)
button
un
til
L.!k.".l9.~ful!J
text
is
displayed.
3
Press
and
release the f button until
[P".....Qlr:J
text
is
displayed
4.
Press
and
hold
the Q button
un
til tones ore pl
ayed
on the LC3 r
emo
te.
5. Successfu l
or
Fa
il
ed
Pa
ir: The LC3 remote control indicates a successful or
foil
ed
pa
iring
on
the displ
ay
Note
: Please see instal lation gui
de
for
pa
iring
wi
th the
hvoy
companio
n remote.
Note:
See
Owne
r
's
guide
for more
de
tails
Iahle
_
of.Zones.
_____ _
A zone is represented by t
he
number
of
st
a
tus
LED
flash
es
used
by the
sys
t
em
to
identify a particular type
of
inpu
t.
1
~
'
,
~:
-
~~-
2~::.:~t~:JZ:,tit~::;.;
;
~~
~._
Tr
unk
Pin 24
pi
n
~arn
e
ss
Bl
ue wire
Ins
tant
tr
igger a heavi
er
impact
Shoc
k se
nso
r.
de
tec
ted
by
t
he
shock
se
nso
r
Door
sw
it
ch
t
ri
gger
I
nstant
tr
igger:
Fo
r optional
se
nso
rs
I
gn
i
tion
tr
igger
H
ood
P
in
Op
t
io
no
l
MUX
porl
10 p
in
H
arness
Pink
wi
re
__
24 p
in
H
arness
Grey wir
e:
LAD
5
7060