10
responsible for their safety or if they are not
instructed by this person on the usage of
the unit.
• Do not use the unit if the coffee maker body,
the power cord or the power plug is dam-
aged.
• If the power cord is damaged, it should be
replaced by the manufacturer, a maintenance
service or similar qualified personnel to avoid
danger.
• Do not repair the unit by yourself. Do not dis-
assemble the unit by yourself, if any mal-
function is detected or after it was dropped,
unplug the unit and contact any authorized
service center from the contact address list
given in the warranty certificate and on the
website www.vitek.ru.
• Transport the unit in the original packaging
only.
• Keep the unit in a dry cool place out of reach
of children and people with disabilities.
THE UNIT IS INTENDED FOR HOUSEHOLD USE
ONLY. ITS COMMERCIAL USAGE AND USAGE
IN PRODUCTION AREAS AND WORK SPACES IS
PROHIBITED.
BEFORE THE FIRST USE
After unit transportation or storage at low
temperature keep it for at least three hours
at room temperature before switching on.
– Take the coffee maker out of the package and
remove the packaging materials.
– Check the delivery set.
– Please, clean all removable parts.
– Before using the coffee maker for the first
time, wash all removable parts (9, 10, 11, 12,
13) with warm water 2-3 times and dry them.
– Check the unit for damages; in case of dam-
ages do not use the unit.
– Make sure that operating voltage of the coffee
maker corresponds to the voltage of your mains.
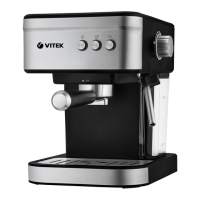
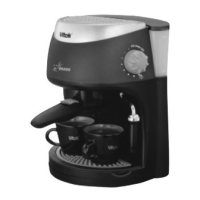
BEFORE USING THE UNIT
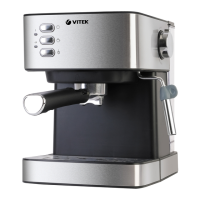
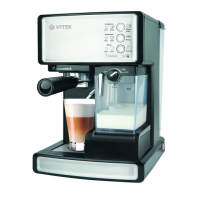
• Make sure that the steam supply is closed. To
do this turn the knob (7) «OFF--- +» clockwise
until bumping «OFF».
• Before switching the unit on, make sure that
the mains voltage corresponds to the voltage
specified on the unit body.
• Remove the water tank (9), fill it with cold
water up to the MAX mark and install it back
to its place.
Note: When installing the water tank (9) back
into the coffee maker, put the water intake pipe
inside the tank first.
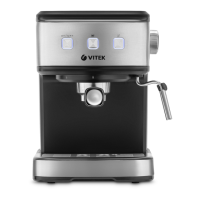
• Insert the coffee filter (10 or 11) into the holder
(12). The ledge on the coffee filter (10 or 11)
must match with the groove in the holder (12)
(the groove is situated on the side of the filter
holder handle (5)). Then turn the coffee filter
(10 or 11) with the ledge in the direction from
yourself. It is necessary for the filter to be
fixed properly in the holder when you remove
the remaining coffee from the filter.
• Install the filter holder into the coffee maker.
The holder (12) ledges must match the
grooves on the boiler «INSERT» (the filter
holder handle (5) is facing 45 degrees to the
left), then turn the filter holder handle (5) to
the right until bumping «LOCK».
• Place a suitable cup on the tray (6) grid (14).
• Insert the power plug into the socket.
• Switch the coffee maker on by pressing the
on/off button (2) «ON/OFF», the button (2)
illumination will light up red.
• To fill the boiler with water press the but-
ton (3), wait for 15-20 seconds, or at the
first signs of appearance of water in the cup,
switch the water supply off by pressing the
button (3) again.
• Wait until the water supply button (3) illumina-
tion glows white constantly. The coffee maker
is ready for operation.
• Filling the boiler with water is necessary for
removing the air block when you switch the
coffee maker on for the first time.
• Press the water supply button (3) and wash
the boiler.
• Depending on the cup capacity repeat this pro-
cedure several times until the boiler is clean.
ATTENTION!
– Do not remove the filter holder (12) if the but-
tons (3), (4) are pressed.
– Do not remove the filter holder (12) immedi-
ately after preparing coffee as there is redun-
dant water and steam pressure inside, let the
coffee maker cool down completely.
– To remove the filter holder (12) turn the knob
(5) to the left «INSERT» and remove the filter
holder (12).