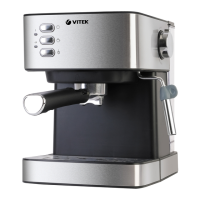
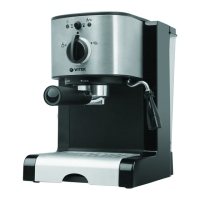
This document describes the VITEK VT-8468 coffee maker, a device designed for preparing espresso and cappuccino.
Function Description
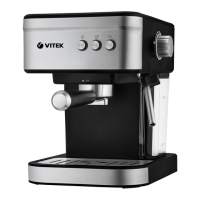
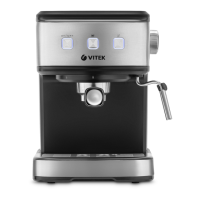
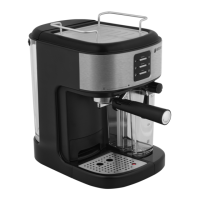
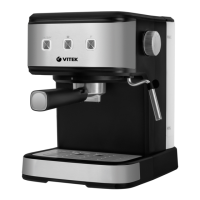
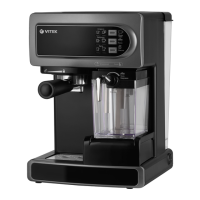
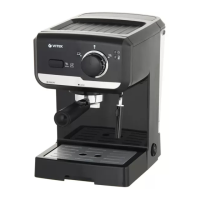
The VITEK VT-8468 is a coffee maker capable of brewing espresso and frothing milk for cappuccino. It features a control panel with buttons for power, espresso/hot water, and steam, along with a steam supply knob to regulate steam output. The device includes a water tank, a removable drip tray with a grid, and various filters for different coffee preparations. It also has a warming plate for cups.
Important Technical Specifications
- Power Supply: 220-240 V ~ 50 Hz
- Rated Input Power: 950 W
- Water Tank Capacity: 1.2 L
- Pump Pressure: 15 bar
The coffee maker comes with the following accessories:
- Coffee maker – 1 pc.
- Filter holder – 1 pc.
- Small coffee filter (for 1 cup) – 1 pc.
- Big coffee filter (for 2 cups) – 1 pc.
- Measuring spoon – 1 pc.
- Manual – 1 pc.
- Warranty certificate – 1 pc.
Usage Features
Before First Use:
Upon unpacking, ensure all parts are present and undamaged. Clean all removable parts thoroughly. Before first use, and after prolonged storage, it is recommended to run the coffee maker through several cycles of hot water without coffee to clean the internal system. Fill the water tank, insert the filter holder without coffee, place a cup on the drip tray, and press the espresso/hot water button to dispense water. Repeat this process 2-3 times.
Preparing Espresso:
- Ensure the steam supply knob (7) is in the "OFF" position.
- Check that the water tank (9) has sufficient water, filling up to the MAX mark if necessary.
- Insert the appropriate coffee filter (10 or 11) into the filter holder (12).
- Add ground coffee to the filter and lightly tamp it with the back of the measuring spoon (13).
- Attach the filter holder (12) to the coffee maker, aligning the lugs with the slots on the boiler and turning the handle (5) to the "LOCK" position.
- Place one or two cups on the drip tray grid (14).
- Plug the power cord into an electrical outlet.
- Turn on the coffee maker by pressing the "ON/OFF" button (2); the button backlight will illuminate.
- Wait until the espresso/hot water button (3) backlight glows steadily, indicating the coffee maker is ready.
- Press the espresso/hot water button (3) to start brewing. Monitor the cup filling and press the button again to stop.
- Turn off the coffee maker by pressing the "ON/OFF" button (2).
- Allow the coffee maker to cool, then remove the filter holder by turning the handle (5) to the "INSERT" position. Discard used coffee grounds and rinse the filter.
Preparing Cappuccino:
- Brew espresso as described above into a cup large enough to accommodate frothed milk.
- Press the steam supply button (4) and wait until its backlight glows steadily.
- Place an empty container under the cappuccino pipe (8).
- Carefully turn the steam supply knob (7) counter-clockwise by a quarter turn to release any condensed water from the pipe.
- Close the steam supply by turning the knob (7) clockwise to "OFF".
- Immerse the cappuccino pipe (8) into cold milk or cream in a cup. The pipe should not touch the bottom of the cup.
- Slowly turn the steam supply knob (7) counter-clockwise by a quarter turn or more to start frothing.
- Once the desired foam consistency is achieved, close the steam supply by turning the knob (7) clockwise to "OFF".
- Remove the cup and add the frothed milk to your espresso.
Important Notes:
- Always preheat cups on the warming plate (1) for best results.
- Never remove the filter holder while the espresso/hot water or steam buttons are pressed.
- Do not remove the filter holder immediately after brewing due to residual pressure. Wait for the coffee maker to cool.
- To quickly release pressure, turn off the coffee maker, place a cup under the cappuccino pipe (8), and slightly open the steam supply knob (7) counter-clockwise.
Maintenance Features
Cleaning:
- General Cleaning: Wipe the coffee maker body with a soft, damp cloth. Do not use abrasive cleaners or solvents.
- Removable Parts: The filter holder (12), filters (10, 11), measuring spoon (13), and drip tray (6) with grid (14) should be washed with warm water and detergent, then rinsed and dried. These parts are not dishwasher safe.
- Internal Cleaning: After each use, clean the cappuccino pipe (8) by immersing it in water and opening the steam supply for a few seconds to clear any milk residue.
- Descaling: Regular descaling is crucial for maintaining performance. Depending on water hardness and frequency of use, descaling should be performed every 2-3 months.
- Fill the water tank (9) with a descaling solution (e.g., 2 teaspoons of citric acid per 1 liter of water).
- Insert the filter holder (12) with the big coffee filter (11) into the coffee maker.
- Place a container under the filter holder and another under the cappuccino pipe (8).
- Turn on the coffee maker and wait for the espresso/hot water button (3) backlight to glow steadily.
- Press the espresso/hot water button (3) to dispense about 100 ml of solution.
- Turn the steam supply knob (7) counter-clockwise to dispense about 100 ml of solution through the cappuccino pipe (8).
- Repeat steps 5 and 6 several times, waiting 10-15 minutes between cycles.
- After descaling, rinse the system by repeating the process with clean water 2-3 times.
Storage:
- Before storing, ensure the coffee maker is clean and dry.
- Store the coffee maker in its original packaging in a cool, dry place, out of reach of children and persons with reduced capabilities.
Troubleshooting:
- Coffee maker does not turn on: Check if the power plug is fully inserted into the outlet.
- Water leaks from the lower part of the coffee maker: The drip tray is full. Empty it.
- Coffee leakage from the filter holder: Check the filter holder gasket and the edges of the filter for cleanliness.
- Ready coffee has a foreign smell: This may indicate improper scaling removal or improper coffee storage. Refer to descaling instructions and use fresh, good quality coffee.
- Steam doesn't froth milk: This could be due to low steam temperature, a tank that is too big or improperly sized, or using skimmed milk. Ensure the steam button (4) backlight is on, use a narrow high container for frothing, and use whole milk with 4-6% fat content.
Environmental Protection:
This symbol indicates that the product should not be disposed of with household waste. It should be handed over to a specialized collection point for recycling electrical and electronic equipment.
Warranty:
The warranty period is 3 years from the date of purchase. The warranty conditions are specified in the warranty certificate.