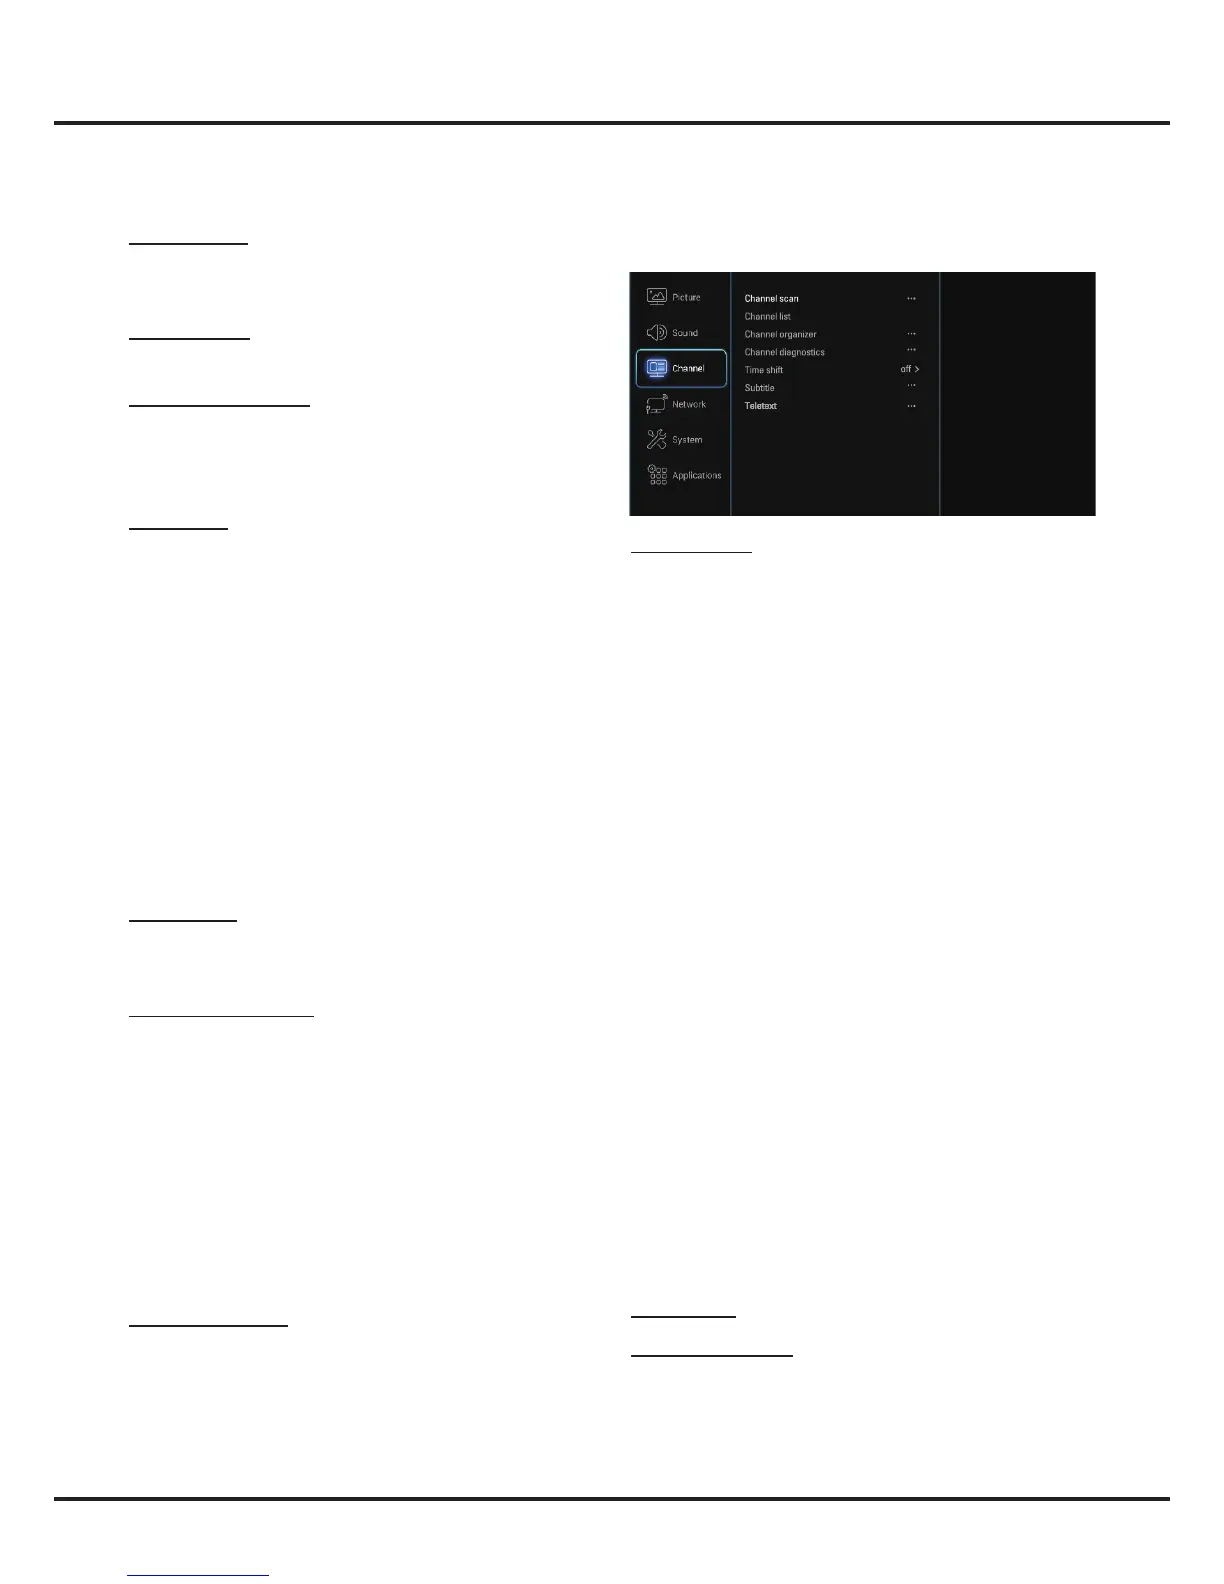
Channel scan: Press OK/► to display channel scan
options.
• Country: Press OK/► to display the country list and
use ▲/▼ to select your country.
• Tuner mode: select Antenna or Cable option
according to your actual use.
Note: The Cable option may not be available for
certain model.
• Automatic search: Select Digital & Analogue (or
Digital or Analogue), then press OK/► to start the
automatic search process. The search may take a few
minutes. During the process, you can press OK to
abort halfway.
• Analogue manual scan: Press OK to enter. Press
▲/▼/◄/► and the number buttons or OK to search,
ne tune or store the channel.
• Antenna manual installation: Allows you to start
manual searching the available channels from the
current frequency or any frequency you input.(Only
for digital channels). Press OK to start search from
the current frequency, or use digit keys to input a
frequency, then press OK to start search. During the
process, you can press OK to abort halfway and press
OK to restart, or press BACK to return.
• Color system: Allows you to select your preferred
color system among Auto, PAL, SECAM, and NTSC.
• Sound system: Allows you to select your preferred
sound system among BG, DK, I, and M.
Note: Color system and Sound system are only
available under ATV source after channel scan is
nished.
Channel list: Press OK/► to display channel list.
Channel organizer: You can skip channels, edit
channels, or delete channels, Press OK/► to enter.
Channel skip: If a channel is stored twice or its
reception is poor, you can simply skip it. The skipped
channels will no longer be selected by pressing the
Note: Some options may not be available for certain
signal sources. Some options may appear in the next
page of the Sound menu, you can press
▲/▼ to switch.
Sound preset: Press OK/► to display the option list.
Use ▲/▼ to select a sound type from the list: Standard,
Music, Movie, Clear voice and Personal.
TV placement: Use ▲/▼ to balance the sound between
Desk top and Wall mount.
Auto volume control: Select On mode to reduce the
annoying blasts in volume during commercial breaks
and also amplifies softer sounds in program material.
Eliminates the need to constantly adjust the volume.
SPDIF type: Connect to an audio device through the
SPDIF output. Select SPDIF type and press OK/► to
display the options. Select a proper sound type from the
list for digital programs.
- If the current program outputs sound in Dolby
format, then either PCM or Dolby can be selected.
- If the current program does not output sound in
Dolby format, only PCM can be selected. Otherwise
no sound will be output.
Note: The options you may choose depend on the
program you are watching. If you select PCM and
the sound output is ahead of the picture, you can
select SPDIF delay from the Sound menu and
press ◄/►
to adjust the delay time to synchronize
the sound
with the picture.
SPDIF delay: If the sound output does not match
the picture, press ◄/► to adjust the delay time to
synchronize the sound with the picture.
Bluetooth audio only: Press OK/► to enter. Turn on
Bluetooth on your smart phone/pad, you will find the TV
set name (which is also displayed on TV screen). Select
the TV set name, and then pair the device and the TV
according to on-screen instructions. Once paired, you
can enjoy playing the audio files from your device on
the TV. While playing, you can press OK on the remote
to turn the TV screen off. Press any button to turn the
screen back on.
Note: This option is not available for some models. For
better connection, please place your Bluetooth device
within a range of 3 meters from the TV.
Advanced settings
:
Press
OK/►
to display its submenu.
Use
▲/▼
to select the items, such as Balance, to obtain
a better sound.
Note: The options offered depend on the program you
are watching.