17
Please Do Not Return This Product To The Store. Contact your local Wayne-Dalton dealer. To find your local Wayne-Dalton dealer, refer to your
local yellow pages/business listings or go to the Find a Dealer section online at www.wayne-dalton.com
Tools Needed:
INSTALLATION
Power Drill
7/16” Socket
Driver
U-Bar
NOTE: U-Bars are required on all doors
14’ wide and over.
NOTE: All U-Bars are placed at the top
of the section.
NOTE: The intermediate I section is the
third section from the bottom on a 5
section door. The intermediate II section
is the fourth section from the bottom on
a 5 section door.
NOTE: For doors 16’1” to 18’0” that
have a glazed section, the U-bar needs
to be placed on the Intermediate
section instead of the Lock section on
a 4 section door. On a 5 section door
the U-bar needs to be placed on the
Intermediate II section instead of the
Intermediate I section.
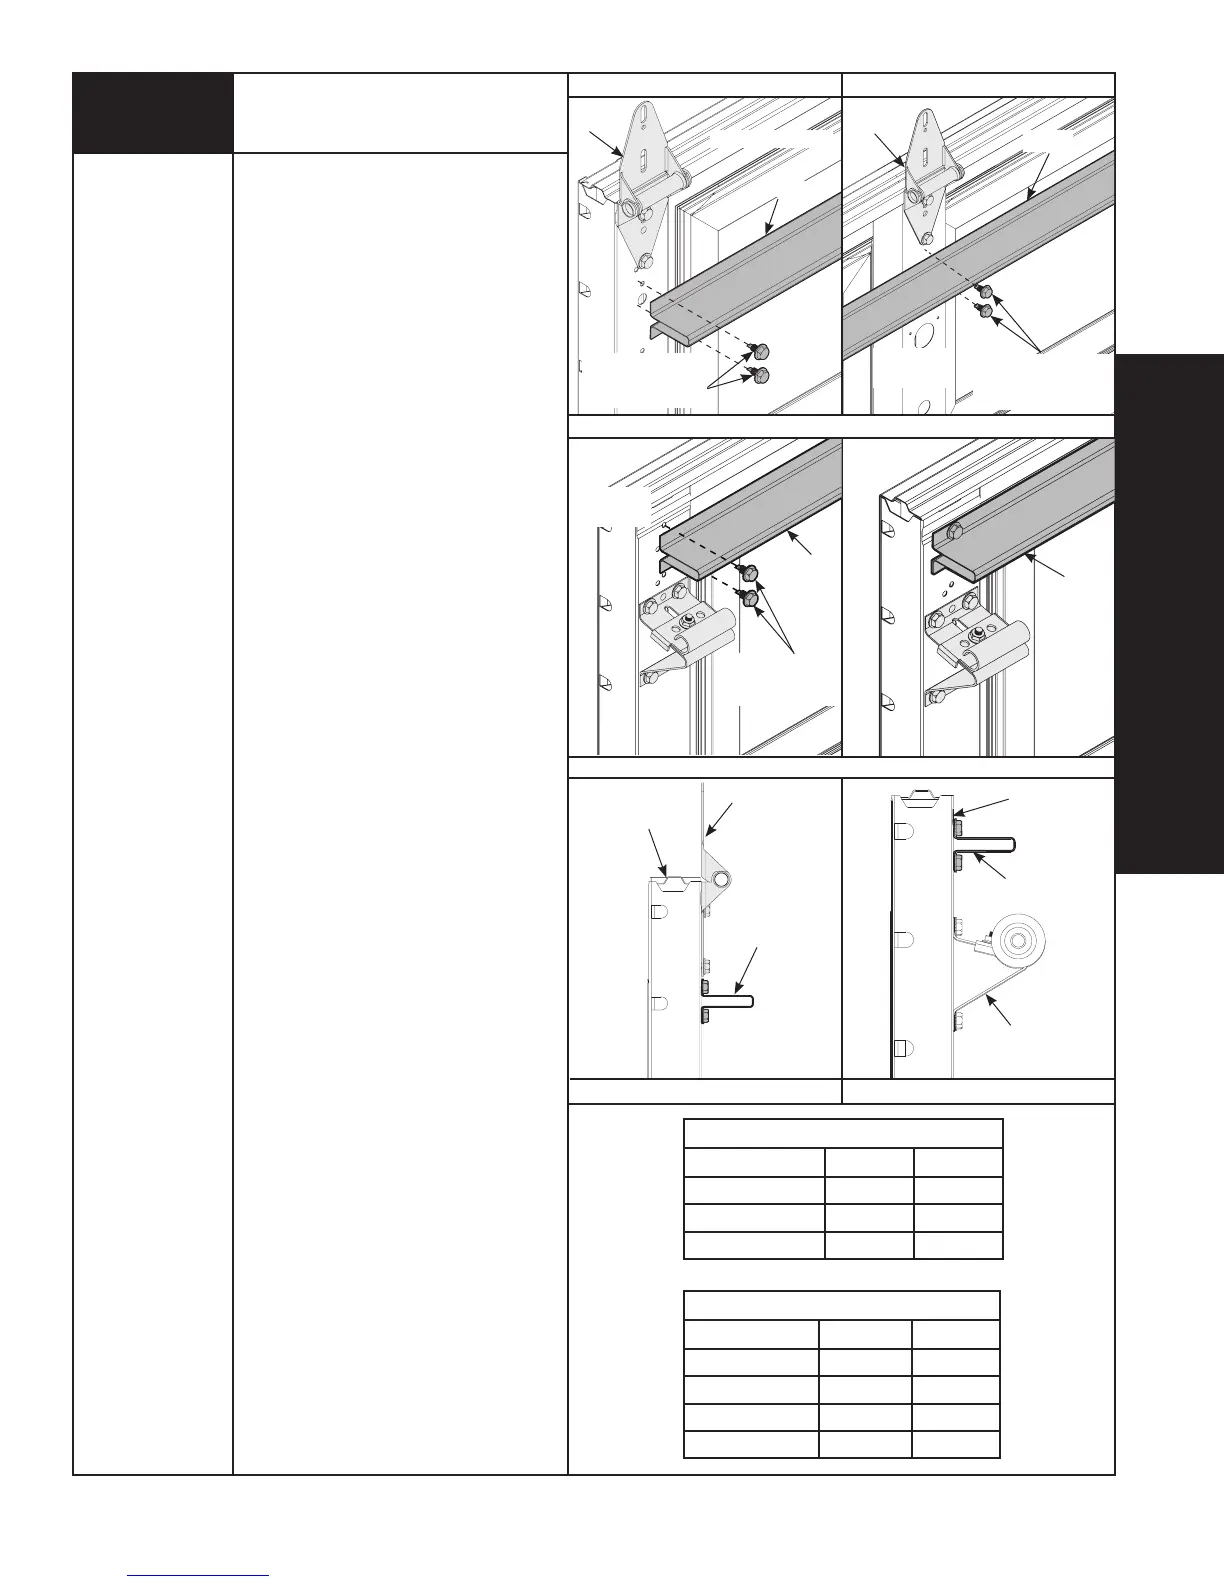
INSTALLATION ON THE TOP SECTION:
Doors 14’ wide and over, locate U-Bar
above top bracket and secure with
(2) 1/4”- 20 x 7/8” self drilling screws
at each end and center stile location.
INSTALLATION ON ALL OTHER
SECTIONS:
NOTE: All WayneMark™ 8200 doors
14’- 0” to 16’- 0” wide, 6’- 0” to 7’- 0”
high (4 section high only) are now
supplied with a 2” U-Bar for the top of
the bottom section.
Place the U-Bar on the section against
the bottom of the hinges. Center the
U-Bar side to side on the section at
the location shown, and secure to the
section using (2) 1/4”- 20 x 7/8” self
drilling screws at each end and center
stile location.
8
U-BAR PLACEMENT FOR BOTTOM, LOCK AND INTERMEDIATE SECTIONS
U-BAR PLACEMENT FOR TOP SECTION
ATTACHING END STILE
U-BAR PLACEMENT FOR TOP SECTION
U-BAR
TOP
BRACKET
ASSEMBLY
TOP SECTION
U-BAR
TOP
SECTION
TOP
SECTION
U-BAR
(2) 1/4”- 20 X 7/8”
SELF DRILLING
SCREWS
Model 46 U-Bar Schedule
Door Width 4 Section 5 Section
8’- 0” to 14’- 11” N/A N/A
15’- 0” to 16’- 0” (1) 2” U-Bar (1) 2” U-Bar
16’- 1” to 18’- 0” (3) 2” U-Bar (3) 2” U-Bar
8000 Series U-Bar Schedule
Door Width 4 Section 5 Section
8’- 0” to 13’- 11” N/A N/A
14’- 0” to 14’- 11” (1) 2” U-Bar (1) 2” U-Bar
15’- 0” to 16’- 0” (1) 2” U-Bar (1) 2” U-Bar
16’- 0” to 18’- 0” (3) 2” U-Bar (3) 2” U-Bar
SIDE PROFILE
HINGE
DOOR
SECTION
U-BAR
ATTACHING CENTER STILE
(2) 1/4”- 20 X 7/8”
SELF DRILLING
SCREWS
(2) 1/4”- 20 X 7/8”
SELF DRILLING
SCREWS
U-BAR
U-BAR
HINGE
HINGE
BOTTOM SECTION
BOTTOM
SECTION