4
Cable
Drum
No space betw
een Ra
tchet
Pawl
and
Cable Drum
indicates engage
ment
Cable
Drum
Ratchet
Pawl
ENGAGE
D SIDE
VIEW
No space
between
Ratchet
Pawl and
Cable Dr
um
H V
IEW
Space b
etween
Ratchet P
awl
and Cabl
e Drum
non-
ind
icate
s engagem
ent
Cable
Drum
Ratchet
Pawl
DISENGAGE
D SIDE
VIEW
No space
between
Rat
chet Pawl
and
H V
IEW
UPPE
R POSIT
ION
LOWER
POSITION
LOWER
POSITION
SI
DE VIEW
Rat
chet Pawl
in Lo
wer Posi
tio
n
Ratchet
Pawl in U
pper Positio
n
Use these
Illustra
tion
, in conj
uncti
on
with the Ins
truc
tions o
n the othe
r side of
this labe
l.
WARNING
Rache
t Bracket
is under
EXT
REME SPRING
TENSION
.
To avoid po
ssible severe
or
fatal i
njury,
DO NOT
remove
fast
ener
s from r
atchet b
racket
until
spring(s) are fu
lly
wnwoun
d.
To safe
ly unwin
d spring
(s)
read
and foll
ow th
e direct
ions in th
e
installatio
n instructio
ns/owners
manua
l.
DO NOT
REMOVE
TH
IS TAG.
Cable Drum
No space
betwee
n Ratchet
Pawl a
nd Cable Drum
indica
tes eng
agement
Cable Drum
Ratchet Pawl
ENG
AGED SI
DE VIEW
No space
between
Ratchet Pa
wl and
Cable Drum
H VIEW
Space
between Ratchet Pawl
and Cable Drum
non-ind
ica
tes
engagem
ent
Cable Drum
Rat
chet Pawl
DISE
NGAGED
SIDE VIEW
No
space bet
ween
Ratchet Pa
wl and
H VIEW
UPPE
R POSI
TION
LOWER
POSITIO
N
LOW
ER POSITI
ON
SIDE
VIEW
Rat
chet Pawl in Lower
Position
Rat
chet Pawl in Upper
Posi
tion
Use thes
e Illustr
ation,
in c
onjunction w
ith t
he Inst
ructions on the othe
r side o
f
thi
s label
.
WARNING
Rachet
Brack
et i
s under
EXT
REM
E SPR
ING
TEN
SION
.
To
avoi
d possi
ble s
evere
or
fatal
injury,
DO NOT
remove
fastener
s f
rom ratc
het brac
ket
until
spri
ng(s)
are ful
ly
wnw
ound.
To safely
unwind s
pring(s
)
read
and follow
the di
rec
tions in t
he
insta
llatio
n ins
tructions
/owners
man
ual.
DO NOT
REMOVE
THIS
TAG
.
Cab
le Drum
No s
pace betwe
en Ratchet
Pawl and C
able Dr
um
indicates engagem
ent
Cable Drum
Ratchet Paw
l
ENG
AGED
SIDE VIEW
No s
pace
between
Rat
chet Pawl
and
Cable Drum
ENGAGED UNDERNEA
TH V
IEW
Space b
etween Ratche
t Pawl
and Cab
le D
rum
non-indicates engagem
ent
Cab
le Drum
Ratchet Paw
l
DISENGA
GED
SIDE VIEW
No s
pace between
Ratchet
Pawl and
DISENGA
GED U
NDERNEAT
H VIEW
UPPER
POSI
TION
LOW
ER POSI
TION
LOW
ER POSITION
SIDE VIEW
UPPER POSI
TION
SIDE VIEW
Ratchet Paw
l in Lower
Position
Ratchet Pawl
in U
pper Po
sition
Use t
hese Illus
tration, i
n conjunction with the Instructions on the other side of
this label.
WARNING
Rachet Bracket is under
EXTREME SPRING
TENSION
.
To
avoid possible severe or
fatal injury,
DO NOT
remove
fasteners from ratchet bracket
until spring(s) are fully
wnwo
und.
To safely unwind spring(s)
read
and follow the directions
in the
installation instructions/owners
manual.
DO NOT REMOVE THIS TAG.
Cable Drum
No space
betwee
n Ratchet
Pawl a
nd Cabl
e D
rum
indica
tes eng
agement
Cable Drum
Ratchet Pawl
ENG
AGED SI
DE VIEW
No space
between
Ratchet Pa
wl and
Cable Drum
H V
IEW
Space
between Ratchet Pawl
and Cable Drum
non-ind
ica
tes
engagem
ent
Cable Drum
Rat
chet Pawl
DISE
NGAGED
SIDE VI
EW
No
space bet
ween
Ratche
t Pa
wl and
H VIEW
UPPE
R POSI
TION
LOWER
POSITIO
N
LOW
ER POSITI
ON
SIDE
VIEW
Rat
chet Pawl in Lower
Position
Rat
chet Pawl in Upper
Posi
tion
Use thes
e Illustration,
in conjunct
ion w
ith t
he Inst
ructions on the othe
r side o
f
thi
s label
.
WARNING
Rachet
Brack
et i
s under
EXT
REM
E SPR
ING
TEN
SION
.
To
avoi
d possi
ble s
evere
or
fatal
injury,
DO NOT
remove
fastener
s from ratc
het brac
ket
until
spri
ng(s)
are ful
ly
wnw
ound.
To safely
unwind s
pring(s
)
read
and follow
the di
rec
tions in t
he
insta
llatio
n ins
tructions
/owners
man
ual.
DO NOT
REMOVE
THIS
TAG
.
NOTE: Spring(s) are fully unwound when counterbalance cables have no
tension.
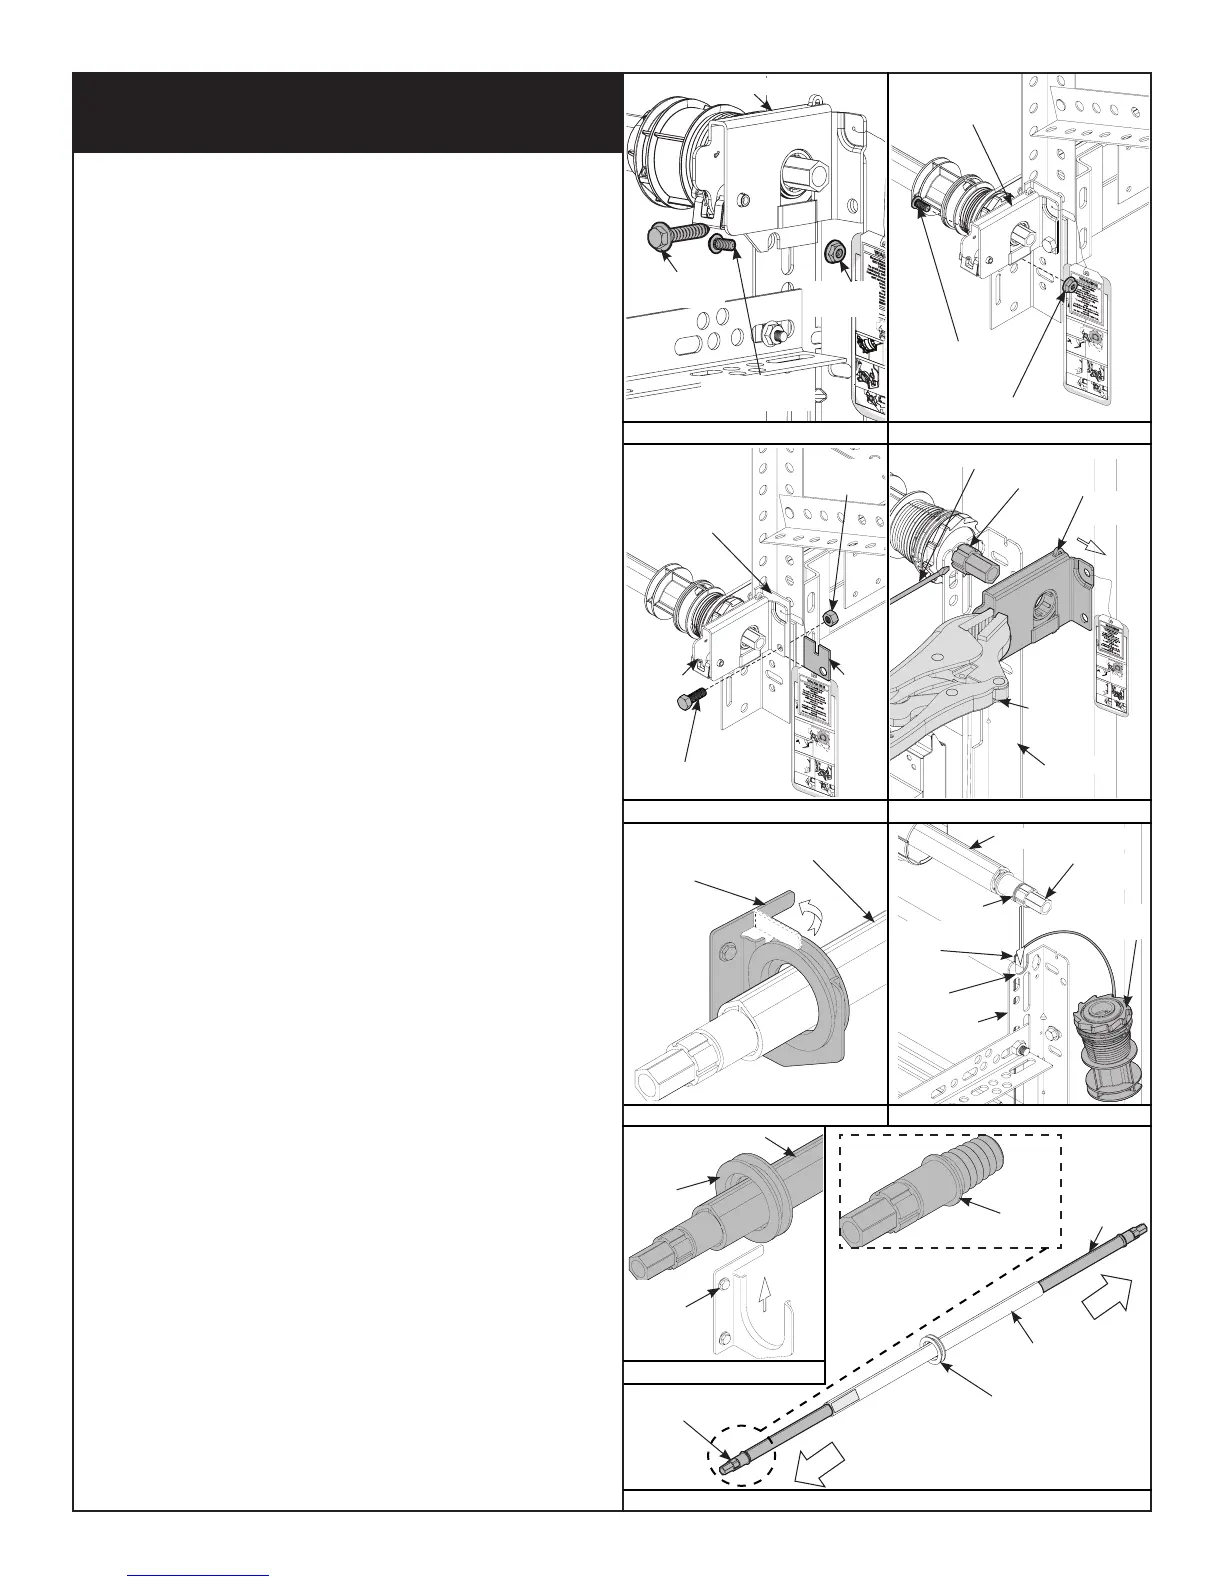
STEP 3:
Standard Lift/Front Mount Low Headroom Applications:
Starting with the right hand end bracket, first remove the 5/16” - 18 x 3/4”
carriage bolt and one 5/16” - 18 hex nut, then remove the 5/16” x 1-5/8” lag
screw from the end bracket, as shown in Fig. 1.5.
Rear Mount Low Headroom Applications: Starting with the right hand end
bracket, first remove the 1/4” - 20 x 9/16” track bolt and one 1/4” - 20 nut,
then remove the shim, the 5/16” - 18 x 1” hex head screw and the 5/16” - 18
nut from the end bracket, as shown in Fig. 1.6 and Fig. 1.7.
NOTE: DO NOT discard the shim.
Holding the end bracket with a pair of locking pliers, carefully pry the end
bracket from the flagangle/rear support bracket and winding shaft with a flat
head screwdriver, as shown in Fig. 1.8. Repeat for left hand end bracket.
CAUTION: THE WINDING SHAFT MAY ROTATE WHEN REMOVING THE END
BRACKET AND DRIVE GEAR.
Now take note on how many cable drum wraps have been applied to your
cable drum, because your cable drum will need to be rewrapped later. Cable
drums require either 1/2 to 3/4 wraps or 1 1/2 to 1 3/4 wraps.
Bend the center bracket tab over, as shown in Fig. 1.9. Lift right hand side of
the TorqueMaster
®
tube and slide the cable drum off the tube.
NOTE: The cable drums and springs may be difficult to remove. If so, twist
the cable drum and TorqueMaster
®
tube to aid removal.
Realign the groove in the winding shaft with the round notch in the flagangle/
rear support bracket and drape the counterbalance cable with drum over the
flagangle/rear support bracket, as shown in Fig. 2.0. Repeat for the other
side. Remove TorqueMaster
®
tube and gently lay it on the floor, as shown in
Fig. 2.1. Remove the left and right hand spring(s) from the torque tube, as
shown in Fig. 2.2.
NOTE: Single spring application will have no spring on the left hand side, only
a loose winding shaft.
Single and Double Spring TorqueMaster
®
Plus Removal
- Continued
FIG. 1.5
5/16” - 18 x 3/4”
Carriage Bolt
FIG. 1.6
FIG. 1.8
FIG. 1.7
FIG. 1.9
FIG. 2.0
FIG. 2.1
FIG. 2.2
5/16” - 18
Hex Nut
5/16” x 1-5/8”
Lag Screw
End Bracket
1/4” - 20 x 9/16”
Track Bolt
1/4” - 20 Nut
End Bracket
5/16” - 18 x 1”
Hex Head Screw
5/16” - 18
Hex Nut
Shim
End
Bracket
Rear Support
Bracket
Flat Head Screwdriver
End
Bracket
Locking
Pliers
Winding Shaft
TorqueMaster
®
Tube
Bend The
Center
Bracket
Tab Over
Center
Bracket
Center
Bracket
Bushing
TorqueMaster
®
Tube
TorqueMaster
®
Tube
Left Hand
Spring
Right
Hand
Spring
Center
Bracket
Bushing
Loose
Winding
Shaft
Flagangle
Winding
Shaft
Round
Notch
Flagangle
Cable
Drum
TorqueMaster
®
Tube
Groove
Counterbalance
Cable
 Loading...