3
IMPORTANT! Right and left hand is always determined from inside the
building looking out.
COUNTERBALANCE SPRING TENSION MUST BE RELIEVED BEFORE REMOVING
ANY HARDWARE. A POWERFUL SPRING RELEASING ITS ENERGY SUDDENLY
CAN CAUSE SEVERE INJURY.
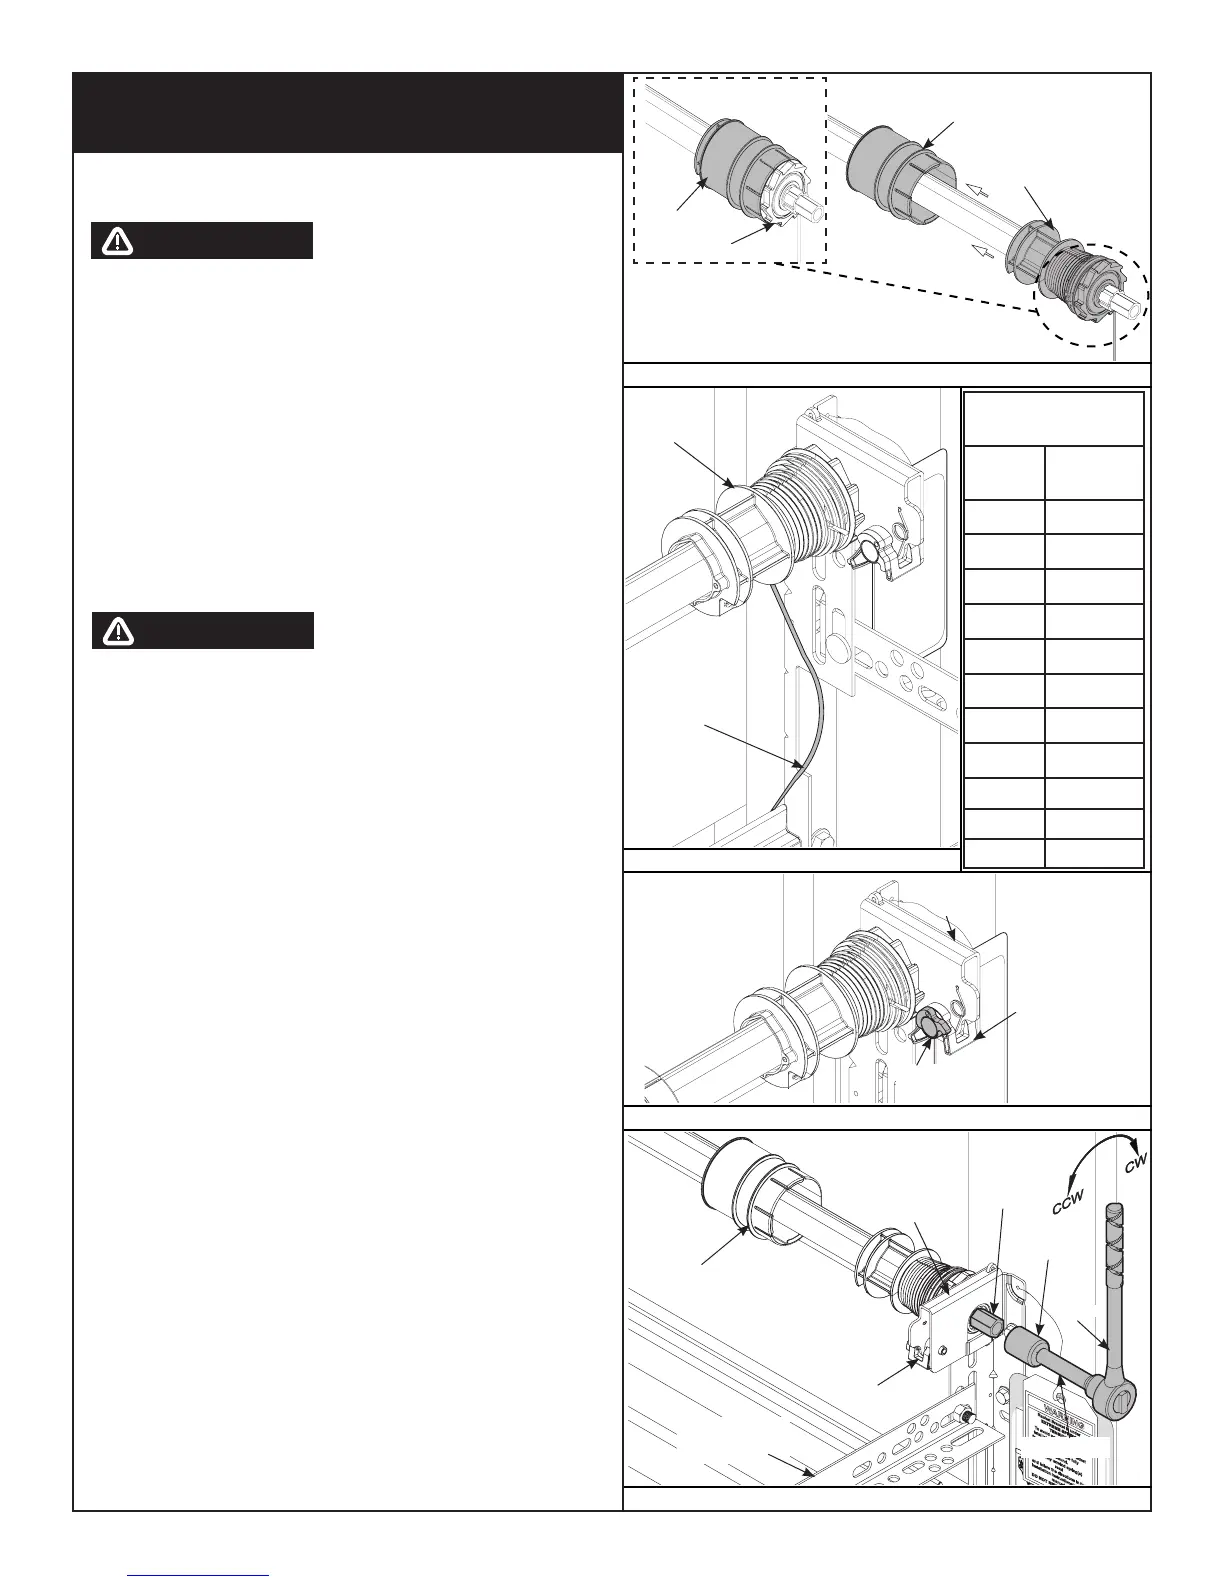
Remove the drum wraps from cable drums (if installed) by twisting the drum
wrap while pulling it away from the drum, as shown in Fig. 1.1.
Check for spring tension by pulling the counterbalance cable on the right
hand cable drum away from the header, as shown in Fig. 1.2.
STEP 1: If there is no spring tension the cable will be loose. In addition, the
torque tube should be free to rotate in either direction. If there is no spring
tension, proceed to Step 3. If the counterbalance cable is still taut and the
torque tube is difficult to rotate, that is an indication that spring tension still
exists, proceed to Step 2.
IT IS RECOMMENDED THAT LEATHER GLOVES BE WORN WHILE UNWINDING
THE TORQUEMASTER
®
PLUS SPRINGS. FAILURE TO WEAR GLOVES MAY
CAUSE INJURY TO HANDS.
STEP 2: If there is spring tension and starting with the right hand side,
ensure ratchet pawl knob is in upper position, as shown in Fig. 1.3.
IMPORTANT! PAWL KNOB MUST BE IN UPPER POSITION TO REMOVE SPRING
TENSION, AS SHOWN IN FIG. 1.3.
Place a ratchet with a 5/8” socket on the winding shaft, as shown in Fig. 1.4.
NOTE: A 3” extension is recommended for added clearance from the
horizontal track assembly.
To remove spring tension, ensure the ratchet and socket is set so that it will
add tension (counter clockwise) on the right hand side and (clockwise) on the
left hand side. Rotate ratchet to relieve pressure between the pawl and the
ratchet wheel. Push in on the pawl to allow the ratchet wheel teeth to pass
by.
CAUTION: BE PREPARED TO HOLD THE FULL TENSION OF THE SPRING.
Gently let the ratchet rotate upward, while watching the number of teeth on
the ratchet wheel pass by the pawl. Remove 3/10 of a turn (watch the 3 teeth
of the ratchet wheel pass the pawl) at a time.
Release the pawl to allow it to engage with the ratchet wheel. Repeat this
process until all spring tension has been removed from spring.
For Double Springs, repeat the same process for the left hand side. Cables
should be loose and the torque tube should be free to rotate in either
direction.
Single and Double Spring TorqueMaster
®
Plus Removal
FIG. 1.4
Pawl Knob In
Upper Position
End
Bracket
Pawl
Cable
Drum
Drum
Wrap
Drum
Wrap
Cable Drum
Cabl
e Dr
um
No s
pace between Ra
tchet
Pawl an
d Cabl
e Drum
indicates engage
men
t
Cabl
e Dru
Ratchet Pawl
ENGA
GED
SI
DE V
IEW
No s
pace bet
ween
Ratche
t Pawl
and
Cabl
e Drum
EN
GAGED
UNDE
R
NEATH V
IEW
Space betw
een R
atchet Paw
l
and
Cable Drum
non-
indicate
s engage
ment
Cabl
e Dru
m
Ratche
t Pawl
DISENG
AGED
SI
DE V
IEW
No space bet
ween
Ratchet Pawl
and
DISENG
AGED
U
NDE
RNE
ATH VIEW
UPPE
R POSI
TION
LOW
ER
POSITION
LOWER
POSI
TION
SIDE V
IEW
UPPE
R POSI
TION
SIDE V
IEW
Ratche
t Pawl
in Lo
wer Posi
tion
Ratche
t Pawl
in Upp
er Pos
ition
Use these Illustration,
in conjunction with the Instructions on the other side of
this label.
WARNING
Rachet Bracket is under
EXTREME SPRING
TENSION
.
To avoid possible severe or
fatal injury,
DO NOT
remove
fasteners from ratchet bracket
until spring(s) are fully
wnwound.
To safely unwind spring(s)
read
and follow the directions
installation instruc
man
DO NOT
End
Bracket
Pawl
Ratchet
3” Extension
Winding
Shaft
5/8”
Socket
Drum
Wrap
Horizontal Track
Assembly
FIG. 1.3
RECOMMENDED
SPRING TURNS
Door
Height
Spring Turns
6’-0” 14
6’-3” 14-1/2
6’-5” 15
6’-6” 15
6’-8” 15-1/2
6’-9” 15-1/2
7’-0” 16
7’-3” 16-1/2
7’-6” 17
7’-9” 17-1/2
8’-0” 18
Loose
Counterbalance
Cable
Cable
Drum
FIG. 1.2
FIG. 1.1
WARNING
WARNING