EasyManua.ls Logo

Weber One-Touch Platinum User Manual

Weber One-Touch Platinum
23 pages
To Next Page IconTo Next Page
Page #1 background imageLoading...
Page #1 background image
55185_081909
22½ inch
(57 cm)
ONE-TOUCH
®
DELUXE
CHARCOAL GRILL
Read owner’s guide before using the barbecue.
Lisez le guide d'utilisation avant d'utiliser le barbecue.
Lesen Sie das Benutzerhandbuch, bevor Sie den Grill verwenden.
ONE-TOUCH
®
PLATINUM
Question and Answer IconNeed help?

Do you have a question about the Weber One-Touch Platinum and is the answer not in the manual?

Weber One-Touch Platinum Specifications

General IconGeneral
Fuel TypeCharcoal
ColorBlack
Lid ThermometerYes
One-Touch Cleaning SystemYes
Cooking Area363 square inches
Grill Dimensions22.5 inches diameter
Grate MaterialPlated steel
LidPorcelain-enameled
VentilationAdjustable dampers
WheelsTwo durable all-weather wheels
MaterialPorcelain-enameled steel

Summary

Weber One-Touch Platinum Charcoal Grill Introduction

Weber One-Touch Platinum Charcoal Grill Exploded View and Parts List

Lid, Handle, and Damper Assemblies

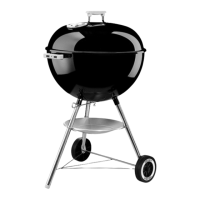
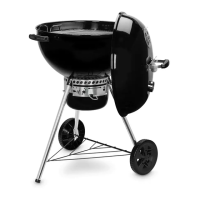
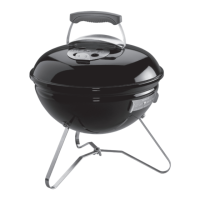
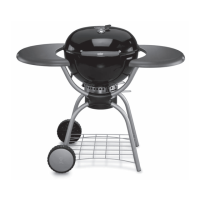
Includes lid, handle, thermometer, and vent damper components.

Cooking and Charcoal Grates

Grates for cooking food and holding charcoal in place.

Main Bowl and Ash Catcher System

The primary grill bowl and its high-capacity ash collection system.

Frame and Leg Structure

Includes upper frame, lower leg frames, and support bars.

Wheels and Leveling Feet

Components for grill mobility and stability.

Side Preparation Tables

Side tables for food preparation and item placement.

Charcoal Management Accessories

Includes charcoal baskets for organizing fuel.

Assembly Step 1: Connect Frame Components

Assemble Frame Part A

Attaching frame components labeled 'A' during assembly.

Assemble Frame Part B

Attaching frame components labeled 'B' during assembly.

Secure Frame with Screw 8

Securing frame parts using screw '8'.

Assembly Step 2: Connect Left Frame

Assembly Step 3: Connect Right Frame Pieces

Attach Frame Piece B

Securely attaching frame piece 'B' to the assembly.

Fasten Frame Assembly

Fastening frame parts using screws and a screwdriver.

Assembly Step 4: Assemble Lower Frame

Attach Frame Piece B to Lower Frame

Connecting frame piece 'B' to the lower frame assembly.

Secure Lower Frame Assembly

Fastening the lower frame assembly with screws.

Assembly Step 5: Attach Wire Rack and Wheels

Install Wire Rack

Mounting the wire rack onto the grill frame.

Attach Wheels to Frame

Securing the wheels to the grill frame assembly.

Assembly Step 6: Secure Wheels

Insert Wheel Retainer

Inserting a retainer into the wheel hub for secure attachment.

Hammer Wheel Retainer

Hammering the wheel retainer into place.

Assembly Steps 7 & 8: Frame and Wheel Securing

Connect Frame to Bowl Support

Attaching lower frame parts to the bowl support.

Secure Wheels to Frame

Finalizing wheel attachment with retainers.

Assembly Step 9: Attach Side Tables

Mount Side Tables

Attaching the side tables to the grill frame.

Assembly Step 10: Attach Lower Leg Frames

Connect Lower Front Leg Frame

Attaching the lower front leg frame to the assembly.

Secure Lower Leg Frames

Fastening the lower leg frames to the main structure.

Assembly Step 11: Attach Side Tables to Base

Mount Side Tables to Base

Attaching the side tables to the base of the grill.

Secure Side Tables

Fastening the side tables using screws and washers.

Assembly Step 12: Mount Grill Bowl

Position Grill Bowl on Frame

Placing the grill bowl onto the assembled frame.

Secure Grill Bowl to Frame

Fastening the grill bowl to the frame assembly.

Assembly Step 13: Attach Lid Handle and Damper

Install Lid Handle Assembly

Attaching the lid handle assembly to the grill lid.

Attach Vent Damper Assembly

Installing the vent damper assembly onto the lid.

Assembly Step 14: Attach Lid to Grill Bowl

Mount Lid onto Bowl

Placing and securing the lid onto the grill bowl.

Assembly Step 15: Install Grates

Place Charcoal Grate

Inserting the charcoal grate into the grill bowl.

Place Cooking Grate

Inserting the cooking grate above the charcoal grate.

Assembly Step 16: Adjust One-Touch Damper

Assembly Step 17: Install Thermometer

Mount Thermometer

Attaching the thermometer to the grill lid.

Assembly Step 18: Final Wheel Attachment

Secure Wheels

Final securing of the wheels to the grill frame.

Assembly Step 19: Attach Lid Handle Clips

Install Lid Handle Clips

Attaching clips to secure the lid handle.

Assembly Step 20: Close Grill Lid

Grill Operation and Safety Warnings

Ventilation Control Explanation

Explanation of vent positions for ash removal and airflow.

Charcoal Fluid Fire Hazard Warning

Warning about using charcoal fluids and checking ash collector.

Related product manuals