6
Before You Cook
Your griddle surface has a special rust resistant finish
applied to the metal surface and has been pre-seasoned
with a food-grade oil to provide rust protection. Therefore,
initial seasoning is not required but if you choose to add
another layer of seasoning to your griddle, please see
seasoning instructions below.
For continued griddle maintenance you should continue
to scrape and season your griddle every 2 to 3 cooking
sessions to keep your griddle in good condition. For more
information about caring for your griddle, scan the QR
code:
Tools Needed: Tongs, lint-free paper towels or cotton cloth,
neutral cooking oil.
For optimal results, you may want to add another layer of
seasining to your griddle. Please see seasoning instructions
below.
1. Open the protective hard cover.
m WARNING: Do not operate the grill with the hard
cover closed. The hard cover is to be used for storage
purposes only to protect the griddle.
2. With the griddle in place on the grill, handwash the
griddle, rinse, and thoroughly dry.
NOTE: The griddle must be COMPLETELY dry before
continuing the seasoning process.
NOTE: This will be the ONLY TIME you use soapy water on
your griddle.
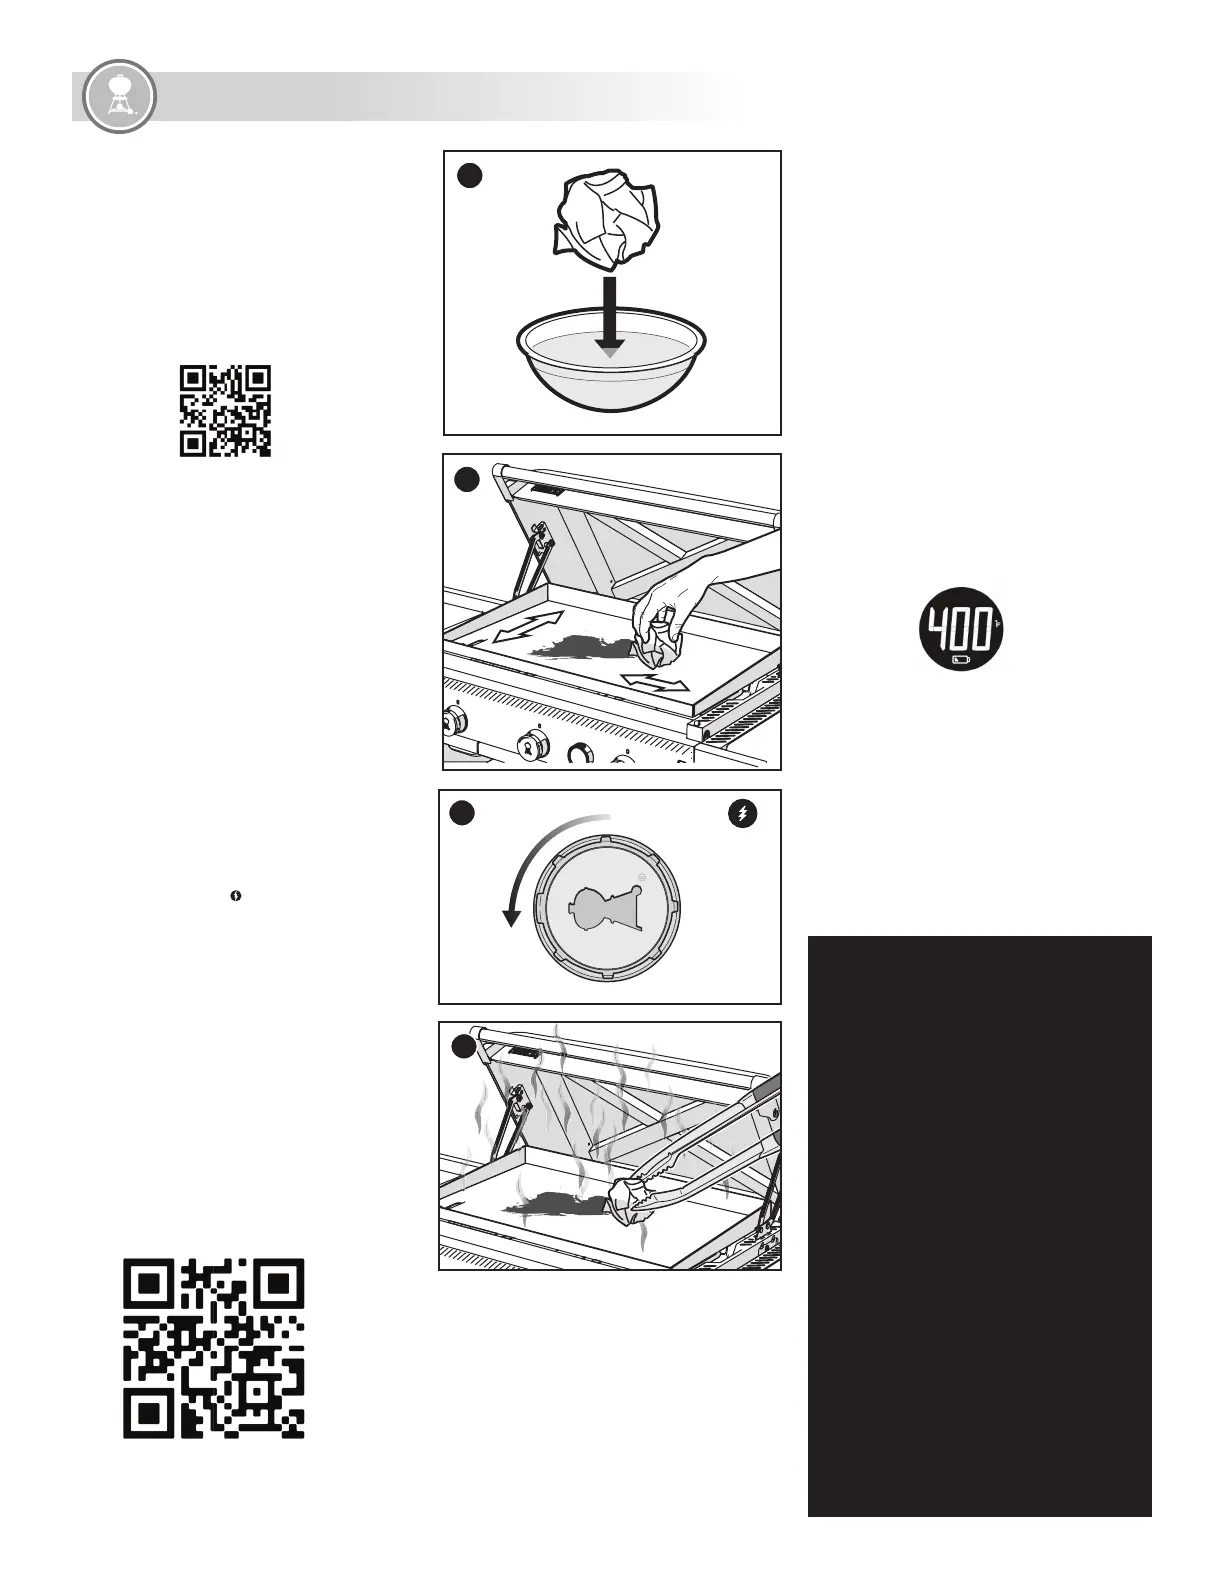
3. Pour ¼ cup of a neutral oil (i.e. canola oil, vegetable oil,
grapeseed oil) into a bowl.
4. Dip a paper towel or cotton cloth into the bowl (A),
squeezing o the excess oil. Wipe the griddle from side to
side, top to bottom as evenly as possible (B). Be sure to
get the interior and exterior sides of the griddle as well.
Wipe away any excess oil with a clean paper towel or
cotton cloth if necessary.
5. Light all of the burners and preheat your griddle on the
high temperature setting (C). The surface will begin to
smoke and darken (approximately 10 minutes). If any oil
begins to bead on the surface, use grill mitts and tongs
to wipe the excess oil from the griddle (D).
NOTE: By the end of the seasoning process, a well-
seasoned griddle will be dark from edge to edge.
6. The surface will darken and begin to smoke. When the
surface stops smoking (additional 20 minutes), turn o
the grill.
m IMPORTANT: Allow the griddle to cool completely, approx.
30 minutes.
7. The griddle now has 1 coat of seasoning. You should
continue to scrape and season your griddle every 2 to 3
cooking sessions to keep your griddle in good condition.
Scan this QR code for more
information on seasoning your
griddle:
m DANGER: Do not line the slide-out grease tray or
cookbox with aluminum foil.
m DANGER: Check the slide-out grease tray and catch
pan for grease build-up before each use. Remove
excess grease to avoid a grease fire.
m WARNING: Use caution when removing catch pan
and disposing of hot grease.
m WARNING: Use heat-resistant barbecue mitts or
gloves when operating grill.
m WARNING: Keep ventilation openings around tank
clear and free of debris.
m WARNING: Keep any electrical supply cord and the
fuel supply hose away from heated surfaces.
m WARNING: If the hose is found to be damaged in any
way, do not use the grill. Replace using only WEBER
authorized replacement hose.
m WARNING: Objects placed near the griddle will
become hot.
m WARNING: Keep paper towels away from direct
flames or extreme heat.
m WARNING: DO NOT remove the griddle until the grill
is o and is completely cool.
m CAUTION: Never apply large amounts of cold water
across the whole griddle surface at once. This may
cause griddle to warp.
m CAUTION: Adding a large amount of cold or frozen
food (or food with significant water content) to a hot
griddle may cause griddle to warp.
m CAUTION: Do not spray cold water on the cooking
surface while cooking.
m CAUTION: Use caution when turning or flipping food
while cooking to avoid splashing hot grease.
OPERATION
Digital Temperature Display
This feature is only available on select models.
The digital temperature display gives you a convenient way to
check the surface temperature of your griddle. While the grill
is in use, please follow these instructions for using the digital
temperature display:
A
B
C
D
Turning the Display ON
1) Press and hold the power button for 2 seconds, located on
the top-left side, to turn on the display.
NOTE: The grill should always be pre-heated for 10 min or
more. If display is turned on when the grill is o, display
lights will cycle through a startup sequence for the first 4
minutes while the griddle temperature is registering with
the display. If display is turned on after grill is lit, the display
will automatically show the griddle temperature.
2) If you want to change between Fahrenheit (Fº) and Celsius
(Cº), push the top-right button on the display unit to toggle
between these options.
Brightness
Once powered on, the display will be at 100% brightness for
15 minutes, then will dim slightly to preserve battery life. To
refresh the display to 100% brightness simply tap the power
button, located on the top-left side, and the display unit will
update to 100% brightness for 2 minutes.
Batteries
When it is time to change the 2 AA batteries, a low battery
icon will appear at the bottom of the display screen.Use
alkaline batteries only. Do not mix old and new batteries
or dierent types of batteries (standard, alkaline, or
rechargeable).
Turning the Display OFF
1) To manually shut o, press and hold the power button,
located on the top-left side, for 2 seconds.
NOTE: The display will automatically turn o after no heat
has been detected for 4 minutes or the grill has completely
cooled.
Error Code: E-8: If there is a detached thermocouple, "E-8"
will be shown on display. Please contact WEBER Customer
Service for assistance.
 Loading...