Do you have a question about the Weider Platinum XP800 and is the answer not in the manual?
Contact information and hours for customer support regarding questions or missing parts.
Advises users to read all precautions and instructions before using the equipment.
Shows where decals are placed on the resistance system and how to order replacements.
Details essential safety rules, user responsibilities, and usage restrictions for the resistance system.
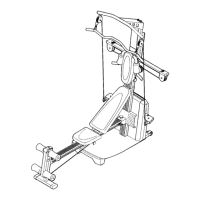
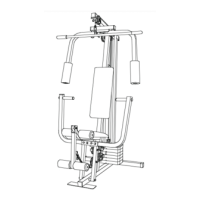
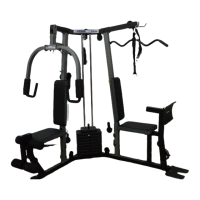
Introduces the resistance system and lists labeled parts with a diagram for user reference.
Lists required tools, preparation steps, and advice for successful assembly of the resistance system.
Attaches the Upright to the Base Plate using specified screws, bolts, and locknuts.
Connects wire harness, attaches Mech Frame to Upright and Base Plate, and tightens screws.
Attaches the Leg to the Rail using button bolts, washers, and locknuts.
Lubricates and attaches the Rail to the Row Plate with a bolt, washers, spacers, and locknut.
Inserts the Squat Pin into the Upright and slides the Squat Carriage onto it.
Attaches the Top Frame to the Upright using button screws, button screw, lock washers, and a washer.
Connects the Console's wire harness and attaches it to the Upright using screws.
Attaches a large pulley to the Upright using a button bolt and locknut, without fully tightening.
Routes the upper cable, attaches another large pulley, and secures a spacer with a screw.
Attaches guide spacers and crossbar guides to the Upright using bolts.
Inserts the resistance bar, attaches pulley brackets and tethers using bolts and washers.
Attaches a large pulley to a pulley bracket with a button bolt and locknut, routing the cable correctly.
Attaches the second large pulley to the other pulley bracket, ensuring correct cable routing and tightening.
Attaches the Leg Lever to the Leg using a station pin and cotter pin.
Slides a pad tube into the Leg and attaches foam pads; repeats for the Leg Lever.
Inserts the rod of the Backrest Frame into the slot in the Seat Carriage.
Advises to adjust upper cable tension as described on page 12.
Ensures all parts are tightened and instructs to turn on the console and set resistance.
Instructions on connecting the two tension gauges together using the magnet.
Guides on plugging in the system and setting the console resistance to the highest setting.
How to position tension gauges and alternately tighten tension screws to achieve proper cable tension.
Instructions on how to attach high pulleys to the top frame and connect cables.
Details on attaching the leg lever to the leg and routing its cable, including connection to lower cable.
Explains how to adjust the squat arm by removing and reengaging the squat knob.
Steps for using the squat station, including removing the backrest and attaching the lower cable.
How to use the backrest in a level or inclined position, and how to remove it for row exercises.
Guides on attaching the Lat Bar, Handles, Ankle Strap, and Hip Strap to the cables.
Instructions for moving and securing the seat to different positions on the rail.
Steps for storing the system, including removing the leg lever and securing the seat and storage knob.
Guidance on how to tilt and move the resistance system using its wheels.
Diagram and list of console features including display, program buttons, and resistance controls.
Instructions for plugging in the transformer and initial system calibration.
Steps to select resistance settings and perform exercises in manual mode.
How to enter desired sets and repetitions for an exercise in manual mode.
Guidance on performing exercises, with the console counting repetitions and sets.
Steps to select programs, warm up, adjust settings, and perform exercises within a program.
Illustrates the correct routing of the upper cable to ensure proper function and prevent damage.
Procedure to recalibrate the console, involving button presses and transformer unplugging.
Instructions for cleaning bar guides to eliminate squeaking noises.
Guidance on adjusting upper cable tension using tension screws to resolve resistance issues.
Explains Muscle Building, Toning, Weight Loss, and Cross Training workout principles.
Advice on determining workout length, sets, repetitions, and listening to your body's signals.
Importance of warming up before and stretching after workouts for preparation and flexibility.
Guidelines for selecting exercises, maintaining proper form, and breathing during workouts.
Recommended rest times between sets for different workout types (muscle building, toning, weight loss).
Tips for staying motivated by keeping workout records and tracking progress.
A chart identifying major muscles and corresponding labels for exercise reference.
Lists and illustrates various screws, bolts, washers, spacers, and other hardware components.
A detailed list of all parts with key numbers, quantities, and descriptions for ordering.
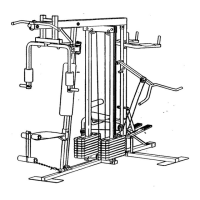
A visual representation showing how all parts of the resistance system fit together for assembly.
Details required information (model, serial, key number) for ordering replacement parts.
Outlines the warranty coverage, duration, limitations, and legal rights for the product.
| Brand | Weider |
|---|---|
| Model | Platinum XP800 |
| Category | Fitness Equipment |
| Language | English |