K
Kathryn McguireSep 6, 2025
What to do if Welch Allyn Medical Equipment shows internal SpO2 error?
- JJohn GutierrezSep 6, 2025
If your Welch Allyn medical equipment displays an internal SpO2 error, retake the reading.

What to do if Welch Allyn Medical Equipment shows internal SpO2 error?
If your Welch Allyn medical equipment displays an internal SpO2 error, retake the reading.
What to do if Welch Allyn Medical Equipment blood pressure cuff pops off?
If the blood pressure cuff keeps popping off during use with your Welch Allyn Medical Equipment, first determine the correct cuff size using the markings on the cuff. If the issue persists, contact the biomedical department or Welch Allyn Technical Support. Also, ensure the cuff is applied correctly with the Welch Allyn label facing away from the arm.
What to do if Welch Allyn Medical Equipment cuff inflation and deflation occurs with no blood pressure reading displayed?
If your Welch Allyn Medical Equipment is inflating and deflating the cuff but not displaying a blood pressure reading, ensure all blood pressure cuff attachments are tight and carefully check for leaks in the cuff, tubing, and pressure hose. Keep the arm still during the blood pressure cycle, as movement can cause inaccuracies. Also, avoid touching the cuff tubing or pressure hose during the cycle, as this can also introduce inaccuracies.
What to do if Welch Allyn Medical Equipment blood pressure cuff is too tight?
If the blood pressure cuff on your Welch Allyn Medical Equipment feels too tight, check the default Pressure Preset setting in the internal configuration mode. Unless the patient has systolic hypertension, set the pressure preset to 160 mmHg.
What to do if Welch Allyn Medical Equipment has excessive noise?
If your Welch Allyn medical equipment is producing excessive noise, check the patient's condition and the placement of the blood pressure cuff. Limit patient movement during operation.
What to do if Welch Allyn Medical Equipment shows SpO2 time limit exceeded?
If your Welch Allyn Medical Equipment displays an SpO2 time limit exceeded message, remove the sensor from the patient, reapply it, and retake the reading.
What to do if Welch Allyn Medical Equipment has a broken or missing probe?
If the probe on your Welch Allyn medical equipment is broken or missing, replace it.
What to do if Welch Allyn Medical Equipment has excessive inflation time?
If your Welch Allyn medical equipment is experiencing excessive inflation time, check for air leaks.
Why Welch Allyn Medical Equipment shows ambient temperature out of range?
If your Welch Allyn Medical Equipment indicates that the ambient temperature is out of range, adjust the ambient temperature or relocate the device.
What to do if Welch Allyn Medical Equipment connections between device and blood pressure cuff are loose?
If the connections between the device and the blood pressure cuff on your Welch Allyn Medical Equipment are loose, check all connections, ensuring not to overtighten them.
| Pulse Rate Measurement | Yes |
|---|---|
| SpO2 Measurement | Yes |
| Display | LCD |
| Power Source | Rechargeable battery or AC power |
| Temperature Measurement | Yes |
| Connectivity | Optional with wireless connectivity |
| Pulse Rate Range | 30-220 bpm |
| NIBP Diastolic Range | 20-195 mmHg |
| SpO2 Range | 70-100% |
| Temperature Range | 80 °F to 110 °F (26.7 °C to 43.3 °C) |
| Battery Life | Approximately 8 hours of continuous operation |
| Weight Capacity | Not applicable |
| Height Measurement Range | Not applicable |
Identifies conditions leading to patient injury, illness, or death if not corrected.
Cautions related to accurate and safe blood pressure measurement for different patient groups.
Safety precautions and usage guidelines for SpO2 sensors and measurements.
Guidelines for safe and accurate temperature measurement using the device.
Safety advice regarding the infrared port and eye contact.
General practices to prevent equipment failure, damage, or data loss.
Procedures to protect sensitive electronic components from ESD damage during service.
Explains various symbols used on the device and in the manual for user guidance.
Defines the manual's purpose and the device's intended use.
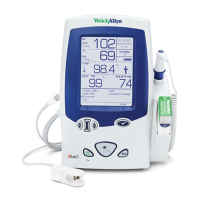
Lists components included with the Spot Vital Signs device for verification.
Details the functions of buttons, ports, and the LCD screen on the device.
Illustrates and describes how to connect hoses, probes, and other attachments.
Explains DC power connection, battery charging, and standby mode operations.
Describes how to power the device on/off and the automatic system self-check.
Explains how to access and change device operating parameters and settings.
Outlines steps to verify device calibration and operational performance.
Specific procedures for testing Masimo and Nellcor SpO2 module functionality.
Details required connections and setup for performing calibration tests.
Procedure to calibrate the device's battery voltage measurement circuit.
Steps to calibrate the blood pressure measurement system for accuracy.
Instructions for setting or updating the device's date and time.
Lists general error codes, their descriptions, and corrective actions.
Specific error codes and corrective actions related to blood pressure measurement.
Error codes and solutions for issues with the temperature measurement function.
Error codes and corrective actions for SpO2 module malfunctions.
Identifies potential causes for inaccurate blood pressure readings and their solutions.
A checklist for technicians to record test results during service and repair.
Lists necessary tools and their sources for performing disassembly and repair.
Step-by-step guide to safely remove and replace the device's internal battery.
Instructions for removing the temperature sensing module from the device.
Procedures for removing the front housing, keypad, and LCD module.
Guides for removing and replacing main and SpO2 circuit boards and associated components.
Steps for disassembling and replacing the pneumatic pump and valve components.
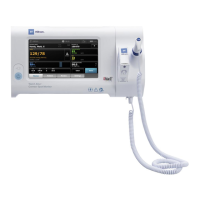
Overview of the Spot Vital Signs device, its functions, and intended use.
Details the battery type, charging system, and power management of the device.
Explains how power is supplied to the main CPU, NIBP, thermometer, and SpO2 modules.
A schematic showing how internal components and external interfaces are connected.
Lists parts for upgrading or repairing Version 1 to function as Version 2.
Comprehensive list of spare parts used in both Version 1 and Version 2 of the device.
Defines the age groups and patient types for which the device is intended.
Details accuracy, range, and determination times for BP measurements.
Outlines accuracy, range, and determination times for temperature measurements.
Provides accuracy guidelines and performance ranges for Masimo and Nellcor SpO2 sensors.
Covers device dimensions, weight, power requirements, and battery details.
Specifies operating, storage, and transport conditions for the device.
Information on emissions, immunity, and recommended separation distances for RF equipment.
Explains device labeling, serial numbering, and how to identify firmware versions.
Guidelines for cleaning the Spot Vital Signs device and its accessories safely.
Instructions for cleaning, disinfecting, and sterilizing blood pressure cuffs.
Procedures for wiping down cables and pressure hoses.
How to clean and inspect SpO2 sensors and cables for wear.
Step-by-step guide for removing and replacing the device's internal battery.
Information on checking SpO2 accuracy and disposing of accessories.
How to verify the accuracy of the SureTemp thermometer.
Standard tests for A-D noise, leak, inflation, and dump functions of the device.
Procedures for pneumatic calibration, accuracy, valve control, and pressure tests.
Tests for current draw in different modes and display/interface functionality.
Specific tests for temperature accuracy and SpO2 module functionality.
Catalog of various blood pressure cuffs, bladders, and hoses available.
Lists Masimo adhesive and reusable SpO2 sensors and related cables.
Lists Nellcor OxiMax and OxiCliq SpO2 sensors and cables.
Includes probes, probe covers, and calibration keys for temperature measurement.
Lists available accessories for mounting the device on stands or walls.
Instructions for installing the wall mount accessory for the Spot Vital Signs.
Assembly guide for the mobile stand accessory.
Installation instructions for mounting the device on an IV pole.
Details on installing the anti-theft security accessory.
Instructions for attaching the transformer mounting plate to the device.
Steps for installing the IR dongle mounting bracket.
Details the warranty period and terms for the Spot Vital Signs device.
Outlines warranty coverage for various accessories like sensors and probes.