
 Need help?
Do you have a question about the Welch Allyn Spot Vision Screener and is the answer not in the manual?
View, select or search for queued subjects to begin the screening process.
View already screened subjects (completed records).
Access various options to customize the vision screener.
Enter subject info, find queued subjects, begin screening, review results.
View battery charging and charge status indicators.
Select age range for instant screening or enter data later.
Prepare lighting conditions for optimal subject screening.
Step-by-step guide for performing a vision screening on a subject.
Connect the vision screener to HP or generic PCL printers.
Steps to reduce patient eye focus adjustment during screening.
Methods to achieve pupil dilation for clearer scans.
Procedure for hard reset if the device becomes unresponsive.
Steps to resolve problems with printer connectivity or jobs.
Guide for resolving problems connecting to a wireless network.
Reference for system messages and consulting device directions.
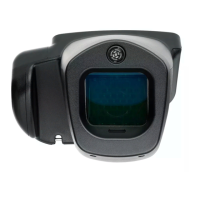
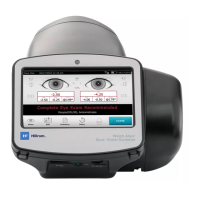
The Welch Allyn Spot™ Vision Screener is a portable, handheld device designed for rapid and accurate vision screening across a wide range of ages, from infants to adults. Its primary function is to detect common vision problems, such as refractive errors, that may lead to amblyopia (lazy eye) if left uncorrected. The device is engineered for ease of use, allowing caregivers to perform screenings quickly and efficiently, even without specialized ophthalmological training.
The Spot Vision Screener utilizes advanced technology to objectively measure refractive errors and other vision parameters. It operates by emitting infrared light towards the subject's eyes and analyzing the reflected light to determine the eye's refractive state. This process is non-invasive and takes only a few seconds, making it ideal for screening young children or uncooperative subjects. The device can detect conditions such as myopia (nearsightedness), hyperopia (farsightedness), astigmatism, and anisometropia (unequal refractive power between the two eyes). It also provides measurements for pupillary distance and pupil size, which are important indicators of ocular health.
The screener is designed to provide immediate, easy-to-understand results. After a screening, the device displays a "Screening Complete" message if all measurements are within normal limits, or a "Complete Eye Exam Recommended" message if out-of-range measurements are detected. This clear indication helps caregivers determine whether a subject requires further evaluation by an eye care specialist. The device's ability to screen binocularly (both eyes simultaneously) and monocularly (one eye at a time) offers flexibility in different screening scenarios.
The Spot Vision Screener is designed for intuitive operation, starting with its charging and power-on process. To charge, the device connects to a wall outlet via a provided DC cord and power supply/charger, requiring approximately four hours for a full charge before initial use. Powering on involves a simple press and release of the power button, after which the Home Screen is displayed within about 30 seconds.
The Home Screen serves as the central hub for all screening activities. It features several key options:
During screening, the device guides the user through the process. Proper lighting is crucial, with recommendations to turn off lights, close blinds, and avoid direct light into the patient's eyes from ambient sources, exterior light, or incandescent/halogen lights. Fluorescent light is noted as the best testing environment. To encourage dilation and limit accommodation (the eye's automatic focusing adjustment), subjects are advised to close their eyes for 10-15 seconds before screening. The screener should be held approximately three feet from the subject, on an even plane with their eyes, to ensure accurate capture and prevent the patient from looking upward. The device provides real-time feedback, such as a "Pupils too small" message if pupils are constricted or if something impedes the infrared light source.
Results are displayed clearly, with out-of-range measurements highlighted in red. The results screen provides detailed information, including pupillary distance, pupil size, and complete refraction data for both the right (OD) and left (OS) eyes. This includes spherical equivalent (SE), sphere (DS), cylinder (DC), and axis measurements. The device also indicates cylinder convention and alignment. Users can customize how results are viewed through the Tools menu, choosing between summary or detailed results, and opting to hide recommendations or screening results.
The device also supports wireless network configuration, allowing it to connect to available networks. This connectivity is essential for printing screening results. The vision screener is compatible with most network-capable Hewlett-Packard (HP) printers and includes generic PCL drivers for non-HP printers. Users can add new network printers, configure printer details, and print test pages. A printer icon in the menu bar indicates job processing and the number of jobs in the print queue.
The Spot Vision Screener is designed for reliability, but like any electronic device, it may require occasional troubleshooting or system maintenance.
The device also provides system messages to guide users, and for comprehensive instructions, warnings, and cautions, users are directed to consult the detailed Directions for Use that shipped with the device. Technical support information is available via the Welch Allyn website.
 General
| Device Type | Vision Screener |
|---|---|
| Display | LCD Touchscreen |
| Wireless Communication | Wi-Fi |
| Measurement Time | Less than 1 second |
| Product Type | Vision Screener |
| Screening Distance | 1 meter |
| Power Source | Rechargeable battery |
| Measurement Distance | 1 meter |
| Data Storage | Internal memory |
| Parameters Measured | Refraction, pupil size, gaze |
| Cylinder Range | +5.00D to -5.00D in 0.25D steps |
| Axis Range | 0 to 180 degrees |
| Interpupillary Distance Range | 40 to 80 mm |
| Working Distance | 1 meter |
| Connectivity | Wi-Fi, USB |
| Operating Conditions | 10°C to 40°C (50° to 104°F), 30% to 75% relative humidity, non-condensing |
| Storage Conditions | -20°C to 60°C, 10% to 95% RH |
| Compliance | CE |





 To Next Page

