EasyManua.ls Logo

Wen 33013

Wen 33013
24 pages
To Next Page IconTo Next Page
Loading...
MILLING
MACHINE
Model # 33013
Your new tool has been engineered and manufactured to WEN’s highest standards for dependability, ease
of operation, and operator safety. When properly cared for, this product will supply you years of rugged,
trouble-free performance. Pay close attention to the rules for safe operation, warnings, and cautions. If
you use your tool properly and for its intended purpose, you will enjoy years of safe, reliable service.
IMPORTANT:
NEED HELP? CONTACT US!
Have product questions? Need technical support?
Please feel free to contact us at:
800-232-1195
techsupport@wenproducts.com
WENPRODUCTS.COM
(M-F 8AM-5PM CST)
bit.ly/wenvideo
For replacement parts visit
WENPRODUCTS.COM
NOTICE: Please refer to wenproducts.com for the most up-to-date instruction manual.
3072101
Question and Answer IconNeed help?

Do you have a question about the Wen 33013 and is the answer not in the manual?

Wen 33013 Specifications

General IconGeneral
BrandWen
Model33013
CategoryPower Tool
LanguageEnglish

Summary

Need Help? Contact Us!

Product Specifications

Safety Introduction

General Safety Rules

Work Area Safety

Guidelines for maintaining a safe work environment.

Electrical Safety

Precautions for safe electrical operation and grounding.

Personal Safety

Measures for operator safety, including PPE and alertness.

Power Tool Use and Care

Guidelines for the proper use and maintenance of power tools.

Service

Information on servicing the power tool with qualified personnel.

California Proposition 65 Warning

Notice about chemicals in dust that cause cancer, birth defects, or reproductive harm.

Specific Rules for the Milling Machine

Electrical Information

Grounding Instructions

Importance and procedures for proper electrical grounding.

Guidelines for Using Extension Cords

Recommendations for selecting and using extension cords.

Know Your Milling Machine

Unpacking the Machine

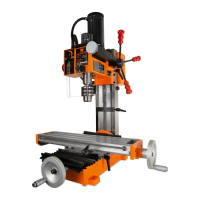
Steps for safely unpacking and preparing the milling machine.

Assembly & Preparation

Cleaning the Surfaces

Instructions for removing protective coatings and cleaning surfaces.

Mounting to a Benchtop

Guidance on securely mounting the machine to a workbench.

Installing the Handles

Steps for attaching the handles to the machine's handwheels.

Preparing Vises to Secure Workpiece

Advice on selecting and preparing workholding vises.

Cutter Holder

Details on drill chucks, collets, and end mill holders.

Cutting Tools

Explanation of end mills and drill bits for milling operations.

Removing the Drill Chuck Taper Shank

Procedure for removing the drill chuck and taper shank.

Installing the Drill Chuck Taper ShankEnd Mill Holder

Steps to install drill chuck or end mill holders.

Installing a Drill Bit

Instructions for inserting and tightening a drill bit into the chuck.

Adjustments

Adjusting the Table Travel

How to adjust the worktable movement along X and Y axes.

Adjusting the Bevel Angle

Procedure for setting the machine's bevel angle.

Adjusting the Headstock Height

Methods for adjusting the headstock position for feeding.

Setting the Depth Stop

How to set the depth stop for consistent cutting depth.

Setting the Speed Range

Selecting appropriate spindle speed ranges for different materials.

Turning OnOff and Adjusting the Speed

Operating the speed adjustment knob for power and speed control.

Operation

Prior to Operation

Pre-operation checks and requirements before using the machine.

DrillingMilling Operations

Detailed steps for performing drilling and milling tasks.

Overload Protection

Understanding the overload protection mechanism and response.

Maintenance

General Maintenance

Routine checks and cleaning procedures for the tool.

Cutter & Taper Shank Maintenance

Care and maintenance for cutters and taper shanks.

Lubrication

Lubrication points and types of lubricants for smooth operation.

Gibs Adjustment

Procedure for adjusting gibs for mechanical precision.

Product Disposal

Guidelines for responsible disposal of electronic components.

Exploded View & Parts List

Limited Two Year Warranty

Related product manuals