Connecting the PPS 1 System Panel Connections
Connect the speaker cable attached to the Left
PPS 1 panel to the Left panel connection on the
LP 1 sub bass unit. Connect the wire with the
marker stripe to the Negative (-) Black terminal
and the plain wire to the Positive (+) Red
terminal. Repeat this procedure to connect the
Right panel to the sub bass unit.
Note: The flat cable is supplied as an option. If
you prefer you can connect the panels using the
supplied speaker cable or a suitable a lternative.
Connecting the LP 1 Sub Bass
Using a prepared speaker cable, connect the
Left speaker terminals on the amplifier to the Left
speaker terminals on the sub bass unit . Connect
the Positive, Red (+) speaker terminal on the
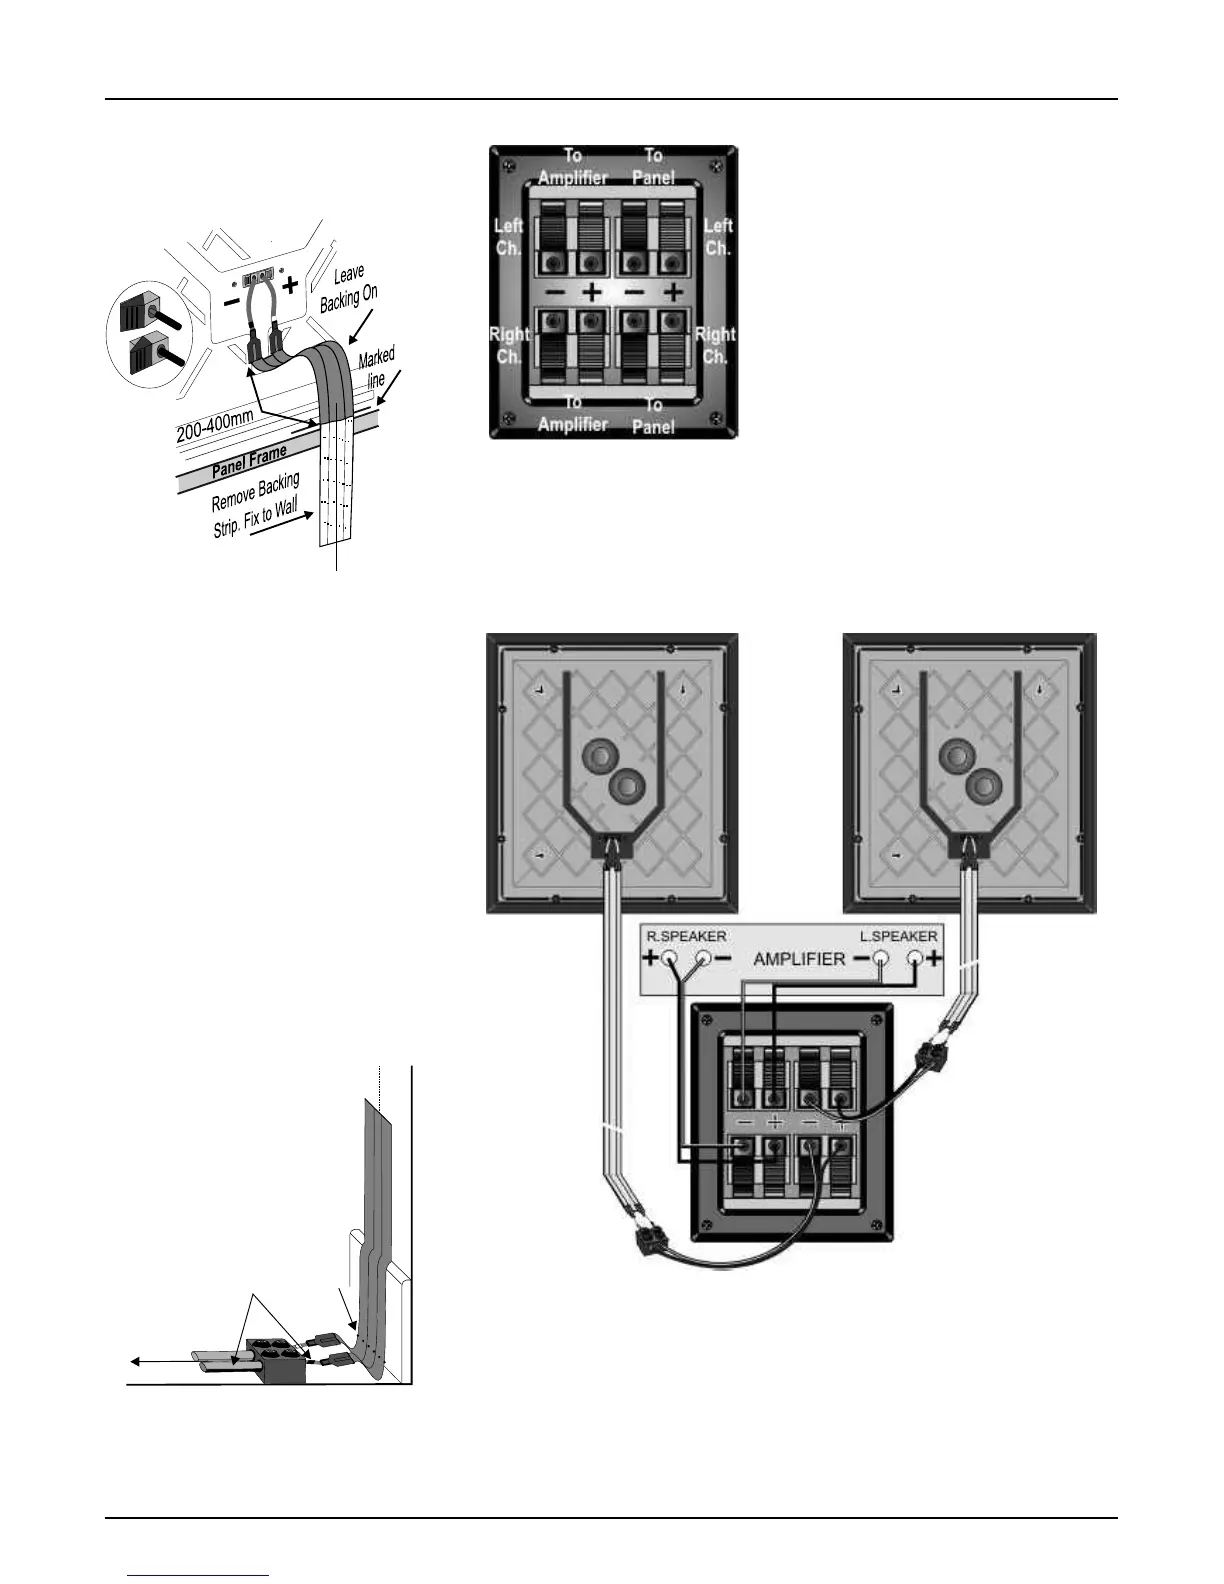
The LP 1 sub bass connector panel is the heart
amplifier to the Positive, Red (+) terminal on the
of the PPS 1 system. The Positive, Red(+) and
sub bass unit. Connect the Negative, Black (-)
Negative, Black(-) terminals are clearly
speaker terminal on the amplifier to the
identified.
Negative, Black (-) terminal on the sub bass unit.
Connect the Right speaker terminals on the
The twin terminal pairs on the left connect to the
amplifier to the Right speaker terminals on the
amplifier and the twin terminal pairs on the left
sub bass unit using the above method.
connect to the panels.
Connecting the PPS 1 Panels
The PPS 1 panel uses spring terminals located
on the rear. Positive, Red(+) and Negative,
Black(-) terminals are clearly identified.
The flat cables terminate in wire pigtails. Take
each flat cable and connect it to a PPS 1 panel at
the end you have prepared. Connect the pigtail
with the Black sleeve to the Black terminal on the
PPS1 panel. Press the lever at the side of the
terminal and insert the cable. Release the lever
and the wire is held firm. Now connect the pigtail
with the Red Sleeve to the Red terminal.
Terminals should always grip the bare wire and
no strands should ever touch adjacent terminals.
Hang each panel and cable assembly securely
on the wall via the mounting slots. Hinge the
panel slightly away from the wall and place the
cable against the wall with the start of the
exposed adhesive against the marked horizontal
line. Ensure that the pigtail with the BLACK
sleeve is to the RIGHT as viewed from the front.
Run the cable carefully down the wall, peeling off
the backing tape and attaching the cable as you
go. Keep the cable centered on the vertical line.
When the cable is 5mm above the floor covering,
cut away the loose backing strip and run a cloth
over the cable to press it firmly to the wall.
The flat cable is connected to the
LP 1 sub bass unit via a length of
speaker cable attached to the flat
cable with a twin terminal block.
Partially unscrew the screws on the
terminal block. Insert a bared end of
each pigtail on the flat cable into each hole at one
end of the block and screw them in place. Now
screw in a prepared speaker cable at the other
end. Make sure that the stripe or rib on the
speaker cable connects to the BLACK pigtail.
Connect striped
core to pigtail with
black marker
Lower limit
of adhesive
To Sub-Bass Unit
diagram carefully and ensure that all the
Home Theatre
connections are correctly and securely made. In
The PPS 1 Panels may be purchased as a pair
particular, the colour coding on the loudspeaker
independently of the sub bass unit and are ideal
connections must be strictly observed.
for the rear channels of a home theatre system,
NOTE: Do NOT connect any component in the
where their dispersion pattern provides a wide,
PPS 1 system to any subwoofer output on your
diffuse sound field.
AV amplifier.
A wide range of Wharfedale centre loudspeakers
PPS 1 panels must be connected to the Front
is available - see your dealer for details.
loudspeaker outputs only via the LP 1 sub bass
Connections for a Home Theatre system are
unit. They may, however, be connected directly
shown on the next page - please follow the
to the Rear Channel outputs.
LP 1 SUB BASS
TERMINALS
LEFT
SPEAKER
PANEL
RIGHT
SPEAKER
PANEL