Do you have a question about the Whirlpool ADP 5560 and is the answer not in the manual?
Controls power and programme selection. Switches on/off and selects wash programmes.
Initiates the wash cycle. Flashes on fault, switches off at end of programme.
Visual signals for rinse aid and regeneration salt levels, guiding maintenance.
Details the phases: Pre-Rinse, Washing, Drying, and Programme End.
Automatic start by turning the programme selector knob.
Instructions for using the large and small compartments.
Monitoring rinse aid and regeneration salt levels.
Choosing desired programmes and options, and starting the wash cycle.
Procedure for turning off the appliance and unloading racks.
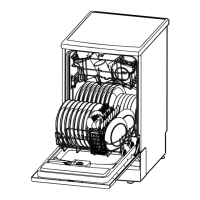
Guidance on placing items in the upper rack, including supports and holders.
How to adjust the rack height for optimal loading.
Instructions for removing the top rack to accommodate larger items.
Instructions for loading the lower rack, especially for plates and saucepans.
Proper placement of cutlery, including safety tips for sharp items.
Checks for no water supply, insufficient water, or power failure.
Addresses issues with residual water, water jets, detergent, or blocked spray arms.
Solutions for sandy/grainy residues, faded plastic parts, and deposits on crockery.
Tips for opaque glasses and issues with rust on cutlery.
Interpreting flashing indicator lamps and fault codes.
This document provides a comprehensive guide for the Whirlpool ADP 5560 dishwasher, covering its functions, usage, and maintenance. It begins with a Quick Reference Guide, offering an overview of the control panel and programme chart, followed by detailed instructions on how to use the appliance, load the racks, and troubleshoot common issues.
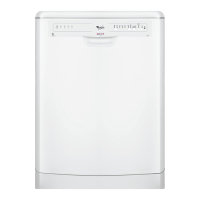
The Whirlpool ADP 5560 is a dishwasher designed to clean various types of crockery and utensils efficiently. Its core function is to automate the washing process through a series of pre-programmed cycles, each tailored for different levels of soiling and types of items.
The control panel features a Programme selector knob which serves as both the mains on/off switch and the selector for various wash programmes. Turning this knob initiates the appliance. A Start button is used to commence the selected programme; it also indicates when the dishwasher is operating and flashes in case of a fault. The button switches off automatically at the end of a programme.
The appliance includes indicators for essential consumables: an Add rinse aid indicator (represented by an asterisk) and an Add regeneration salt indicator (represented by an 'S'). These indicators alert the user when these agents need refilling, ensuring optimal washing performance. Regeneration salt should be added immediately before starting a wash programme.
The dishwasher offers a range of wash programmes to suit different needs:
Each programme involves a sequence of wash cycle phases: Pre-Rinse, Washing, and Drying, culminating in the End Programme. The programme chart provides details on detergent requirements (Detergent A and B), water consumption (Litres), energy consumption (kWh), and duration (Minutes) for each cycle.
Operating the ADP 5560 involves a straightforward sequence of steps:
Regular maintenance ensures the dishwasher's longevity and optimal performance. The manual provides guidance on troubleshooting common issues:
If any malfunction persists after these checks, users are advised to turn off the appliance and water supply, then contact After-Sales Service. When contacting service, it is helpful to provide the nature of the fault, appliance type and model, and the service code (found on the adhesive rating plate inside the door).
The manual also specifies that only dishwasher-proof crockery and dishes should be used. Items like wooden items, aluminium, plastic utensils, tin, hand-decorated crockery (unglazed), and silver cutlery are not suitable for dishwashers. Spare parts like the multi-purpose support and revolving glass support are available separately.
| Type | Freestanding |
|---|---|
| Energy Efficiency Class | A |
| Washing Class | A |
| Drying Class | A |
| Number of Programs | 6 |
| Delay Start | Yes |
| Dimensions (HxWxD) | 85 x 60 x 60 cm |