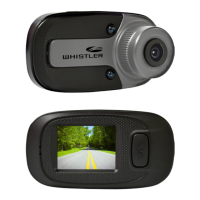
The Whistler D12VR is an automotive digital video recorder (DVR) designed to capture video and images while operating in a vehicle. This device is intended for use in motor vehicles running on 12 or 24 volts DC.
Function Description
The primary function of the D12VR is to record video and take still images. It features a camera lens with a 120° viewing angle, allowing for a wide field of capture. Infrared LEDs are integrated to provide illumination for night recordings, enhancing visibility in low-light conditions. The device includes a display for viewing recorded photos and videos directly on the unit. Audio is also captured via a built-in microphone and can be played back through the speaker.
The D12VR supports loop recording, which means it continuously records video in segments (1, 2, or 3 minutes) and overwrites the oldest files once the memory card is full, ensuring continuous recording without manual intervention. A G-sensor function is included to detect sudden shocks, such as those from an accident. When a shock is detected, the current video segment is automatically protected from being overwritten, preserving critical event footage.
An automatic power ON/OFF function is a key feature when the DVR is connected to a car adapter plugged into a 12V power port controlled by the vehicle's ignition. The unit will automatically turn on and begin recording when power is applied and turn off when power is removed. This ensures that recording starts and stops seamlessly with vehicle operation.
The Parking Monitor feature, when enabled, allows the DVR to automatically turn on and start recording if it detects a crash against the car while parked. This is particularly useful for capturing incidents that occur when the vehicle is unattended. A "P" icon on the screen indicates when this feature is active.
For connectivity, the D12VR has a USB jack that allows it to interface with a PC. In "Mass Storage" mode, recorded files on the micro SD card can be accessed directly from a computer for viewing or transfer. In "PC Camera" mode, the DVR can function as a webcam when connected to a computer, though additional drivers may be required. An AV Output Jack is also provided to connect the DVR to an external TV or video monitor for larger viewing.
Usage Features
Operating the D12VR involves several straightforward steps. Before initial use, a micro SD card (at least 4GB, Class 6 minimum, up to 32GB) must be inserted into the micro SD card slot. The unit should be fully charged using either the included 12-volt car charger or a PC USB port; a red status LED indicates charging is in progress. It's important to turn the DVR off before inserting or removing the micro SD card.
Installation in a vehicle involves securing the windshield bracket. The threaded collar is inserted into the bracket mounting point on the DVR and tightened. After removing any protective film from the suction cup and cleaning the windshield, the bracket is pressed onto the windshield, and the locking tab is pressed to secure it. The adjustable knob on the bracket allows for adjusting the DVR's angle.
Power connection in the vehicle is simple: the mini USB end of the power cord plugs into the DVR's USB jack, and the other end goes into the vehicle's lighter socket/power port. The DVR will automatically power on and begin recording when power is applied and turn off when power is removed. Manual power ON/OFF is achieved by pressing and holding the Power/OK button. The unit also automatically powers off when the low battery warning is displayed.
Initial settings, such as Date & Time, can be configured through the menu. After connecting to the car charger, the device powers on and starts recording. Pressing the OK button switches to standby mode. The MENU button, when pressed and held for 2 seconds twice, allows access to Date/Time settings. The UP and DOWN buttons are used to select numbers, and OK confirms selections. The MENU button returns to DVR operation.
The D12VR offers three main operational modes: VIDEO, CAMERA, and PLAYBACK. Short pressing the MODE/MENU/SOS button cycles through these modes. Long pressing and releasing this button enters the MENU mode. During recording, a short press of the MODE/MENU/SOS button creates a protected file (SOS) to prevent it from being overwritten.
In VIDEO mode, a blinking red "REC" icon indicates recording is active. Pressing OK stops recording. In CAMERA mode, the camera icon appears, and pressing OK takes a picture. For reviewing files, pressing MODE twice enters the review screen. The UP and DOWN buttons highlight files, and OK selects and plays a video or pauses it. Pressing MODE again exits review mode.
Additional features include Exposure Compensation, Motion Detecting, Recording Audio ON/OFF, Date Stamp ON/OFF, and various system settings like language, TV mode, light source frequency, and screen saver options (OFF, 3, 5, or 10 minutes). The screen saver mode minimizes nighttime distraction and extends battery life when operating without external power.
Maintenance Features
The D12VR is designed for ease of use and minimal maintenance. For troubleshooting, if the unit cannot record or take photos, users should confirm the micro SD card is of the proper class (C6 minimum) and has available capacity. If the unit doesn't recognize the card, reinsert it; if the problem persists, the card may be damaged or incompatible, and trying another memory card (SanDisk recommended) is advised.
"Files error" during replay suggests a micro SD card storage error, requiring reformatting or replacement of the card. If video or photos are unclear, the lens should be checked for fingerprints, protective film, or other obstructions and cleaned with a soft cloth. For black images when recording sky or water scenes, adjusting the Exposure setting in the Global menu settings can correct the image. Cross stripe interference in images can be resolved by checking and correcting the "Light Frequency" setting (50Hz or 60Hz) in the MENU Settings.
A reset button is available to restore operation in case of a system jam or crash. It's important to note that there are no user-serviceable parts inside, and the product should not be opened.
Regarding care, the unit does not use a touch screen, so users should avoid touching the screen with any objects to prevent damage. To prolong the device's life, it should not be left in direct sunlight for extended periods, especially in a vehicle, and its use in dusty and damp environments should be avoided. The unit is intended to be used with an external power source; stand-alone battery time is approximately 15 minutes.