Do you have a question about the Wincor Nixdorf BEETLE /M-III and is the answer not in the manual?
| Brand | Wincor Nixdorf |
|---|---|
| Model | BEETLE /M-III |
| Category | Touch terminals |
| Language | English |
Details the UL and cUL symbols received by the BEETLE system.
Explains FCC compliance for Class A digital devices and Canadian ICES-003.
Warns that only authorized personnel should repair the device to avoid safety risks.
Describes the purpose of the documentation and how to find information.
Explains the system's ability to connect various peripherals and expand.
Guides users on unpacking, checking delivery, and reporting damages or defects.
Advises on ideal placement to avoid extreme conditions and protect from environmental factors.
Details minimum clearances and ambient temperature limits for horizontal placement.
Specifies minimum clearances required for vertical mounting to ensure ventilation.
Explains how to prepare and attach the optional cable cover to the device.
Mentions that the system is pre-configured and may need adaptation for peripherals.
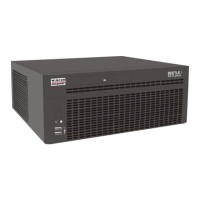
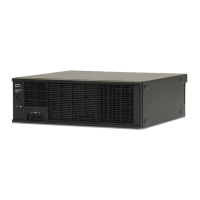
Illustrates and labels the components visible on the front of the BEETLE system.
Explains how to turn the system on and off using the power button.
Details the meaning of the different LED indicators on the device.
Describes how to connect USB peripheral devices and emphasizes using compliant cables.
Shows and labels the internal components of the BEETLE system.
Identifies and describes the main connectors on the rear panel of the BEETLE.
Explains the fan-cooled power supply and safety precautions for replacement.
Details the 24V PoweredUSB interface for connecting peripherals like printers.
Describes the RJ12 socket for connecting cash drawers and its specifications.
Explains how to connect the power cable to the device for operation.
Explains the 9-pin D-sub jacks used for powered peripherals like scanners.
Describes the DVI interface for connecting LCD monitors and RMT function.
Details the 9-pin D-sub plug for connecting peripherals like scales and keyboards.
Explains the VGA port for connecting high-definition monitors.
Describes the 6-pin mini-DIN jack for connecting a keyboard.
Covers connecting various USB peripheral devices and power delivery capabilities.
Explains how to connect the system to a network using the RJ45 socket.
Describes the audio input and output jacks and how to adjust volume.
Details the 12V PoweredUSB interface for connecting peripherals like scanners.
Provides instructions for replacing a 3.5-inch hard disk drive.
Details the process for changing one or two 2.5-inch data storage devices.
Explains how to replace 2.5-inch drives with frontal disk access.
Lists the technical specifications including dimensions, weight, and processor.
Provides a comprehensive list and description of all available interfaces.
Details the current consumption limits for various interfaces on the system.