<TUNING> menu
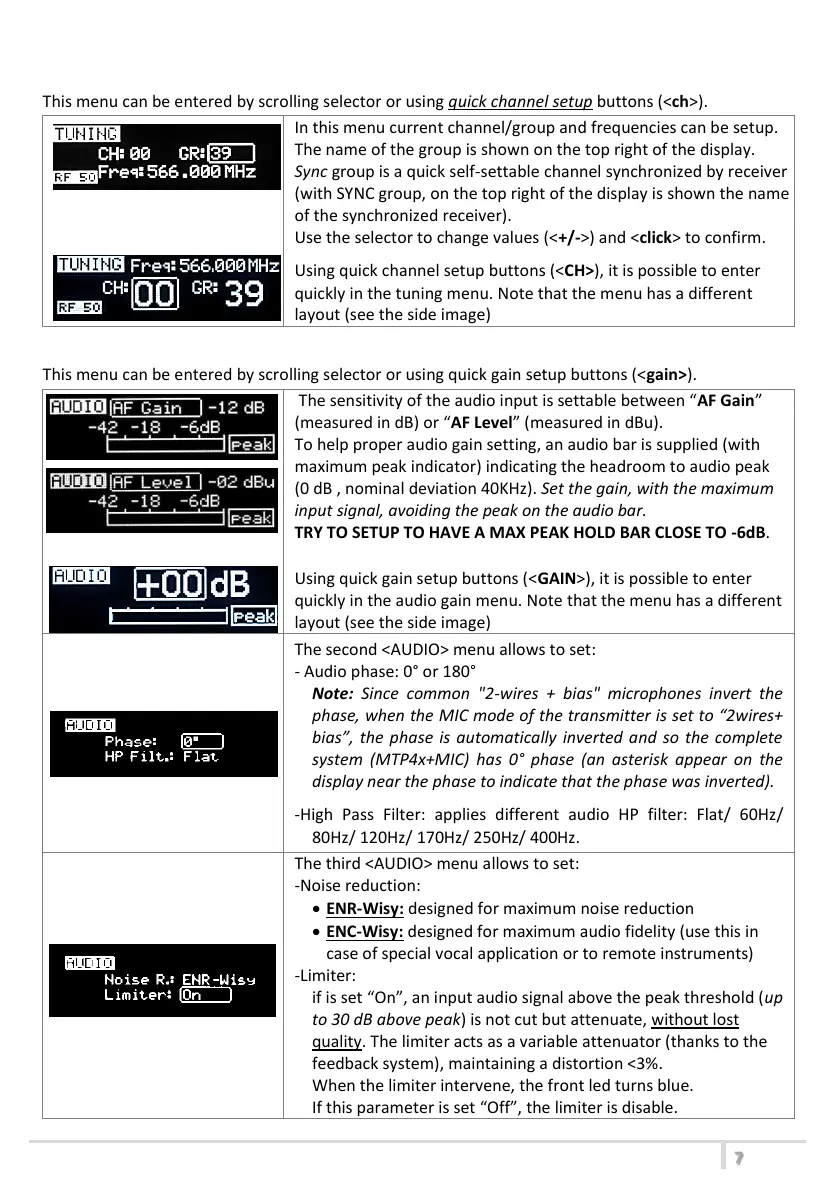
This menu can be entered by scrolling selector or using quick channel setup buttons (<ch>).
In this menu current channel/group and frequencies can be setup.
The name of the group is shown on the top right of the display.
Sync group is a quick self-settable channel synchronized by receiver
(with SYNC group, on the top right of the display is shown the name
of the synchronized receiver).
Use the selector to change values (<+/->) and <click> to confirm.
Using quick channel setup buttons (<CH>), it is possible to enter
quickly in the tuning menu. Note that the menu has a different
layout (see the side image)
<AUDIO> menu
This menu can be entered by scrolling selector or using quick gain setup buttons (<gain>).
The sensitivity of the audio input is settable between “AF Gain”
(measured in dB) or “AF Level” (measured in dBu).
To help proper audio gain setting, an audio bar is supplied (with
maximum peak indicator) indicating the headroom to audio peak
(0 dB , nominal deviation 40KHz). Set the gain, with the maximum
input signal, avoiding the peak on the audio bar.
TRY TO SETUP TO HAVE A MAX PEAK HOLD BAR CLOSE TO -6dB.
Using quick gain setup buttons (<GAIN>), it is possible to enter
quickly in the audio gain menu. Note that the menu has a different
layout (see the side image)
The second <AUDIO> menu allows to set:
- Audio phase: 0° or 180°
Note: Since common "2-wires + bias" microphones invert the
phase, when the MIC mode of the transmitter is set to “2wires+
bias”, the phase is automatically inverted and so the complete
system (MTP4x+MIC) has 0° phase (an asterisk appear on the
display near the phase to indicate that the phase was inverted).
-High Pass Filter: applies different audio HP filter: Flat/ 60Hz/
80Hz/ 120Hz/ 170Hz/ 250Hz/ 400Hz.
The third <AUDIO> menu allows to set:
-Noise reduction:
ENR-Wisy: designed for maximum noise reduction
ENC-Wisy: designed for maximum audio fidelity (use this in
case of special vocal application or to remote instruments)
-Limiter:
if is set “On”, an input audio signal above the peak threshold (up
to 30 dB above peak) is not cut but attenuate, without lost
quality. The limiter acts as a variable attenuator (thanks to the
feedback system), maintaining a distortion <3%.
When the limiter intervene, the front led turns blue.
If this parameter is set “Off”, the limiter is disable.
前面パネルの<CH>ボタンを押してもこのメニューに入ることができます。
(クイックメニュー)
初めにチャンネルを設定し、チャンネルのEdit Modeが終了した状態で
+ボタンを押すとグループの設定が可能となります。
クイックメニューの場合は設定画面が異なります。
このメニューではチャンネル/グループの組み合わせで周波数を変更できま
す。グループの数字がディスプレイの右側に表示されます。
”SY”と表示されている場合はレシーバーより赤外線で”Sync”したことを意味
します。ジョグダイヤル式セレクターの<+/->でチャンネルもしくは
グループを選択しEdit Modeの状態にして任意の周波数を設定してください。
入力感度はAF Gain(単位はdB)かAF Level(単位はdBu)に設定が
可能です。(日本仕様はAF Gain仕様のみとなります。)
適正なオーディオゲインの設定をするために音声入力を表すオーディオバー
とピークホールドインジケーターが表示されます。
オーディオバーがピークに届かないくらいの最大入力のゲインをセットしてくだ
さい。
(オーディオバーのピークが-6dB近くになる設定を試してください。)
2番目のオーディオメニューでは以下の設定を行います
-位相(0°もしくは180°)
注:トランスミッターのMICモードが「2wires+bias」に設定されている場合
は「2線式バイアス」のマイクロフォンは位相が反転する為、自動的に
位相が反転されシステム全体(トランスミッターとマイクロフォン)の位相は
0°となります。
自動的に位相を反転されている場合は右側にアスタリスクマークが
表示されます
前面パネルの<GAIN>ボタンを押してもこのメニューに入ることができます。
(クイックメニュー)
ゲインが点滅している時に<+/->ボタンで任意のゲインを設定してください。
クイックメニューの場合は設定画面が異なります。
-ハイパスフィルター
Flat/60Hz/80Hz/120Hz/170Hz/250Hz/400Hz
3番目のオーディオメニューではノイズリダクション(コンパンダー)とリミッター
を設定します
MTP40S-JB/41S-JBは2つの違うコンパンダーシステムを搭載しております
JNR-Wisy 最大ノイズリダクションシステム
JNC-Wisy 音声を忠実に復調するシステム
(特別なボーカルや楽器に使用します。)
リミッターをONにした場合、ピークを越えた30dBまでの音声信号を
音質を悪くすることなくカットではなく減衰させます。
リミッターは可変アッテネーター(フィードバックシステムにより)の働きをしま
す。そして歪み率を<3%に維持します。
リミッターが作動したときは正面のLEDは青く点灯します。
OFFに設定した場合は作動しません。
MTP40S-JB/MTP41S-JB User Manual
 Loading...