•
When you hear the timer sound, the prehea-
ting phase has finished and the temperature
has reached 200°C.
•
Do not take the frying basket out during the
pre-heating phase otherwise the timer will
revert back to 0 and the timer will start again.
•
The product goes into keep warm mode at
200°C for 10 minutes.
•
Take the frying basket out of the appliance
and place it on a heat-resistant surface.
ATTENTION
•
The frying basket and the grill grid are very
hot. Use a pair of tongs to place the food
on the grill grid.
•
Wait until the preheating phase has comple-
ted then place the food on the grill grid and put
back the frying basket into the appliance.
•
Select the required cooking time by pressing the
and buttons (see section ‘Cooking guide’).
Press the Start button to launch the cooking.
The temperature and remaining cooking time
will alternate on the on-screen display. Turn the
meat halfway through cooking for optimum grill
marks. Excess oil from the food is collected in
the bottom of the frying basket.
•
When the cooking is finished, the appliance
emits an acoustic signal and switches off. Take
the frying basket out of the appliance and place
it on a heat-resistant surface.
•
Check if the food is ready. If the food is not
ready yet, put it back in the appliance and set
the timer for a few extra minutes at 200°C with
manual setting (see section “Cooking guides”).
•
When the food is cooked, take out the frying
basket. To remove food, use a pair of tongs to
lift the food out of the frying basket.
ATTENTION
•
After hot frying, the frying basket, the
grill grid and the food are very hot. Do not
touch the frying basket during use and for
some time after use, as it gets very hot.
Only hold the frying basket by the handle.
6.1| DEHYDRATION
•
Place the grill grid in the frying basket of the
appliance.
•
Press , then adjust the temperature by
the
and buttons to 80°C on the digi-
tal screen.
•
Then set the desired cooking time by pres-
sing the
and buttons. You can set the
timing from 1 hour to 4 hours.
•
Press the Start button to launch the dehy-
dration process. The selected temperature and
remaining cooking time will alternate on the
screen display.
•
When the cooking time is finished, the appli-
ance emits an acoustic signal and switches
off. Take the frying basket out of the appli-
ance and place it on a heat-resistant surface.
•
Check if the food is ready. If the food is not
ready yet, put it back in the appliance and set
the timer for a few extra minutes.
•
Remove the cooked food from the frying bas-
ket using tongs.
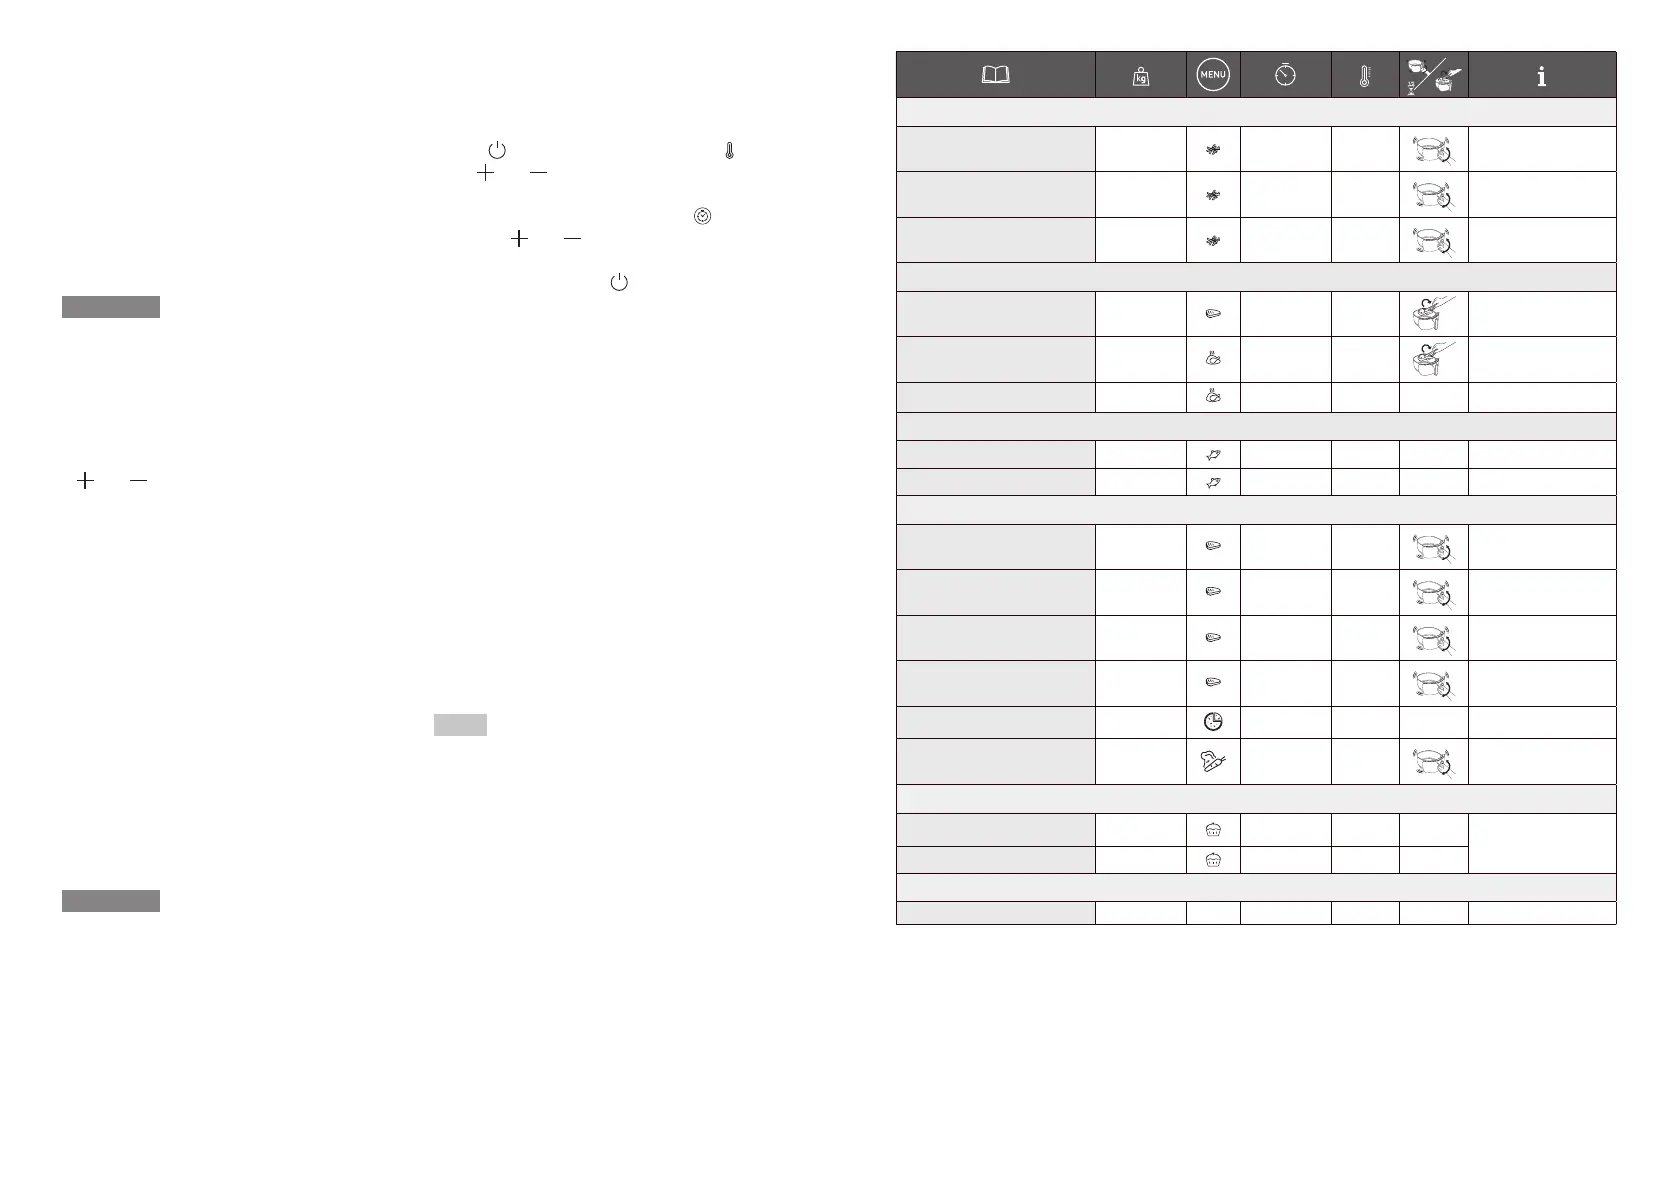
6.2| COOKING GUIDE
The table below helps you to select the basic
settings for the food you want to prepare.
NOTE
The cooking times below are only a guide and
may vary according to the variety and batch of
potatoes used. For other food the size, shape
and brand may affect results. Therefore, you
may need to adjust the cooking time slightly.
POTATOES & FRIES
Frozen chips (10 mm x 10mm
standard thickness)
300 - 800 g
15 - 25 min* 180°C
Homemade
Fries (8 x 8 mm)
300 - 800 g
22 - 27 min* 180°C Add 1 tbsp of oil
Frozen
potato wedges
300 - 800 g
22 - 27 min* 180°C Add 1 tbsp of oil
MEAT & POULTRY
Steak 100 - 500 g
6 - 10 min 180°C
Chicken breast
fillets (boneless)
100 - 500 g
12 - 19 min 180°C
Chicken (whole) 1000 g 60 min 200°C
FISH
Salmon fillet 350 g
15 - 17 min 140°C
Prawns 12 pieces
4 min 170°C
SNACKS
Frozen chicken nuggets 100 - 600 g
7 - 15 min 200°C
Frozen chicken wings 300 g 16 - 20 min 200°C
Frozen cheese sticks
125 g
(5 pieces)
7 - 9 min 180°C
Frozen onion rings
200 g
(10 pieces)
8 - 10 min 200°C
Pizza 400 g 7 min 190°C
Vegetables 300 - 700 g
16 - 20 min 200°C
BAKING
Muffins 7 pieces
15 -18 min 180°C
Use a baking
tin/oven dish**
Cake 300 g
30 min 160°C
DEHYDRATION
Sliced apples 1-2 pieces 4 h 80°C
* Shake halfway through cooking.
**Place a baking/casserole dish in the frying basket (silicone, stainless steel, aluminium, terracotta
casserole dish).
28 29
IL AE UA PL HU SK CZ SL HR RO BG TR SV NO NL FI DA IT ES FR EN DE
 Loading...