EasyManua.ls Logo

Wood-mizer E10 - User Manual

Wood-mizer E10
17 pages
Print Icon
To Next Page IconTo Next Page
Loading...
E10 Motor
Safety, Operation, Maintenance
& Parts Manual
LT15 rev. E2.00 - E8.13
LT15W rev. A1.00 - A1.14
Safety is our #1 concern! Read and understand
all safety information and instructions before oper-
ating, setting up or maintaining this machine.
April 2010
Form #1100

Questions and Answers

  • C
    Christy WilliamsonSep 8, 2025
    How to fix wavy cuts with my Wood-mizer Saw?
    • A
      Alexis JohnsonSep 8, 2025
      Wavy cuts can occur due to several reasons. You might be feeding the saw too quickly, so try slowing down the feed rate. The blade might be improperly sharpened, so resharpen it carefully following the sharpener’s instructions. Check if the blade guides are improperly adjusted and adjust them if needed. Sap buildup on the blade can also cause this, so try using Water Lube. Finally, a tooth set problem can also be the cause, so resharpen and reset the blade.
  • J
    Jenny LeAug 23, 2025
    Why do drive belts wear prematurely or jump on my Wood-mizer E10 Saw?
    • M
      mstanleyAug 23, 2025
      If the drive belts on your Wood-mizer Saw are wearing out quickly or jumping, it's likely that the engine/motor and drive pulleys are out of alignment. You should align the pulleys.
  • E
    Eddie HayesAug 25, 2025
    What to do if the blade does not track right on the drive wheel of my Wood-mizer E10?
    • K
      Kurt BrownAug 25, 2025
      If the blade on your Wood-mizer Saw isn't tracking correctly on the drive wheel, the cant adjustment is likely incorrect. Readjust it.
  • T
    Tammy ScottAug 26, 2025
    How to correct Lumber that is not square with my Wood-mizer Saw?
    • R
      ramirezjeffreyAug 27, 2025
      If your lumber isn't square, it could be due to several reasons. Start by adjusting the side supports to ensure they are square to the bed. Next, adjust the bed rails so they are parallel to the blade. Make sure to remove any sawdust or bark between the cant and bed rails. Finally, resharpen and reset the blade to address any tooth set problems.
  • M
    Michael RandallAug 27, 2025
    What causes drive belts to wear prematurely or jump on a Wood-mizer E10 Saw?
    • J
      Jasmine NelsonAug 27, 2025
      If the drive belts are wearing out quickly or jumping, it's likely due to the engine/motor drive pulleys being out of alignment. Make sure to align the pulleys.
  • M
    Micheal MoralesSep 22, 2025
    How to fix the Blade that does not track right on the drive wheel of my Wood-mizer E10?
    • N
      nicholas00Sep 22, 2025
      If the blade isn't tracking correctly on the drive wheel, the cant adjustment might be incorrect. Readjust the cant.
  • C
    Christopher CraigSep 16, 2025
    What causes the height adjustment to jump or stutter on my Wood-mizer E10?
    • T
      Tracy ReyesSep 16, 2025
      If the height adjustment jumps or stutters, it may be due to an improperly adjusted up/down chain, so adjust the up/down chain. It could also be that the vertical wear pads are too tight, so adjust the pads.
  • H
    Hannah MerrittSep 18, 2025
    What to do if blade guides do not spin while cutting on my Wood-mizer Saw?
    • D
      donnahamiltonSep 18, 2025
      If the blade guides aren't spinning during cutting, the bearings may be frozen. Replace the bearings.
  • R
    Raymond ShortSep 7, 2025
    What to do if blade guides do not spin while cutting with Wood-mizer Saw?
    • S
      Samuel SmithSep 7, 2025
      If the blade guides on your Wood-mizer Saw aren't spinning while cutting, the bearings are likely frozen. You'll need to replace the bearings.
  • J
    John Johnson MDSep 4, 2025
    What causes boards to be thick or thin on the ends or middle when using a Wood-mizer Saw?
    • J
      Javier MeyerSep 4, 2025
      If you're getting boards that are thick or thin on the ends or middle with your Wood-mizer Saw, it could be due to stress in the log causing it to not lay flat on the bed. After squaring the log, take equal cuts off opposing sides, alternating between the top and bottom, to keep the heart in the middle. Another cause might be the set in the teeth, requiring you to resharpen and reset the blade. Finally, check if the bed rails are misaligned and realign the sawmill if necessary.

Overview

The E10 Motor manual provides comprehensive information for the safety, operation, maintenance, and replacement parts of the LT15 and LT15W models. This manual serves as a crucial supplement to the equipment manufacturer's manuals, offering specific details for the use of this equipment on Wood-Mizer® sawmills. Users are strongly advised to consult both the sawmill operator's manual and the engine manufacturer's manual for complete instructions and safety precautions before operating, setting up, or maintaining the equipment. The information and instructions within this manual do not amend or extend the limited warranties provided at the time of purchase.

Function Description:

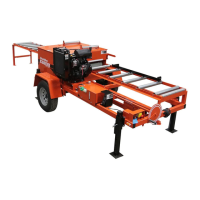
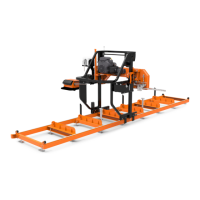
The E10 Motor is an integral component of the LT15 and LT15W Wood-Mizer® sawmills, primarily responsible for powering the saw blade. It is designed to provide the necessary power for cutting wood products. The manual details the motor's integration with a starter assembly, throttle/clutch assembly, and various control components, all working in concert to facilitate the operation of the sawmill. The motor is available in different electrical configurations to suit various power supplies, including 208-240V, 380-500V, and 575V three-phase electric motors.

Important Technical Specifications:

The manual lists several key technical specifications and part numbers for the E10 Motor and its associated assemblies:

  • Motor Modules:

    • MOTOR MODULE, 10HP 3-PHASE 208-240V ELECTRIC MOTOR (Part # 017954)
    • MOTOR MODULE, 10HP 3-PHASE 380-500V ELECTRIC MOTOR (Part # 017955)
    • MOTOR ASSEMBLY, LT15 10HP 3-PHASE ELECTRIC (Part # 034812)
    • MOTOR ASSEMBLY, LT15 10HP 575 VOLT ELECTRIC (Part # 017957)
    • Individual motor components include 10HP 3-phase Lincoln motors (Part # 034903 for 208-240V/380-500V and 034907 for 575V).
  • Control Assemblies (for LT15 E10 3-Phase):

    • 240V Control Assembly (Part # 053713)
    • 460V Control Assembly (Part # 053738)
    • 230V Control Assembly (Part # 052816)
    • 460V Control Assembly (Part # 052817)
    • 575V Control Assembly (Part # 052818)
  • Starter Assemblies:

    • STARTER ASSEMBLY, 10HP 3-PHASE 50/60HZ ELECTRIC MOTOR (Part # 088280-4)
    • Manual Motor Starters:
      • 24-32A (LT15E10L) (Part # 088264)
      • 13-18A (LT15E10H) (Part # 090561)
      • 9-14A (LT15E10C) (Part # 090430)
  • Key Components and Hardware:

    • Enclosures for control boxes (e.g., Part # 053584 for 16"x16"x8" Custom, Part # 055348 for LT15 Control Box).
    • Various bolts, nuts, washers, brackets, and clamps are specified with their respective part numbers and quantities. For example, Bolt, 5/16-18 x 3/4 Hex Head (F05006-5), Nut, 5/16-18 Keps (F05010-20), Washer, 5/16 Flat (F05011-16).
    • Harness Assemblies for blade motors (e.g., Part # 053714 for 240V, Part # 053739 for 460V).
    • Throttle/Clutch Assembly components include a knob (P04211), handle (016487), bushings (016486, P737), block weldment (065572), linkage assembly (034605), and brake/clutch assembly (065874).
    • The manual also lists specific contactors (LC1 D09 B7 - 084305, LC1 D18 B7 - 084306), modular switches (088278), transformers (090562), and various electrical connectors and decals.

Usage Features:

The E10 Motor is designed for straightforward operation with clear safety protocols.

  • Starting the Motor: The process involves turning the main switch on the starter box to the "ON" position, followed by pressing the green "START" button.
  • Motor Shutoff: To stop the motor, users must press the red "STOP" button on the starter box and then turn the main switch to the "OFF" position.
  • Safety First: A critical usage feature is the emphasis on safety. Before starting, operators must ensure the blade is disengaged and all persons are clear of the blade's path to prevent serious injury or death. The manual includes multiple warning decals (e.g., Electrical Hazard Danger S20061, Eye/Ear Protection Warning S11753, Read Manual Warning 016402) to reinforce safety practices.
  • Proposition 65 Warnings: The manual includes California Proposition 65 warnings regarding exposure to gas/diesel engine exhaust and wood dust, advising users to operate in well-ventilated areas, vent exhaust outside if enclosed, avoid modifying the exhaust system, and use dust masks or other safeguards when machining wood.

Maintenance Features:

Maintenance of the E10 Motor is crucial for its longevity and safe operation. The manual outlines general maintenance guidelines and specific safety precautions.

  • Manufacturer's Manuals: Users are directed to refer to the equipment manufacturer's manuals for maintenance intervals and procedures, especially for dusty conditions. This manual provides supplementary information or procedures to be performed at different time intervals.
  • Sawdust Removal: A key maintenance task is to clean sawdust from all guards, vents, control boxes, or any area where sawdust may gather after every shift to prevent fire hazards.
  • Electrical Safety: All electrical installation, service, and maintenance work must be performed by a qualified electrician in accordance with applicable electrical codes. Hazardous voltage is present inside the disconnect box, starter box, and at the motor, necessitating disconnection and lockout of the power supply before servicing. All electrical component covers must remain closed and securely fastened during mill operation.
  • Rotating Parts: Caution is advised regarding rotating shafts, pulleys, and fans. Operators must maintain a safe distance and ensure loose clothing or long hair does not engage rotating members.
  • Blade Removal: The blade must be removed before performing any engine service to prevent serious injury.
  • Personal Protective Equipment (PPE): Proper safety equipment, including eye protection, breathing protection, hand protection, and foot protection, must be worn when performing service functions.
  • Maintenance Intervals: The manual uses a symbol (0) to identify maintenance procedures based on hours of operation, with "AR" signifying "as required" procedures.
  • Throttle/Clutch Assembly Maintenance: Specific components like the clutch handle (016487) have been modified (Rev. E6.01) to eliminate pinch points, and the brake/clutch assembly (034603) has been improved for durability (Rev. E7.01), with spring mount hardware changes to provide more freedom of movement and prevent binding. These revisions highlight ongoing improvements to ease maintenance and enhance reliability.

Wood-mizer E10 Specifications

General IconGeneral
BrandWood-mizer
ModelE10
CategorySaw
LanguageEnglish

Related product manuals