Do you have a question about the WOPET FT70 Plus and is the answer not in the manual?
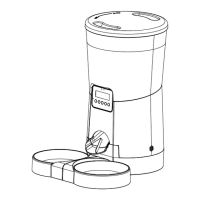
Explains the clock indicator and time setting icon on the device display.
Details the display of meal numbers and timing/portion information.
Describes the manual feed, recording, and other control button indicators on the display.
Covers the child lock status indicator and battery level icon on the device.
Details the function of the Set/Save/Unlock button for saving settings and locking/unlocking.
Explains the Return/Cancel button for navigating steps and returning to the interface.
Describes the function of the Number Increase and Decrease buttons for adjusting values.
Outlines the function of the Manual feed and Recording buttons for device operation.
Details the child lock feature, automatic locking, and unlocking procedure.
Explains the clock indicator's flashing behavior and its relation to time setting.
Describes the display of local time in 24-hour format and the number of meals set.
Explains the battery level indicator, its lighting, and low battery indication.
Explains the initial display state when powered on, showing a flashing clock icon.
Procedure to set the device's current time using the interface buttons.
Steps to set up the first meal, including selecting the meal number.
Procedure to set the feeding time and portion size for the first meal.
Steps to set up the second meal, following the pattern of the first meal.
Procedure to set up other meals and repeat the setting process if needed.
Steps to return to the main interface after setting up meals.
Procedure to modify local time, feeding time, and portion settings.
How to lock the screen to prevent accidental operation and the automatic locking feature.
Procedure to unlock the screen using a button press and hold.
Instructions for recording a voice message for the pet, including duration and saving.
How to manually feed the pet one portion using the manual feed button.
Steps to reset the device to its factory default settings using specific button combinations.
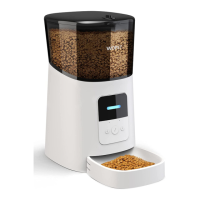
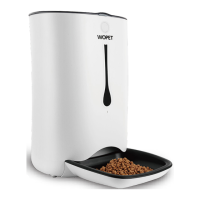
This document is a quick operation guide for the Wopet Automatic Pet Feeder, Model: FT70 Plus. It provides an overview of the display, buttons, screen panel, and step-by-step instructions for setting up and operating the device.
The Wopet Automatic Pet Feeder is designed to automatically dispense food to pets. It allows users to set specific feeding times and portion sizes, record voice messages for meal calls, and manually dispense food. The device features a child lock mode to prevent accidental changes to settings.
1. Setting Current Time (Step 1): * When powered on, the clock icon flashes. * Unlock the screen by pressing and holding the "Set/Save/Unlock" button for 2 seconds. * Press the "Time Setting Icon" button to enter time setting mode. * Use the "Number Increase/Decrease" buttons to adjust the current time. * Press the "Set/Save/Unlock" button to save the time. * The manual provides a 12-hour to 24-hour clock conversion chart for reference.
2. Setting First Meal (Step 2): * Press the "Number Decrease" button until "1" flashes, indicating the first meal setting. * Press the "Time Setting Icon" button to set the feeding time for the first meal. * Use the "Number Increase/Decrease" buttons to adjust each digit of the time. * Press the "Set/Save/Unlock" button after setting each digit to move to the next. * After setting the time, press the "Timing/Portions" button to set the portion size. * Use the "Number Increase/Decrease" buttons to adjust the portion size. * Press the "Set/Save/Unlock" button to save the portion setting. * To modify settings, press the "Set/Save/Unlock" button again.
3. Setting Other Meals (Step 3): * To set subsequent meals (2 through 6), press the "Number Decrease" button until the desired meal number flashes. * Follow the same procedure as setting the first meal to configure feeding time and portion size for each additional meal. * To modify settings for any meal, press the "Number Increase/Decrease" buttons to navigate to the flashing meal number, then press the "Set/Save/Unlock" button.
4. Returning to Interface (Step 4): * After setting up, press the "Return/Cancel" button to return to the main interface. * If a meal portion is set to 0, the corresponding meal number will not be displayed on the main interface. * From the main interface, pressing the "Set/Save/Unlock" button allows modification of local time, feeding times, and portions.
5. Lock & Unlock (Step 5): * Lock: From the interface, press the "Return/Cancel" button, then press and hold the "Set/Save/Unlock" button for 2 seconds to lock the screen. The child lock icon will appear. The device automatically locks after 2 minutes of inactivity. * Unlock: Press and hold the "Set/Save/Unlock" button for 2 seconds to unlock the screen. The child lock icon will disappear.
6. Recording (Step 6): * Ensure the device is in "Unlocking Status." * Press and hold the "Recording" button for 3 seconds. A beep will sound, indicating the start of recording (maximum 10 seconds). * A double beep will confirm that the recording has been saved.
7. Manual Feed (Step 7): * Ensure the device is in "Unlocking Status." * Press the "Manual" button to dispense 1 portion of food immediately.
1. Reset to Factory Default (Step 8): * Ensure the device is in "Unlocking Status." * Press and hold the "Recording" button and the "Return/Cancel" button simultaneously for 3 seconds. * A beep will sound, indicating that the device has been reset to its factory default settings.
2. Battery Level Indicator: * The battery level icon lights up when the device is powered only by batteries. * It turns red when the battery level is low, signaling that the batteries need to be replaced or the device needs to be connected to an adapter.
| Brand | WOPET |
|---|---|
| Model | FT70 Plus |
| Category | Pet Care Product |
| Language | English |