SYMBOLS OPERATING INSTRUCTIONS
1. ASSEMBLY OF THE MAIN HANDLE AND
SHAFT (See A)
Loosen the upper locking knob (3) clockwise.
Insert the telescopic shaft into the main handle,
until a click sound is heard (See A).
Tighten the upper locking knob anti-clockwise.
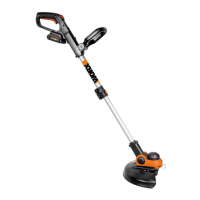
2. ASSEMBLY OF THE SAFETY GUARD
Fix the safety guard to the trimmer head making
sure the sides are located into the grooves on
the trimmer head (See B).
Secure the safety guard onto the trimmer head
with the screw provided (on the inside of the
guard).
3. ASSEMBLY OF THE SPACER GUARD
Locate and snap fit the pivot bracket of spacer
guard into the hole of trimmer head (See C).
When not required, rotate the spacer guard to
the underside opposite side of the safety guard
and clip into the two locations.
4. ADJUSTMENT OF THE TELESCOPIC
SHAFT (See D)
Unscrew the lower locking knob (4) in the
direction indicated to unlock.
Adjust the length of the telescopic shaft to the
most comfortable length.
Tighten the lower locking knob.
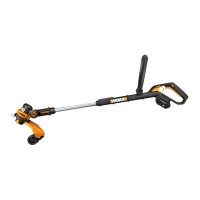
5. MAIN HANDLE ROTATION (See E)
Unscrew the upper locking knob (3) in the direc-
tion indicated to unlock.
Adjust the angle of the main handle to be clock-
wise 90 degree max.
Turn the upper locking knob in the opposite di-
rection to lock.
6. ADJUSTMENT OF AUXILIARY HANDLE
Pull up the auxiliary handle locking lever (5).
Hold the lever and rotate the auxiliary handle to the
most comfortable and balanced position (See F).
Release the lever, your auxiliary handle has
been locked.
7. ADJUSTMENT OF THE TRIMMER HEAD
ANGLE TO THE SHAFT
Use both of your hands, one grips the shaft,
another on the head, then apply adequate
Read the manual
Warning
Double insulation
Wear eye protection
Wear ear protection
To avoid possibility of electric
shock, do not use in damp or wet
conditions.
Switch off! Remove plug from mains
before adjusting, cleaning or if cable
is entangled or damaged.
Keep all other people, including
children, pets and bystanders outside
the 15 meters hazard zone, stop
the trimmer immediately if you are
approached.
 Loading...