OPERATING INSTRUCTIONS
NOTE: Before using the tool, read the
instruction book carefully.
INTENDED USE
The machine is intended for routing grooves,
edges, profiles and elongated holes as well
as for copy routing in wood, plastic and light
building materials, while resting firmly on the
workpiece.
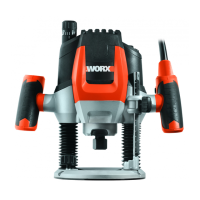
1. INSERT THE ROUTER BIT
Router bit selection
Depending on processing and application,
router bits are available in many different
designs and qualities:
Router bits made of high-speed steel
(HSS) is suitable for the machining of soft
materials, e. g. softwood and plastic.
Carbide tipped router bits (HM) is
particularly suitable for hard and abrasive
materials, e. g. hard wood and aluminum.
WARNING:Use only routing tools
with an allowable speed matching
at least the highest no load speed of
the machine. The shank diameter of the
router bit must correspond with the
rated diameter of the collet.
Inserting router bits (See Fig. A)
Before any work on the machine
itself, disconnect the mains plug. It is
recommended to wear protective gloves
when inserting or replacing router bits.
Press spindle lock button (14) and keep
depressed. If required, turn the spindle by
hand until the lock engages.
Press the spindle lock button only when at a
standstill.
Insert router bit. The shank of the router
bit must be inserted at least 20mm (shank
length).
Tighten the tightening nut (13) with the
spanner (19) (size 22mm). Release the spindle
lock button.
Do not tighten the tightening nut
of the collet without a router bit
inserted.
HOW TO FIT THE 8mm COLLET (See a)
This router is supplied with a 8mm collet as an
accessory.
To fit the 8mm collet (b) simply slide it into the
12mm collet (a) fitted to the collet nut.
The 8mm collet has a flange coller to ensure
insertion to correct depth.
NOTE: 1. Do not attempt to remove the
12mm collet from the collet nut.
2. Always wear safety gloves when
changing the router bits.
2. MOUNTING THE EXTRACTION
ADAPTER (See Fig. B)
To connect the vacuum cleaner via a suction
hose, you must fasten dust adapter (20) to
base plate (10) with both screws and nuts (25).
When mounting the extraction
adapter, ensure correct mounting
position!
• For dust extraction, the vacuum hose can
be connected directly to the extraction
adapter.
• Clean the dust adapter (20) regularly to
ensure optimum dust extraction at all
times.
• The vacuum cleaner must be suitable for
the material to be worked.
• When vacuuming dry dust that is especially
detrimental to health or carcinogenic, use a
special vacuum cleaner.
3. ON AND OFF SWITCH
a) LOCK-ON SWITCH
Depress to start and release to stop your tool.
Depress on/off switch (18) then lock on button
(16), release on/off switch first and lock-on
button second. Your switch is now locked on
for continuous use. To switch off your tool just
depress and release the on/off switch.
b) LOCK-OFF SWITCH
For starting operation of the machine, actuate
the lock-off button (12) first, then press and
hold the On/Off switch (18) afterwards. To
switch off the machine, release the On/Off
switch (16).
For safety reasons the On/Off switch
of the machine cannot be locked; it
must remain pressed during the entire
operation.