Base
Hex Screw
Hex Key
Adjuster Body
X Mark
X
CLOCKWISE to TIGHTEN
Fig. (6.3)
Once the A-Pole is on the shaft – align both the
Static/Spin screws with the ‘X-Marks’ on the base
and tighten the 2 screws by turning the hex key
clockwise.
®
LEADERS IN POLE & AERIAL FITNESS
Once the A-Pole and B-Pole (and any additional extensions) are connected, insert the Top Insert into the
B-Pole or last extension used, then slide the upper dome onto the top insert.
BE CAREFUL WHEN YOU LIFT THE ASSEMBLED POLE, TO INSTALL, THAT THE UPPER DOME DOES NOT
FALL OFF, AS IT IS LIFTED INTO POSITION. TWO PEOPLE ARE RECOMMENDED FOR 1
ST
INSTALLATION
Fig. (7.1)
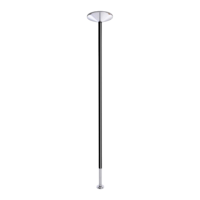
Inserting the top insert and upper dome
A Pole
Upper Dome
B Pole Extension Top Insert
CAUTION: DO NOT FORGET: If you are using extensions, you can ONLY use a 180mm X-JOINT
(200mm in the case of 40mm & Silicone poles) with a 125mm extension and make sure the
ARROW is always pointing towards the ceiling.
Installing Xpert
Make sure that the base of the pole is at the centre point of your dance area – as explained in ‘Finding a suitable exercise
& dance area’ [Fig 3.1- 3.4] and under the selected Joist [Fig 2.4].
CAUTION: When assembled, the pole is heavy and at full height, NOT easy to handle. It is
therefore MANDATORY/COMPULSORY that 2 people install the pole – i.e. 2 people should lift it
into position and 1 person hold the pole while the other rotates/expands the height adjuster.
10
Copyright© Vertical Leisure Ltd. 2019 Version 2.1 All rights reserved.