For connecting active subwoofers
Non volume controlled output. For TAPE
Volume controlled output, from the preamp.
Normally connected to AMP IN. Can be used for
connecting other power amps
Input to the power amp. Is normally connected to
Switch between MM and MC.
Remember to connect the ground screw
from the LP player
19 PHONO IN
the amplifier accordingly
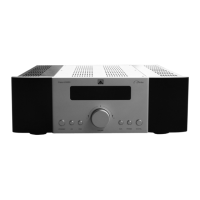
Remote control
To set the product in standby mode, without
Lower the backlight in the display
”MUTE” in the display.
23 OPERATION
MODE
amplifier into the corresponding operating
automatically set the most suitable mode.
Class A mode uses a higher nominal
quiescent current through the output
stage, which in turn produces more heat
dissipation. The output transistors heat
the cooling sink, and the temperature is
measured by a sensor, feeding the
information back to the output stage, thus
regulating the bias.
The regulation takes a few minutes before
it becomes completely stable. During this
time high listening volumes should be
avoided.
24 INPUT