EasyManua.ls Logo

Yakima BoatLoader EVO User Manual

Yakima BoatLoader EVO
6 pages
To Next Page IconTo Next Page
Page #1 background imageLoading...
Page #1 background image
Instruction #1035869A-1/6
BoatLoader EVO
$POUFOUTt"DDFTTPJSFTt"DDFTPSJPT
BoatLoader EVO (1X)
RoundBar bushing (2X)
Manchon pour barre ronde (x 2)
buje para RoundBar (2X)
RoundBar clamp (1X)
Bride pour barre ronde (x 1)
abrazadera para RoundBar (1X)
security wrench (1X)
clé de sûreté (x 1)
llave de seguridad (1X)
1
REMOVE the end
cap by carefully
prying it from the
crossbar.
ENLEVER délicatement
en tirant le bouchon
se trouvant dans le
bout de la barre.
EXTRAIGA con
cuidado el capuchón
del extremo del
travesaño.
DECIDE WHICH BAR WILL HOUSE
THE EXTENSION. We recommend
using the front crossbar.
DÉCIDER DANS QUELLE BARRE LE BRAS SERA MONTÉ.
Nous recommandons d’utiliser la barre transversale avant.
DECIDA EN QUÉ TRAVESAÑO INSTALARÁ LA
EXTENSIÓN. Recomendamos el travesaño delantero.
Note: Go to page 4 for RoundBar installation.
Remarque : passer à la
page 4 pour le montage
sur les barres RoundBar.
Vaya a la página 4 para
la instalación en los
travesaños RoundBar.
2
There must be at least 1.5” of
crossbar to install the extension.
Loosen and slide your crossbar
if necessary. %POPUGPSHFUUP
UJHIUFOUIFUPXFSTBHBJO
1.5” (4 cm) Min.
4cm (1,5po) min.
1.5" (4 cm) mín.
1.5” (4 cm) Min.
4cm (1,5po) min.
1.5" (4 cm) mín.
Pour pouvoir poser le bras, la barre
transversale doit dépasser le pied d’au
moins 4 cm (1,5 po). Au besoin, desserrer
et faire coulisser la barre transversale. Ne
QBTPVCMJFSEFSFTTFSSFSMFTQJFETFOTVJUF
Debe haber por lo menos 1,5" (4cm)
de travesaño libre para instalar
la extensión. Afloje y deslice el
travesaño si es necesario. `/PPMWJEF
BKVTUBSMPTTPQPSUFTOVFWBNFOUF
Q TOWER USERS: Do not loosen your towers! If your crossbars are
too short, you could install longer crossbars, or slide your existing
bars off center. In any case, you must completely reinstall your
system using the instructions, and the measurements specific to your
vehicle. If you have lost your instructions, see your Yakima dealer.
SI VOUS AVEZ DES PIEDS Q: ne pas desserrer les pieds! Si les barres transversales
sont trop courtes, il est possible d’en poser des plus longues ou de décentrer la
barre déjà en place. D’une façon ou de l’autre, il faudra réinstaller le porte-bagages
complètement en suivant les instructions et les mesures spécifiques à votre véhicule.
Si vous n’avez plus les instructions d’origine, consulter votre dépositaire Yakima.
USUARIOS DE SOPORTES Q TOWERS: ¡No aflojen los soportes! Si los travesaños
son demasiado cortos, puede instalar otros más largos, o desplazar del centro los
que tiene. En todo caso tendrá que reinstalar completamente el sistema siguiendo
las instrucciones y las medidas específicas para su vehículo. Si ha perdido las
instrucciones, comuníquese con su concesionario Yakima.
*/45"--"5*0/t.0/5"(&t*/45"-"$*»/
80 lbs. Max. / 36.3 kg
Works only with Yakima CoreBar and RoundBar.
=
Seulement compatible
avec les barres CoreBar et
RoundBar de Yakima.
Compatible solamente con
los travesaños CoreBar y
RoundBar de Yakima.
Question and Answer IconNeed help?

Do you have a question about the Yakima BoatLoader EVO and is the answer not in the manual?

Yakima BoatLoader EVO Specifications

General IconGeneral
BrandYakima
ModelBoatLoader EVO
CategoryAutomobile Accessories
LanguageEnglish

Summary

Installation

Select Crossbar for Extension

Choose the crossbar to mount the extension. Front crossbar is recommended.

Check Crossbar Clearance

Ensure at least 1.5 inches (4 cm) of crossbar is available for extension installation.

Q Tower User Warning

Important safety advice for Q Tower users regarding crossbar length and tower adjustment.

Installation Steps

Insert Extension into Crossbar

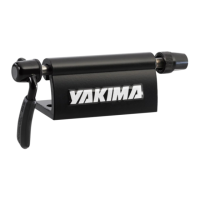
Loosen knob and bolt, then carefully insert the extension into the crossbar.

Secure Clamp to Crossbar

Press the disc until the clamp covers the crossbar end, with the knob facing down.

Tighten Clamp Bolt

Use the security wrench to tighten the clamp bolt to 5 Nm.

Extend and Secure Bar for Loading

Extend the bar by loosening the knob, then tighten it securely.

Safe Bar Extension Technique

Avoid extending the bar with a quick, throwing motion for safety.

Protect Vehicle During Loading

Use a towel to protect your vehicle where the boat will make contact.

Boat Loading Procedure

Load Boat Onto Vehicle

Lean the boat against the EVO and carefully maneuver it onto the vehicle.

Retract and Secure Extension

Loosen knob, retract extension, and re-tighten knob securely.

Secure Boat to Racks

Center the boat and follow accessory instructions to secure it to the racks.

Secure Load for Transport

Secure the load to the vehicle ends and ensure the extension is fully retracted and tightened.

RoundBar Clamp Installation

Remove Rubber Inserts

Flex tabs and remove rubber inserts from the clamp.

Remove Knob and Bolt

Remove the knob and carriage bolt from the clamp.

Remove CoreBar Clamp

Remove the clamp designed for CoreBar.

Install Hardware onto RoundBar Clamp

Attach hardware removed in step 2 to the RoundBar clamp.

Slide on RoundBar Clamp

Slide the RoundBar clamp onto the extension.

Install RoundBar Bushings

Install RoundBar bushings, orienting tabs correctly.

Removal

Loosen Clamp and Slide Out Extension

Loosen clamp with security wrench and slide the extension out.

Replace End Cap

Reinstall the end cap after removing the extension.

Store BoatLoader EVO

Store the BoatLoader EVO safely when not in use.

Important Safety Warnings

Rack Installation and Security

Ensure proper installation and security of roof racks to prevent accidents.

Load Securing and Distribution

Properly secure and distribute loads for safe travel, minding weight limits.

Vehicle Handling and Speed

Adjust driving speed and style based on load, road, and weather conditions.

Maintenance and Part Replacement

Maintain racks with approved cleaners and use only original spare parts.

Related product manuals