EasyManua.ls Logo

Yakima Tracks User Manual

Yakima Tracks
9 pages
To Next Page IconTo Next Page
Page #1 background imageLoading...
Page #1 background image
Tracks
1030988F-1/9
TOOLS REQUIRED:
adjustable end wrench
1/2” wrench
1/8” Allen wrench
center punch
hammer
electric drill
1/8” drill bit
9/32” drill bit
touch-up paint
Place both tracks on the
roof. Carefully select their
locations, making sure
they are aligned with each
other and symmetrical on
the vehicle. Carefully hold
the tracks in place with
masking tape.
Remove both
tracks.
ATTENTION INSTALLERS:
If you will be installing tracks on several vehicles,
call for information on industrial grade installation tools.
YAKIMA CUSTOMER SERVICE: 888-925-4621
INSTRUCTION PART #1030988 REV.F
Read yellow caution
page before you begin.
Clean
vehicle’s
roof before
you begin.
DO NOT DRILL DEEPER THAN 1/4”. Use a drill
stop to prevent drilling through vehicle’s interior
liner. If you do not have a stop, use tape and
mark bit 1/4” from tip.
Wear goggles
when drilling!
For both tracks, first,
drill 1/8” pilot holes.
Next, drill
9/32” hole.
Carefully blow
away debris.
Seal edges
of holes with
enamel base
paint. Allow
to dry.
Attach nut with
washer onto
Plusnut® tool.
Punch center of marks
to prepare for drilling.
Attach
soft rubber
washers onto
Plusnuts®.
Note: Washer
should be
flat against
Plusnut® head.
Attach Plusnut®
and washer
to tool
as shown.
Track base is loose and can slide.
Be sure it is aligned to track.
Outline rear holes through
both tracks.
Question and Answer IconNeed help?

Do you have a question about the Yakima Tracks and is the answer not in the manual?

Yakima Tracks Specifications

General IconGeneral
BrandYakima
ModelTracks
CategoryAutomobile Accessories
LanguageEnglish

Summary

Initial Preparation and Hole Marking

Clean Vehicle Roof

Prepare the vehicle's roof surface by cleaning it thoroughly before starting the installation.

Position and Align Tracks

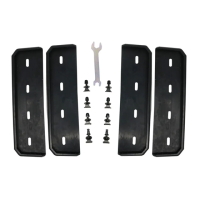
Carefully place and align both tracks on the vehicle roof, securing them with masking tape.

Outline and Mark Holes

Outline rear hole positions and mark front hole locations accurately for drilling.

Drilling and Fastener Installation

Prepare and Drill Holes

Punch center marks, drill pilot holes (1/8"), then main holes (9/32"), using drill stops.

Install Plusnuts

Attach soft rubber washers onto Plusnuts and install them into the drilled holes.

Seal Drilled Holes

Apply touch-up paint to seal the edges of drilled holes to prevent corrosion.

Final Track Attachment and Alignment

Secure Tracks and Install Bolts

Place tracks on roof, align holes, and install bolts loosely into Plusnuts.

Verify Track Alignment

Measure diagonally to ensure tracks are square and symmetrical on the vehicle.

Install Remaining Fasteners

Install Plusnuts and bolts for all remaining holes, planning usage and avoiding skips.

Sealing and Tower Mounting

Apply Sealant and Finalize

Apply silicone sealant to Plusnut openings and attach end caps before mounting towers.

Attach Tower Hardware

Slide nut plates into the track and attach bolts with hard washers into Plusnuts.

Related product manuals