EasyManua.ls Logo

Yamaha Clavinova CVP-403 User Manual

Yamaha Clavinova CVP-403
2 pages
To Next Page IconTo Next Page
Page #1 background imageLoading...
Page #1 background image
1
4
2
3
Press the [START/STOP] button to start installation.
Go on to step 4. (Executing the installation).
Press the [BREAK] button to delete the data the upgrade
data in the USB device.
Go on to step 5. (Deleting the upgrade data).
CVP-409/407/405/403/401, CGP-1000 Installation Procedure
Connecting the USB device
Installing the upgrade program
Caution: Make sure that the USB device is connected properly to the
terminal. Do not try to force an incorrect connection; doing so
may damage the terminal.
Caution: Do not turn off the power or remove the USB media during this operation.
1) Download the Zip file.
2) Extract the six files included in the Zip file.
3) Insert the USB device into your computer.
4) Copy the extracted files into the root directory of the USB device.
Connect the USB device containing the appropriate upgrade data
to the USB TO DEVICE terminal on the instrument.
Simultaneously hold down the [START/STOP] button in the STYLE CONTROL section and turn on
the power.
Keep holding down the [START/STOP] button until the following display is shown.
After a few moments, the following display appears.
Press [START/STOP] button to start the
installation.
When the installation is completed, the
following display appears.
Turn off the power switch on the instrument.
Downloading the firmware
Executing the installation
Question and Answer IconNeed help?

Do you have a question about the Yamaha Clavinova CVP-403 and is the answer not in the manual?

Yamaha Clavinova CVP-403 Specifications

General IconGeneral
BrandYamaha
ModelClavinova CVP-403
CategorySynthesizer
LanguageEnglish

Summary

Firmware Download and USB Preparation

Download and Extract Firmware

Download the Zip file and extract its six firmware files.

Prepare USB Device

Insert USB into computer and copy extracted files to its root directory.

Connecting the USB Device

Installing the Upgrade Program

Initiate Installation Mode

Hold [START/STOP] and turn on power until "System Booter" appears.

Start Installation Process

Press [START/STOP] to begin the installation.

Option to Delete Program

Press [BREAK] button to delete the upgrade data.

Executing the Installation

Installation Progress

Press [START/STOP] to start; wait for installation to complete.

Installation Completion

Confirmation display shows update is complete; turn off power.

Deleting the Upgrade Data

Initiate Data Deletion

Press [BREAK] to display the deletion prompt.

Confirm Data Deletion

Press [START/STOP] to confirm deletion of upgrade data from USB.

Data Deletion Completion

Confirmation display shows data deleted; turn off power and remove USB.

Confirming the Version Number

Navigate to Version Information

Access the UTILITY menu and select the OWNER tab.

Verify Program Version

Use version buttons to check if the program version is correct.

Troubleshooting Common Issues

Power Loss or USB Removal

Reinstall firmware from the beginning if interrupted.

Installation Errors

Check USB connection, cleanliness, and data integrity.
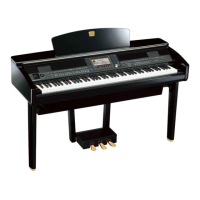
Related product manuals