Do you have a question about the Yard force EasyMow 260B and is the answer not in the manual?
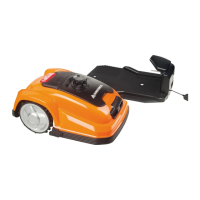
Overview of individual parts of the robotic mower, including buttons and ports.
Step-by-step instructions for setting up the robotic mower.
General advice for preparing the lawn and planning the installation.
Instructions for cutting the lawn to the correct height before installation.
Details on obstacles and their detection by the mower's sensors.
Guidance on clearing small rocks and stones from the lawn.
Information on navigating slopes and boundary wire placement on inclines.
How to protect trees and their roots from the mower.
Advice on handling driveways and roads for the mower's operation.
Recommendations for leveling lawns or excluding uneven areas.
Guidelines for selecting the optimal location for the docking station.
Instructions on how to lay and secure the boundary wire.
Methods for excluding flowerbeds using boundary wire.
Safety precautions and exclusion methods for ponds and pools.
Requirements for creating a narrow passage for the mower.
How to connect the boundary wire to the docking station.
How to set the signal for interference avoidance with neighbors.
Confirmation of correct docking and charging procedures.
List of items included in the mower's package.
Overview of the buttons and their functions on the control panel.
How to command the mower to return to its charging base.
Procedure to immediately halt the mower's operation.
Instructions for adjusting the mower's cutting height.
How to initiate the mowing process.
General guidance on cleaning and maintaining the robotic mower.
Information regarding the mower's Li-ion battery lifespan.
Instructions for preparing and storing the mower during winter.
Steps to take before using the mower after winter storage.
How to clean the exterior of the robotic mower.
Guidelines for environmentally responsible disposal of the product.
Instructions for cleaning the mower's underside and blades.
How to clean contact points for efficient charging.
Guidance on blade maintenance and replacement.
Information on available spare parts and ordering.
How to obtain software updates for the machine.
Solutions for issues preventing the mower from docking.
Diagnosing and fixing issues causing the mower to run in circles.
Troubleshooting causes of excessive noise from the mower.
Resolving issues where the mower fails to start or returns to dock.
Interpreting LED signals for docking station status.
Common problems and solutions related to charging the mower.
Common problems and solutions encountered during mowing operations.
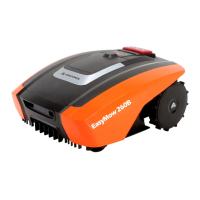
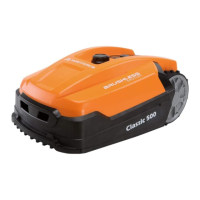
The Yard Force Easymow 260B is a robotic mower designed to automate lawn maintenance, offering convenience and efficiency for homeowners. It is engineered to navigate and cut grass within a defined boundary, returning to its docking station for charging.
The primary function of the Easymow 260B is autonomous lawn mowing. It operates by following a boundary wire laid around the perimeter of the lawn, ensuring it stays within the designated cutting area. Equipped with collision sensors, the mower detects obstacles such as walls, fences, and garden furniture that are higher than 100 mm, stopping, backing up, and changing direction to avoid them. For optimal performance and to protect the mower and obstacles, it is recommended to lay the boundary wire such that the mower is not more than 20 cm away from the wire at any point in the mowing area.
The mower can handle slopes up to a maximum of 30% incline or decline. However, the boundary wire should not be perpendicular to an incline of more than 10%, and a strip of at least 2 meters should be left between a slope of 10% or steeper and the boundary wire to prevent the mower from crossing the wire, especially on wet ground.
For areas with flowerbeds, the boundary wire can be used to exclude them from the cutting area. There are two methods: either keep parallel wires more than 5 cm apart, treating the flowerbed as an ordinary obstacle, or keep them less than 5 cm apart, allowing the mower to cross them if an additional obstacle is placed on the boundary wire around the flowerbed.
When navigating corridors, it is crucial that the corridor is at least 2 meters wide and a maximum of 8 meters long to ensure the mower can traverse it successfully. For driveways that cross the lawn, if elevated, it's best to keep them outside the boundary wire with a safety distance of 40 cm. If the driveway and lawn are at the same level, a corridor can be created with the boundary wire to allow the mower to cross and reach an opposite lawn section.
The docking station, which serves as the mower's charging point, requires a permanent connection to the mains. It should be placed on an even, flat surface, away from ponds, pools, or stairs, and in a shaded location to benefit battery charging. To ensure smooth return to the docking station, 1.5 meters of straight wire should be left in front and 30 cm to the side facing the cutting area. The docking station should not be placed too close to a slope or have an inclination exceeding 5 degrees.
The mower uses a boundary wire to define its working area. This wire is secured to the ground with pegs, with a recommended distance of about 80 cm between pegs in straight lines. The wire connects to the docking station, with one end going to the left (front) connector and the other to the right (back) connector. The system includes a signal selection feature (S1 or S2) to prevent interference with neighbors using similar robotic mowers, requiring a distance of at least 0.5 meters between boundary wires and 10 meters between docking stations.
Before initial use, the lawn should be pre-cut to a height of 45 mm. Small rocks and stones (less than 100 mm high) with round or sloped edges should be cleared to prevent the mower from getting stuck or damaging its blades. Exposed tree roots lower than 100 mm should also be excluded with boundary wire to protect the tree, blades, or rear wheels. Uneven lawn surfaces should be leveled or excluded.
The mower is operated via a control panel. It features a "STOP" button for immediate halt, a "Start" button to initiate mowing, and a "Home" button to send the mower back to the docking station. Users can select working times using dedicated buttons. The cutting height can be adjusted by rotating a dial on top of the machine, with a range from 20 mm to 55 mm.
After initial installation, the mower will remain in the docking station until the battery is fully charged. Once docked, a flashing symbol indicates charging. The system confirms successful boundary wire connection and signal status via an LED indicator on the charging station.
Regular maintenance is crucial for extending the service life of the Easymow 260B. This includes checking and cleaning the mower regularly. A dry brush, damp cloth, or sharpened wooden piece is recommended for cleaning; flushing water should never be used.
The underside of the mower, including the blade disc and frame, should be cleaned with a soft brush or damp cloth. The blade disc should rotate freely, and blades should turn on their pivots without obstruction from grass. The contact pins on the mower and charging strips on the docking station should be cleaned with wire wool, metal cleaner, or fine-grade emery paper to ensure efficient charging.
The mower's three blades are fixed to the blade disk. Weekly inspection of the blades and fixing screws is advised. Blades are double-edged and can be flipped when one side becomes blunt. It is recommended to replace all three blades at the same time for optimal performance, using only manufacturer-recommended spare parts.
For winter storage, the mower, docking station, and power supply should be kept in a dry place, preferably indoors. The battery should be fully recharged, the main power switch set to "OFF," and the mower thoroughly cleaned. The power supply should be unplugged from the mains outlet and disconnected from the docking station. The boundary wire can remain outside but should be protected against corrosion with water-free grease or sealing tape.
Before spring use, the charging contacts on both the mower and docking station should be cleaned with fine abrasion paper or a brass brush to ensure optimal charging efficiency.
The device is designed for easy troubleshooting, with indicators for common issues such as incorrect wire connection, boundary wire breaks, and docking problems. The manual provides guidance on corrective actions for these issues, as well as for problems related to mowing, such as the mower running in circles, being noisy, or failing to start. Software updates, if needed, can be handled by contacting customer service.
| Type | Robotic Lawn Mower |
|---|---|
| Grass Box Capacity | N/A (Mulching) |
| Power Source | Battery |
| Battery Capacity | 2 Ah |
| Run Time | 60 minutes |