This document is the original instruction manual for the YARD FORCE ProRider E559 56V Ride-On Lawnmower. It provides comprehensive information on the device's function, technical specifications, usage, and maintenance.
Function Description
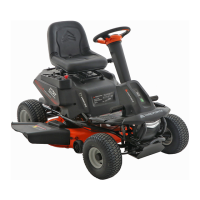
The YARD FORCE ProRider E559 is a 56V ride-on lawnmower designed for cutting grass. It is intended for use in private areas closed to traffic and is not approved for public roads or heavy-duty commercial/industrial applications. The machine is designed to be operated by a single user, with safety features such as a safety interlock system that shuts off the blades if the operator leaves the seat while the blades are running. It offers both forward and reverse mowing capabilities, with a specific "Reverse Mode Button" required to engage blades while backing up. The mower is equipped with a mulch cover for finer clippings and can also be configured for side discharge.
Important Technical Specifications
Dimensions:
- Assembled Length: 1635 mm
- Assembled Height: 1168 mm
- Assembled Width Without Discharge Deflector: 1035 mm
- Net Weight: 210 kg
Mower & Deck:
- Pneumatic Tyre Sizes: 380 x 153 x 153mm Front, 406 x 165 x 203 Rear
- Cutting Width: 96 cm
- Blade Cutting Diameter: 49 cm
- Number Of Blades: 2
- Number Of Deck Wheels: 2
- Cold Tyre Pressure: 1.4 bar
- Blade Speed: 3500 rpm
- Deck Lift System: Hand operation
- Minimum Cutting Height: 38 mm
- Maximum Cutting Height: 114 mm
- Number of Cutting Height Positions: 12
Battery:
- Battery Type: Lithium
- Battery Voltage (V): 56
- Battery Amp Hours (Ah): 50
- Charge Time (hours): 6.25
- Charge Cycle (Minimum 80% remaining capacity): 3000
- Charger and Mower Operating Temperatures: 5~40°C
Charger:
- Type: input:100~240V, 50~60HZ; Output: 57.6V DC, 8A
Performance:
- Maximum Forward Speed: Driving, 12.9 km/h; Mowing, 8 km/h
- Maximum Reverse Speed: 4.8 km/h
Noise:
- Guaranteed sound power level: 100 dB(A)
Usage Features
The ProRider E559 includes several user-friendly features:
- Accelerator Pedal: Controls the mower's speed.
- Battery Level Indicator/Odometer/Parking Brake Indicator: Displays battery charge, tracks total distance used, and indicates parking brake status.
- Blade Engage Knob: Pulls up to activate cutting blades, pushes down to stop.
- Brake Pedal: Used for slowing and stopping the mower.
- Charger: Wall-mountable for convenient storage, with LED status light.
- Cruise Control Button (CCS): Allows the mower to maintain a constant speed without continuous accelerator pedal pressure. It is activated by pressing the button while driving forward at the desired speed, illuminating a green light. It can be disengaged by tapping the accelerator, depressing the brake, or pressing the CCS button again.
- Deck Height Adjustment Lever: Used to raise or lower the cutting deck, offering 12 cutting height positions from 38 mm to 114 mm.
- Direction Control Switch: Controls movement direction (Forward, Neutral, Reverse).
- Headlight Button: Turns headlights ON and OFF.
- Media Holder: Provides a storage place for cell phones or MP3 players.
- Mulch Cover: Equipped for mulching clippings, covering the side discharge opening.
- Parking Pedal: Locks the mower in the braked position, requiring the brake pedal to be depressed first.
- Power Switch with Start Key: Turns the mower ON and OFF; the start key must be inserted.
- Reverse Mode Button: Allows blades to operate when moving in reverse. A constant beeping sound is emitted when operating in reverse with blades engaged or disengaged.
- Seat Adjustment Lever: Moves the seat to the desired position for operator comfort and access to pedals.
- USB Port: Provides 5V DC at up to 2 amps for charging USB devices when the start key is in the ON position.
Operating Procedures:
- Starting: Ensure the work area is clear, check brake operation, tire pressure, and fasteners. Adjust the seat and verify battery charge. Raise the deck, insert the start key, release the parking brake, and place the direction control switch in forward (F) to drive.
- Mowing: Raise the blade engage knob to activate blades. Reduce speed for heavy grass and avoid cutting wet grass.
- Slope Operation: Mow up and down slopes, not across. Avoid wet grass, holes, ruts, rocks, and sudden changes in speed/direction. Never attempt to stabilize the mower with your foot.
- Parking Brake: Depress and hold the brake pedal, then depress and hold the parking pedal. Release both. To release, depress and release the brake pedal.
- Charging: Connect the charger plug to the charging port and then to a power supply. A solid green LED indicates a full charge.
- Safety Interlock System Test: With the blade engage knob down and the direction control switch in neutral, turn the key to ON, raise the blade engage knob, then briefly lift off the seat. Blades should shut off within 5 seconds.
Maintenance Features
The manual outlines a detailed maintenance schedule and procedures to ensure the longevity and safe operation of the mower:
General Maintenance:
- Keep the work area clean and well lit.
- Avoid operating in explosive atmospheres.
- Keep children and bystanders away.
- Do not expose power tools to rain or wet conditions.
- Use personal protective equipment (PPE), including ear and eye protection and gloves.
- Keep hands and feet away from blades and cutting area.
- Do not operate on steep slopes greater than 12°.
- Regularly inspect for damaged, missing, or loose parts.
- Avoid using solvents on plastic parts; clean with dry cloths.
- Remove grass and leaves from the motor cover.
Maintenance Schedule (Inspect Before Each Use / Every 25 Hours / Every 50 Hours / Every 100 Hours / Before Storage):
- Check Brake Operation: X
- Check Tyre Pressure: X
- Check Safety Interlock System: X
- Check for Loose Fasteners: X
- Clean Debris From Mower: X
- Check/Replace Mower Blades: Check / Replace (Every 50 Hours)
- Lubricate mower pivot points, front axle pivot and axle spindles, front axle wheel bushings, and deck pivot points: X (Every 100 Hours)
- Clean Battery Terminals: X (Every 100 Hours)
Specific Maintenance Procedures:
- Cleaning the Machine: Remove grass and leaves from the mower housing. Use compressed air to clean the housing and the top side of the deck. The underside of the deck should be cleaned using the wash port after each use to prevent accumulation of debris.
- Using Wash Port to Clean Mower Deck: Set the parking pedal, stop the motor, adjust the deck height to the lowest position, attach a garden hose with quick-coupler to the wash port, turn on water, start blades for 1 minute, then disengage blades, turn off water, and remove the hose.
- Adjusting Cutting Deck Wheels: Position wheels off the ground at the desired cutting height. Remove the nut and bolt, move the wheel to the desired position (38mm, 45mm, 51mm, 57mm options), and re-tighten.
- Removing the Cutting Deck: Set the direction control switch to neutral, disengage blades, stop the motor, remove the start key, set the parking brake, disconnect cables, lower the deck, remove hitch pins and washers, and slide the deck out.
- Replacing Cutting Blades: Wedge wood between the blade and deck, loosen the blade nut counterclockwise, remove the old blade, place the new blade with curved ends pointing up, replace insulator and spacer, and torque the blade nut clockwise to 68-74 Nm.
- Tyre Maintenance: Check air pressure (recommended 1.4 bar) when tires are cold. Replace tires if tread depth is 4mm or less, or if damaged.
- Adjusting the Brakes: Test by pushing the mower forward with the parking brake set. If rear tires turn, tighten adjustment nuts on the interior side of the rear wheels 1/4 turn clockwise until the mower cannot be moved.
- Leveling the Cutting Deck: Check side-to-side alignment and adjust as needed before measuring and adjusting front-to-back. The front tip of the blade should be 3-10mm lower than the rear tip.
- Storing the Mower: Clean the mower, fully charge the battery, and store in a clean, dry place inaccessible to children. Do not leave the key in the mower.
- Preparing for Use After Storage: Review maintenance chart, fully charge batteries, check tire pressure, and briefly drive the mower to check all systems.