Do you have a question about the Yard force LM G34 and is the answer not in the manual?
Read instructions carefully, understand controls, and ensure familiarity with product use.
Wear appropriate clothing, inspect area for objects, check blade assembly, and ensure switch is off before battery insertion.
Use designated battery packs, operate in daylight, avoid wet conditions, maintain footing on slopes.
Avoid operating in rain, maintain footing, walk not run, mow across slopes, use caution reversing, stop blades when tilting.
Use specified charger, check for damage, ensure correct voltage, avoid cord abuse, keep cord safe, keep charger clean.
Charge fully before use, recharge when power slows, avoid extreme temperatures, do not short-circuit, use correct fire extinguisher.
Protect from moisture, store within temperature range, clean regularly, charge/discharge every 6 months if unused.
Clean thoroughly, store in dry room, fold handles for storage, remove safety key and battery packs.
Use original packaging to ship whenever possible.
Attract attention to dangers, explain symbols, and emphasize caution and understanding of instructions.
Depicts and describes safety symbols on product. Read and understand all instructions before assembly and operation.
Waste electrical products should not be disposed of with household waste; recycle where facilities exist.
Read manual carefully, do not throw into water, do not throw on fire, avoid strong sunlight, do not leave on heater.
Read manual carefully, charger is for indoor use only, double insulation, protective fuse, pole orientation.
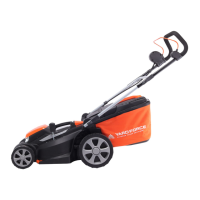
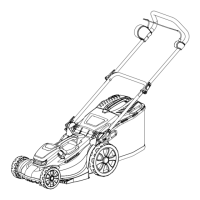
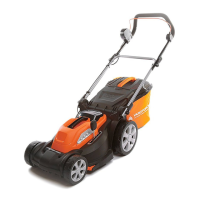
Lists numbered parts of the lawnmower, e.g., switch box, handles, wheels, battery pack tank cover.
Lists parts included in the package, e.g., lawnmower, handles, grass bag, battery pack, charger.
Attach two tooth clamps to the lower handle.
Install lower handle with quick release clamps, ensuring teeth interlock correctly.
Mount top handle to lower handle using quick release clamps with curved head.
Use cable clips to fix the cable to the lower handle.
Fix grass bag to frame using plastic hooks, secure with ejector flap.
Includes setting cutting height, installing/removing battery, safety key, and switching on/off the mower.
Covers mowing on slopes, overload protection, battery temperature limits, and grass bag indicator.
Use soft brush for debris, wear safety glasses, wipe with damp cloth. Do not spray with water.
Keep nuts/bolts tight, check grass bag for wear, examine machine for worn/damaged parts.
Use wrench to remove/fit blade bolt. Wear gloves. Retighten securely to 20N.m. Replace/re-sharpen at service centre.
Protect from moisture, store within temperature range, clean regularly, charge/discharge every 6 months if unused.
Clean thoroughly, store in dry room, fold handles for storage, remove safety key and battery packs.
Use original packaging to ship whenever possible.
The YARD FORCE LM G34/LM G37 is a 40V cordless lawnmower designed for cutting grass in domestic settings. It is not intended for commercial, trade, or industrial applications, and using it for such purposes will void the warranty. The product emphasizes user safety, requiring careful reading and understanding of all instructions and warnings before operation.
The primary function of the YARD FORCE LM G34/LM G37 is to cut grass using a rotating blade powered by a 40V Li-ion battery. It features adjustable cutting heights and a grass collection bag for efficient lawn maintenance. The lawnmower is equipped with a safety key to prevent accidental start-up and an overload protection circuit to prevent damage from excessive load.
The LM G34 and LM G37 models share many specifications but differ in cutting width and battery capacity.
Mower Type:
General Specifications:
Noise and Vibration:
Battery Pack (Li-ion):
Battery Charger:
Assembly:
Battery Charging:
Operation:
General Maintenance:
Cleaning:
Blade Maintenance:
Battery Maintenance:
Storage and Transport:
Troubleshooting: The manual provides a troubleshooting guide for common issues such as the mower failing to start, stopping/losing power, insufficient grass bag filling, vibrating at high speed, or cutting unevenly. Solutions range from inserting the safety key, recharging the battery, adjusting cutting height, cleaning the housing, to replacing or sharpening the blade.
| Brand | Yard force |
|---|---|
| Model | LM G34 |
| Category | Lawn Mower |
| Language | English |