EasyManua.ls Logo

Yardistry MERIDIAN User Manual

Default Icon
20 pages
To Next Page IconTo Next Page
Page #1 background imageLoading...
Page #1 background image
1 support@yardistrystructures.com
05-29-2020
12’ x 16’ MERIDIAN Mosquito Mesh Kit
Installaon Instrucons – YM11920
Kit Mosquitero de MERIDIAN 12’ x 16’
Instrucciones de instalación – YM11920
Ensemble de mousquaire MERIDIAN 12’ x 16’
Instrucons d’installaon – YM11920
Yardistry – North America
Toll Free Customer Support: 1.888.509.4382
info@yardistrystructures.com
www.yardistrystructures.com
Yardistry – Norteamérica
Línea gratuita de servicio al cliente: 1.888.509.4382
info@yardistrystructures.com
www.yardistrystructures.com
Yardistry – Amérique du Nord
Service client sans frais: 1.888.509.4382
info@yardistrystructures.com
www.yardistrystructures.com
Y40000-920
18
IMPORTANT, RETAIN FOR FUTURE REFERENCE: READ CAREFULLY
IMPORTANTE: CONSERVE PARA FUTURA REFERENCIA. LEA CUIDADOSAMENTE
IMPORTANT, À CONSERVER POUR DE FUTURS BESOINS DE RÉFÉRENCE : À LIRE SOIGNEUSEMENT
Pour utilisation avec
le Pavillon Meridian
YM11915 12 x 16
For use with the
YM11915 12 x 16
Meridian Gazebo
Para usar con el
Pavilion Meridian
YM11915 12 x 16
Question and Answer IconNeed help?

Do you have a question about the Yardistry MERIDIAN and is the answer not in the manual?

Yardistry MERIDIAN Specifications

General IconGeneral
BrandYardistry
ModelMERIDIAN
CategoryTent
LanguageEnglish

Summary

Important Safety Notice

Product Intended Use and Restrictions

Details what the product is NOT intended for, such as safety barriers or load support.

Flammability and Fire Hazards

Warns that netting is not flame retardant and about fire hazards near the structure.

Installation Safety Precautions

Advises on tool safety, using safety glasses, and requiring multiple people for installation.

Proper Maintenance

Hardware Maintenance

Instructions for checking hardware for rust, tightening, and preventing wood damage.

Required Tools for Maintenance

Lists essential tools needed for performing product maintenance.

Step 1: Inventory Parts

Hardware and Component Inventory

Guide to checking all hardware and components against identification sheets before assembly.

Step 2: Attach Curtain Track Short

Attaching Short Curtain Track to Beam Assembly

Instructions for fixing the short curtain track to the short beam assembly using screws.

Sliding Curtain Hangers into Track

Details on sliding 14 curtain hangers into the track channel for easy movement.

Repeating for Other Beam Assembly

Instruction to repeat the attachment process for the second short beam assembly.

Step 3: Attach Curtain Track Long

Attaching Long Curtain Track to Beam Assembly

Instructions for fixing the long curtain track to the long beam assembly using screws.

Sliding Curtain Hangers into Long Track

Details on sliding 22 curtain hangers into the long track channel for easy movement.

Repeating for Other Beam Assembly

Instruction to repeat the attachment process for the second long beam assembly.

Step 4: Attach Curtain Track Gussets

Securing Tracks with Gussets and Screws

Guidance on attaching curtain tracks to beam assemblies using gussets and screws.

Step 5: Attach End Screws

Preventing Hangers from Falling Out

Instructions on installing end screws to prevent curtain hangers from falling out of tracks.

Step 6: Attach Tie Back Ribbons

Securing Tie Back Ribbons to Post Assembly

Instructions for attaching tie back ribbons to the inside corner of post assemblies using screws.

Step 7: Attach Insect Panel Part 1

Attaching First Insect Panel to Beams

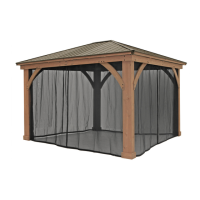
How to attach the first insect panel using button snaps to curtain hangers on beam assemblies.

Attaching Remaining Insect Panels

Instructions for attaching the rest of the insect panels around the gazebo.

Step 7: Attach Insect Panel Part 2

Joining Insect Panels with Zipper

Guidance on joining the insect panels together by using the zipper closure.

Step 8: Attach Insect Panels to Posts

Securing Insect Panels to Posts with Snaps

Instructions for fastening insect panels to post assemblies using button snaps and male snaps.

Step 9: Secure Insect Panels

Permanent Attachment of Insect Panels

Optional step for permanently securing insect panels to post assemblies using screws.

Limited Warranty

Warranty Coverage and Exclusions

Details what the 1-year product and 5-year lumber warranty covers and excludes.

Product Modifications and Use Restrictions

Explains that modifications void warranty and limits use to residential.

Customer Rights and Limitations

Outlines customer legal rights and limitations on consequential damages.

Related product manuals