Do you have a question about the YARDMAX YL2250 and is the answer not in the manual?
Emphasizes the manufacturer's commitment to quality, user experience, and value.
Explains YARDMAX's approach to providing practical and high-performing outdoor equipment.
Details the importance of recording model and serial numbers for future reference and inquiries.
Outlines manufacturer responsibility for engine issues and emission control regulations.
Provides phone numbers, email, and social media for customer assistance and inquiries.
Explains the meaning of various warning and informational symbols on the machine and manual.
Covers essential safety practices for operators, including personal protection and machine handling.
Details critical safety measures for engine operation, fuel handling, and fire prevention.
Provides detailed instructions for safe operation, including pre-operation checks and hazard avoidance.
Offers guidance on using the machine safely on inclines and avoiding falls.
Lists all the items included in the YARDMAX string trimmer mower package.
Step-by-step guide for assembling the string trimmer mower, including handles and wheels.
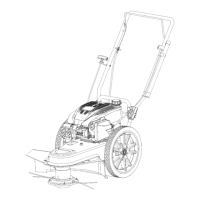
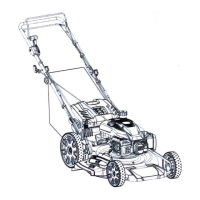
Illustrates and describes the main components and controls of the string trimmer mower.
Covers adding oil/fuel, adjusting height, starting, stopping, and engaging the trimmer head.
Outlines the recommended maintenance schedule and detailed procedures for upkeep.
Provides instructions for preparing the machine for storage, including fuel draining and handle folding.
Lists common problems, their causes, and recommended remedies for the string trimmer mower.
A visual guide showing all components of the YARDMAX string trimmer mower.
A comprehensive list of all parts with their corresponding numbers and quantities.
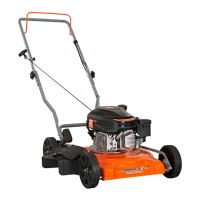
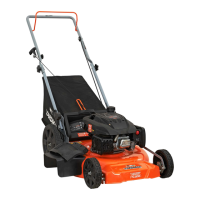
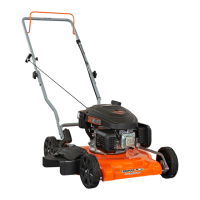
The YARDMAX Walk-Behind String Trimmer Mower (Model YL2250) is an outdoor power equipment designed for cutting grass, vegetation, undergrowth, and weeds. It is a walk-behind unit, meaning the operator walks behind the machine to guide it during operation. The machine is built with quality construction, aiming for ease and safety of operation, and with proper use and care, it is designed to provide years of dependable service.
The trimmer mower features an upper handle with a handle adjustment knob, allowing the operator to pivot the handle backward to a desired, comfortable position. The handle adjustment knobs should be securely tightened after adjustment. The unit also includes a trimmer head drive control lever, which, when squeezed against the upper handle, allows the trimmer mower spindle to rotate. Releasing this lever stops the rotation of the spindle. An engine ON/OFF switch is located on the upper handle, used to start and stop the engine. For starting, the switch is moved to the "ON" position, and to stop, it is moved to the "OFF" position.
The machine is equipped with an engine recoil starter, which is used to pull-start the engine. For cold starts, the primer bulb should be pressed one to three times in succession, followed by a quick pull of the recoil cable grip. For hot starts, the starter cable grip can be pulled directly. A rope guide is provided to hang the engine recoil starter.
The trimmer head height can be adjusted vertically to five different positions, ranging from 1.5 inches to 3.5 inches. This adjustment is made by pushing the trimmer head height adjusting plate tab inward towards the axis and moving the trimmer head up or down to the desired position. If the head does not disengage, a slight rotation of the head while pushing the tab may be necessary. The tab should be released to ensure the trimmer head is locked into one of the height positions. Higher positions are recommended for tall grass or areas with frequent objects, while lower positions provide a more finished appearance. The recommended cutting height for an average yard is 2 inches.
The trimmer mower uses a trimming line, and a line cut length guide is integrated to aid in cutting the line to the correct length. The unit also includes a line storage pipe with buckles on the upper handle for carrying spare trimmer lines.
For maintenance, the manual emphasizes the importance of reading and understanding all instructions and safety precautions. Before any maintenance, the engine must be stopped, allowed to cool, the spark plug wire disconnected and grounded against the engine, and the Electric Start Push Key (if equipped) removed to prevent accidental starting.
Regular checks for loose fasteners, cleanliness of the trimmer, under engine cover, and drive belt/pulleys are recommended. Trimmer lines should be checked and replaced as needed. The engine oil level should be checked and changed periodically, with the recommendation to use API SERVICE Category SJ class or higher oil. The air filter element needs regular cleaning and replacement, especially in dusty conditions. The muffler should be inspected for proper attachment and damage. Spark plugs and spark arrestor screens (if equipped) also require periodic cleaning or replacement.
The belt tension is crucial for performance and can be adjusted. If the belt slips or the trimmer head does not rotate when the control lever is engaged, the upper jam nut on the trimmer head drive control cable should be loosened, and the lower jam nut tightened. Conversely, if the trimmer head rotates when the control lever is not fully pressed, the lower jam nut should be loosened, tightened in several threads, and then the upper jam nut tightened.
When replacing the belt, the drive belt must be disconnected from the spark plug. The decorative cover, main trimmer shield, mower deck, mower head, and base assembly need to be removed to access the belt. After replacement, the drive system should be tested to ensure the mower head completely stops when disengaged.
For storage, the fuel tank should be drained, and the engine run until it stops to prevent gum deposits. The engine oil should be drained and refilled with fresh oil. The machine should be cleaned, and any loose or damaged parts repaired. The handle can be folded for compact storage by loosening the handle adjustment knobs. The unit should be stored in a clean, dry building, out of reach of children.
The manual also includes troubleshooting tips for common issues such as engine failure to start, erratic engine running, engine overheating, poor trimming performance, excessive vibration, and loss of head drive, providing potential causes and remedies for each.
| Starting System | Recoil |
|---|---|
| Mulch Capable | Yes |
| Side Discharge | Yes |
| Rear Bag | Yes |
| Deck Material | Steel |
| Cutting Width | 22 inches |
| Cutting Height | 1.25 - 3.75 in |
| Wheel Size (Rear) | 8 in |