Do you have a question about the Yeswelder CUT-65DS PRO and is the answer not in the manual?
Warnings related to California's Proposition 65 for welding fumes.
Safety precautions specific to engine-powered equipment.
Information on potential hazards from EMF in welding.
Critical safety measures to prevent electrical shock.
Precautions against burns from arc rays and spatter.
Hazards associated with welding fumes and gases.
Risks of fire and explosion from welding and cutting sparks.
Safety warnings regarding compressed gas cylinders.
Safety instructions for electrically powered equipment.
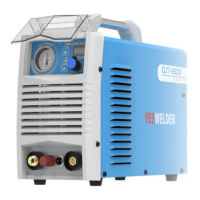
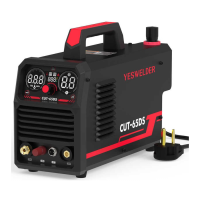
Overview of the YesWelder CUT-65DS plasma cutter.
List of items included in the product packaging.
Detailed technical parameters and specifications of the CUT-65DS.
Physical dimensions and weight of the power source.
Details on the cutting torch's installation, size, and weight.
Essential safety guidelines before installing the equipment.
Guidelines for choosing an appropriate installation location.
Information regarding the stacking limitations of the CUT-65DS.
Instructions on placing the CUT-65DS on a stable surface.
Details on connecting the external air supply to the machine.
Steps for installing the air pressure compressor filter regulator.
Procedures for connecting the torch and work lead.
How to properly connect the work clamp for good electrical contact.
Instructions for connecting the machine to the power supply.
Crucial safety warnings and guidelines for operating the plasma cutter.
Identifies and explains the functions of the control panel and its components.
Explains various displays, voltage, pressure units, and cutting modes like 2T/4T.
Explains air pressure display, voltage indication, and unit conversion.
Procedures for adjusting air pressure, output current, and post-flow time.
Explains thermometer symbol (E-3) and warning indicator (E-1) for machine status.
Steps, checks, and tips for effective cutting operations.
Recommended cutting speeds and guidance on replacing electrode and nozzle.
Safety warnings related to electrical hazards during maintenance.
Recommended periodic cleaning and checks for the machine.
Procedures for maintaining torch components before and after operation.
Warning against using worn components to avoid damage and voiding warranty.
Lists common malfunctions and their corresponding solutions.
Explains specific error codes (E-1, E-3, E-5) and their meanings.
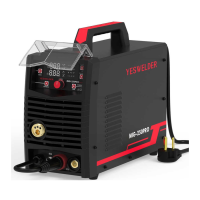
The YesWelder CUT-65DS is an air plasma cutter designed for efficient and precise cutting of various metal materials. This machine utilizes a non-high frequency start mechanism, employing a blow-back type start. This innovative starting method involves a rearward movement of the electrode within the torch head, initiated by air pressure. As air is applied, the electrode moves off its seated position against the inner surface of the circuit-grounded nozzle, generating a spark that energizes the plasma stream. This unique start type and pilot arc design allow the CUT-65DS to initiate cuts on any metal surface without requiring direct contact to strike an arc. This feature is particularly advantageous for cutting items like expanded metal or uneven surfaces, where maintaining constant contact can be challenging. The CUT-65DS is versatile, suitable for cutting stainless steel, alloy steel, mild steel, copper, and other colored metal materials, making it a valuable tool for a wide range of applications.
The CUT-65DS is designed with user-friendly controls and indicators to ensure efficient and safe operation. The front panel features a digital screen that displays key operational parameters. Upon power-on, the digital screen illuminates, and the right display panel shows the preset output current. The middle display panel automatically recognizes and displays the input voltage (110V/220V). A green light indicates that the input voltage is within an acceptable range, while a yellow light signals an undervoltage condition, prompting the user to check the power supply.
The gas pressure display shows the air pressure in either PSI or MPA units, which can be toggled using the UNIT button. This display also serves to show fault codes when certain system faults occur. The machine includes a center knob for adjusting the electric current value and the POST Flow time. Rotating the knob left or right decreases or increases these values, respectively. The input voltage (110V/220VAC) is also displayed. A green POWER ON LED indicates that the power switch is ON and the system is ready to cut. A yellow LED illuminates if the input voltage is outside the reasonable range, indicating potential issues with cutting performance. A WARNING indicator lights up if internal components are damaged.
The CUT-65DS supports both 2T and 4T cutting modes, which can be selected using the STEPS MODE button. A thermometer icon appears, and the gas pressure display shows "E-3" if the operating temperature of the machine becomes too high, indicating thermal protection activation. The "A" indicator light signifies that the machine is in the output current setting mode, while the "S" indicator light indicates the post-flow time setting mode. Post-flow refers to the continued air flow from the torch after a cut is completed and the trigger is released, which helps cool the consumables.
Setting the cutting parameters involves several steps. First, the air pressure needs to be adjusted. The UNIT button allows switching between PSI and MPA display units. The air compressor's output air flow and pressure must be adequate for the machine, and the air compressor valve should be open. The center knob is used to adjust the amperage, ensuring it is appropriate for the thickness of the workpiece. The POST FLOW button is pressed to select post-flow mode, and the center knob is then used to adjust the post-flow time. Finally, the STEPS MODE button is used to select either 2T or 4T mode.
Before starting a cut, operators should verify several conditions: the green power ON LED should be illuminated, the voltage display should match the actual input voltage, the output current (amperage) and "A" LED should be correct, the gas pressure displayed should be accurate, and no fault LEDs or codes should be illuminated. If any fault indicators are active, the fault condition must be corrected before proceeding.
The CUT-65DS features instant-on torches, meaning the plasma arc ignites immediately when the torch trigger is pulled. It is crucial to ensure the power is OFF before changing consumables. To activate the torch, the trigger is pulled to allow air to flow. The pilot arc will engage and remain on for 5 seconds, during which the cutting tip must contact the workpiece. If contact is not made within 5 seconds, the arc automatically stops, though post-flow air continues to cool the torch.
For optimal cutting, it is recommended to avoid igniting the arc in the air unnecessarily, as this can shorten the lifespan of the electrode and nozzle. Starting cuts from the edge of the workpiece is advised unless penetration is required. Proper cutting is indicated by spatters flying from the bottom of the workpiece. If spatters fly from the top, it suggests the workpiece is not being fully cut, possibly due to the torch moving too fast or insufficient cutting current. Maintaining a slight distance between the nozzle and the workpiece is important; pressing the torch against the workpiece can cause the nozzle to stick and result in uneven cuts. For cutting round workpieces or achieving precise cuts, molding boards or other assistant tools may be necessary. Pulling the cutting torch while cutting is generally recommended. The nozzle of the cutting torch should be kept upright over the workpiece, and the arc should follow the cutting line. Care should be taken not to bend or press on the cable excessively, as this can restrict gas flow and potentially damage the torch.
Regular maintenance is essential for ensuring the longevity and optimal performance of the CUT-65DS. Before performing any maintenance, it is critical to turn off the input power at the disconnect switch or fuse box and discharge input capacitors. Electrically hot parts should not be touched. Only qualified personnel should install and service the machine.
Routine maintenance includes keeping the cutting or gouging area and the machine's surroundings clean and free of combustible materials to prevent obstruction of airflow. Every six months, the machine should be cleaned with a low-pressure airstream to remove dirt and dust from printed circuit boards, heat sinks, and the power switch, which contributes to cooler operation and higher reliability. When using a low-pressure airstream for cleaning, appropriate eye protection must be worn.
The sheet metal case should be regularly examined for dents or breakage and repaired as needed to protect high-voltage parts and maintain correct spacings. All external sheet metal screws must be in place to ensure case strength and electrical ground continuity. The compressor air inlet filter should be cleaned regularly.
Consumables, such as the electrode and nozzle, need to be changed as required. Before changing consumables, the machine must be turned off at the disconnect switch on the rear, and the torch must be completely cool. The torch should be disassembled, and the cutting tip inspected. If the interior is damaged, or if the opening is enlarged or gouged, it should be replaced. The inside of the tip should be cleaned with steel wool, ensuring all pieces of steel wool are removed afterward. The electrode should be inspected and replaced if it is pitted by 1/16" or more or is misshapen. All other internal torch components should be undamaged and clean. The electrode should be assembled snugly using the included wrench, but not overtightened. The swirl ring and cutting tip are then inserted into the torch, and the retaining cup is assembled tightly. Using worn components will void the warranty and damage the plasma cutter.
The CUT-65DS is equipped with thermal detection devices that protect the machine from excessive operating temperatures. Overheating can be caused by insufficient cooling air or operating the machine beyond its duty cycle and output rating. If overheating occurs, the yellow thermal LED will light up, and the detection devices will prevent output voltage or current. These devices are self-resetting once the machine cools sufficiently. If the shutdown was due to excessive output or duty cycle and the fan is operating normally, the power switch can be left on, and the machine should reset within 15 minutes. If the fan is not turning or the air intake louvers are obstructed, the power must be switched off, and the fan or obstruction issue must be corrected.
The machine's front panel includes an abnormity indicator that illuminates for internal failures. Error codes like "E-1" indicate damaged internal components, "E-3" signifies high IGBT operating temperature, and "E-5" appears when the machine is turned on without air pressure. Troubleshooting steps are provided for these and other issues, such as undervoltage, absence of arc maintenance, and ineffective cutting, guiding users to diagnose and resolve problems.
| Maximum Cutting Thickness | 25mm |
|---|---|
| Pilot Arc | Yes |
| Thermal Overload Protection | Yes |
| No-Load Voltage | 260V |
| Protection Class | IP21S |
| Insulation Class | F |
| Output Current | 65A |
| Duty Cycle | 60% |
| Input Voltage | 110/220V |
| Input Current | 32A |