YORK INTERNATIONAL
18
FORM 102.20-FA1 (1104)
15. INSTALL UPPER TIER COMPONENTS
Proceed with the installation of the components to
the support bulkheads and support walls that belong
in the upper tier.
16. INSTALL UPPER TIER WIREWAYS
Install the wireways if originally provided and
removed. Connect the wiring within and to the
wireways. Observe and match the labels. Do not
install the light fi xtures at this time, but leave the wire
connectors accessible.
17. INSTALL THE VERTICAL AND UPPER RACE-
WAYS OF THE UPPER TIER
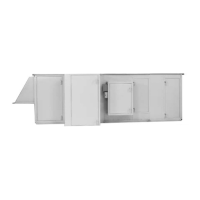
18. INSTALL SIDE PANELS / UPPER TIER
Install the side panels of the upper tier. Those con-
taining dampers, duct connections, electric boxes,
etc. fi rst.
19. INSTALL TOP PANELS OF UPPER TIER
20. CONNECT REMAINING WIRING
Connect any remaining wiring such as motors, lights,
controls
21. CONNECT ANY REMAINING FILTER GAUGE
OR PNEUMATIC TUBING
22. INSTALL DOOR ASSEMBLIES
Install all door assemblies. Before installing Door/
Frame Assembly, remove old gasket material. Apply
new gasket material to back of frame along the outer
edge. Use Compound Sealing (Perma Gum/Butyl
Tape), P/N 013-02976-000 for Outdoor Unit and Neo-
prene Gasket, P/N 028-11873-010 for Indoor Unit.
Proper adjustment is achieved by installing the screws
in hinge side of frame fi rst. Then insert spacer(s) be-
tween the door and frame at the bottom on the latch
side. Add or remove spacers as necessary until gap
between bottom of door and frame is even. Install
screws in top, bottom and latch sides of door frame.
23. INSPECT SEAMS FOR LEAKS
Once the unit is completely assembled, from inside the
unit (no lights on) inspect seams for leaks by looking
for light penetration. Adjust panels or gaskets where
ever possible. Add minimal amount of construction
grade sealant if needed.
24. SEAL WIRING PENETRATIONS
To prevent the passage of air, apply permagum or
caulk anywhere wiring penetrates the unit side, top
or bottom panels.
25. BALANCE FAN
If the fan assembly was disassembled (motor, belts
and fan) the reassembled fan assembly MUST be trim
balanced by a qualifi ed dynamic balance technician
prior to operation of the equipment.
26. TESTING OF DRAIN PANS
To minimize conditions of water
stagnation that may result in micro-
bial growth, drain pans shall be fi eld
tested under normal operating condi-
tions to ensure proper drainage.
Exception: Field testing of drain pans is not required
if units with factory-installed drain pans have been
certifi ed (attested in writing) by the manufacturer for
proper drainage when installed as recommended.
If drain pan has not been removed from unit base dur-
ing disassembly, fi eld testing is not required.
IAQ