3
1. Default function
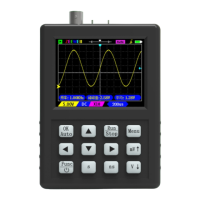
OK
Auto
1. When the menu opens, as the OK button.
2. as an "Auto" button
Run/Stop Run / Stop
Menu Open/close the menu
Move up the waveform/cursor
Move down the waveform/ cursor
Move left the waveform/ cursor
Move right the waveform/ cursor
mV/V Adjust vertical sensitivity (voltage of one grid)
s/ns Adjust the time base (the time of one grid)
Func 1. Press and hold 2s to turn on/off the power
2. Open the multi-function interface
2.Second function(Func interface)
OK Single
F_Meter: Turn on the 6-digit high-precision frequency meter
RunStop AC/DC: switching AC/DC coupling
Menu X1/X10: which is set to match the probe.
50%: one key to make the waveform quickly centered
Count: turn on the pulse counter
View: Enter the image view page
mV Save: save the waveform screenshot
s ||: open the horizontal cursor
ns ==, open the vertical cursor
V Zoom: enter magnifying glass mode
More:
Trigger level: The default trigger level is automatic adjustment, if you need to
adjust it manually, you need to set the trigger level to "manual" in the menu, you can
adjust the trigger level position arbitrarily (Press and hold the Func key, then press the
up and down keys to move the trigger level).
RTAuto: long press “Auto”key, RTAuto appears in the upper right corner of the
screen, indicating real-time automatic adjustment. When the probe is connected, the
oscilloscope automatically adjusts the range in real time. Press any key to exit.
Ref: Keep holding down the “Func” key and then press the “mV” key.
20M limit: Keep holding down the “Func” key and then press the “RunStop” key.


 To Next Page