ZEKS Eclipse
TM
90-5,000ZPB Desiccant Dryers
www.zeks.com
23
9.0 MAINTENANCE AND SYSTEM CHECK
!
WARNING
To avoid injury, depressurize dryer before performing any
service.
!
CAUTION
Desiccant will produce dust during the changeout procedure.
Be sure to wear respiratory protection during the draining
and fi lling process to minimize inhalation of desiccant
dust.
!
WARNING
To avoid injury, depressurize dryer before performing any
service.
9.3 CONTROL AIR SOLENOID VALVES AND
FILTER/REGULATOR
The length of time the Control Air Valves can reliably operate
without replacement is dependent upon the dryer operating
cycle. On -40°F dew point ZPB dryers, replacing the valves every
36 months is recommended. For -80°F and -100°F dryers, it is
recommended that the Control Air Valves be replaced every 6
months. On NEMA 4 confi gured dryers, the Control Air Regulator
pressure should be set for 100 PSI.
9.4 MUFFLER CHANGEOUT PROCEDURE
• Depressurize the dryer. Disconnect dryer from electric power
source.
• Replace muffl ers.
• Follow Start-up Procedure described in SECTION 8.8 of this
Technical Manual.
• Turn control power back on.
9.5 ANGLE-SEAT PURGE AND SWITCHING VALVES
These valves have two control ports; one on top and the other on
the back side of the bonnet.
• MAIN INLET FLOW VALVES - Normally-Open (N.O.) Valves:
For inlet or re-pressurization valves, control air is supplied
through tubing that is connected to the top port.
• PURGE VALVES - Normally-Closed (N.C.) Valves: For purge
valves, control air is supplied through tubing that is connected
to the side port. When control air is supplied to the valve, a
position indicator will extend through the bonnet to indicate that
the valve is open.
9.6 OUTLET CHECK VALVES
Outlet check valve sealing can be verifi ed by fi rst depressurizing
the dryer and then slowly applying pressure to the dryer outlet.
The valves should seal and prevent air from pressurizing the two
dryer towers. If a tower begins to pressurize, the check valve on
that side requires replacement.
9.7 DESICCANT CHANGEOUT PROCEDURE
When it becomes necessary to replace the desiccant in the
towers, or on units that are shipped without the desiccant
installed, observe the following procedure:
• The standard units are furnished with fi ll and drain ports on
each desiccant tower. Remove the caps on both ports.
• To assist in getting the desiccant to fl ow from the tower, insert a
small rod into the drain port as necessary. This may be required
as the desiccant is packed into the towers which may interfere
with the free fl ow of desiccant from the towers.
• Retainer Screens, located at the inlet and outlet piping
connections of each tower, are removable on all models. It is
suggested that these Screens be removed and cleaned at the
time of desiccant changeout. The Screens can be accessed
by disconnecting the upper and lower manifolds from the dryer
towers.
• After cleaning the retainer Screens, replace Screens and re-
insert the outlet port plug.
• With the fi ll port plug removed, fi ll the dryer tower with the
appropriate grade and size desiccant. The level of the
desiccant should be below the top retainer screen as shown on
the Desiccant Fill Chart on the following page of this Technical
Manual.
• When the towers have been fi lled to the correct level, reinsert
the fi ll port plug on each tower.
• Any connections and joints disturbed in the desiccant changeout
procedure should be leak tested prior to re-commissioning the
dryer.
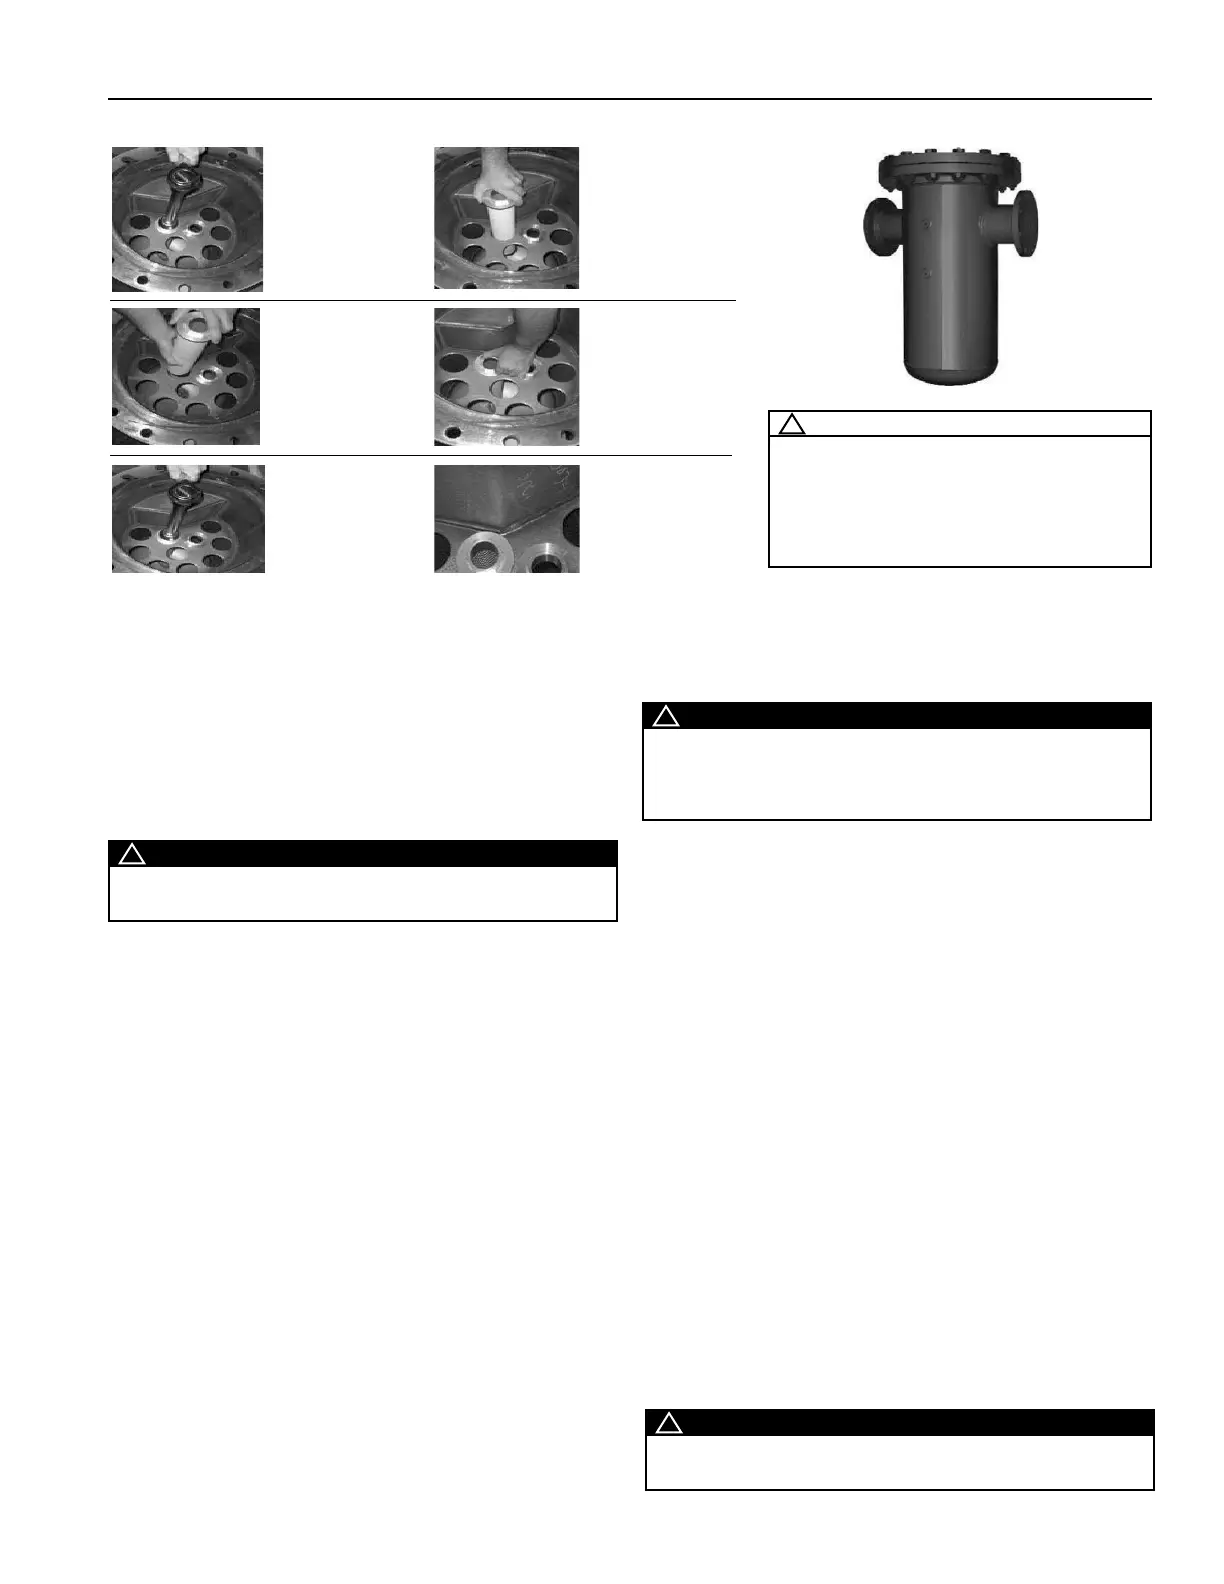
9.2.1 FLANGED FILTER ELEMENT REPLACEMENT (Factory Installed Option)
STEP1- Using a 2”
socket with an
extension,
carefully loosen
element.
STEP 2- Remove
old element from
filter housing.
STEP 3 - Install
new element by
carefully inserting
element in top
plate.
STEP 4 - Hand
tighten element
in place until
element o-ring
contacts top plate.
STEP 5 - Using a 2”
socket with an
extension, tighten
element one half
turn. DO NOT
STEP 6 - Repeat
procedure as
required to
replace all
elements.
!
NOTICE
Should the dryer become overloaded, it
may malfunction because of high pressure
drop caused by a plugged after-fi lter.
Inspect after-fi lter element(s) frequently
and replace when necessary to avoid this
problem.