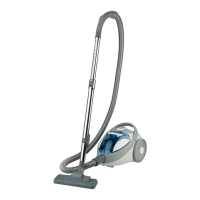
5
Assemble the proper nozzle or brush to the other end of
the suction tube.
6
To clean hard surfaces – wooden oors, plastic oors,
ceramic tiles etc. pull out the brush by pressing the switch on
the combination brush according to the gure .
7
Pull the plug and cord (3) out of the vacuum cleaner.
ATTENTION! While pulling out the cord, pay attention
to the yellow stripe which signals the end of the
cord. Further attempts (pulling on cord) may result in
damaging the cord.
8
Plug in the appliance.
Before turning the vacuum cleaner on, check whether the
CYKLON dust container is installed in the chamber of the
vacuum cleaner, and whether the inlet and outlet lters are
installed in the vacuum cleaner.
9
Switch on the vacuum cleaner by pressing the “on/off”
button (7).
10
The vacuum cleaner is equipped with a suction power
regulation control. The power is controlled by means of
a knob.
11
Turning the knob according to the label increases or
respectively decreases the suction power.
Filter disassembly
Before changing the lters make sure that the vacuum
cleaner is switched off and unplugged from the mains
supply.
INLET FILTER CONE
It is necessary to clean the inlet lter cone from time to time.
1
Remove the CYKLON dust container and empty it
according to paragraph (F).
2
Release the fastening of the HEPA basic lter (14) and
remove it from the CYKLON dust container.
3
Press the button situated on the CYKLON dust container
and open the bottom of the container.
4
Turn the inlet lter cone (17) clockwise.
5
Remove the inlet lter cone from the CYKLON dust
container.
6
If the inlet lter cone (17) is dirty, it may be rinsed
with running water. Remember to dry the cone before its
reinstallation.
ATTENTION! Pay attention to the gasket placed on the
bottom of the cone collar. Do not lose it.
7
Place a new/rinsed inlet lter cone into the socket in
such a way that the two protrusions placed on the collar are
situated under the fastening in the body of the container.
8
The cone should be pressed tightly and turned to the limit
counterclockwise. A characteristic click noties about a proper
installation.
9
Snap the bottom of the CYKLON dust container.
10
Place the HEPA basic lter (14). Pay attention so that the
two protrusions on the bottom part of the HEPA basic lter
(14) nd their way into the holes of the dust container.
11
Place the CYKLON dust container in the chamber of the
vacuum cleaner. A characteristic click noties about a proper
installation.
BASIC HEPA FILTER & FOAM FILTER
It is necessary to clean the basic HEPA lter from time to
time, as it is contaminated with dust.
Uninstall the CYKLON dust container and empty it according
to paragraph (F).
1
Release the fastening of the HEPA basic lter (14) and
remove it from the CYKLON dust container.
2
Remove the foam lter (15). If the foam lter (15) is dirty,
it may be washed with running water. Remember to dry it off
before reinstalling the lter.
The main function of the foam lter (15) is protecting the
basic HEPA lter (14) from excessive dirt.
ATTENTION! Due to safety reasons it is forbidden to
install a wet or damaged foam lter (15).
Clean the pleads of the basic HEPA lter
●
(14), if any of
them are damaged, the lter denitely must be replaced.
If the basic HEPA lter (14) is dirty, it may be washed with
running water. Remember to dry it off before reinstalling
the lter.
ATTENTION! Due to safety reasons it is forbidden to
install a wet or damaged basic HEPA lter (14).
Place the foam lter back into its place.
●
3
Put the new/rinsed HEPA basic lter (14) back in its place
– pay attention to put the two protrusions in the bottom part
of the HEPA basic lter (14) in the holes of the dust container.
A characteristic click noties about a proper installation.
4
Place the CYKLON dust container with the installed
basic HEPA lter (14) in the chamber of the vacuum cleaner.
A characteristic click noties about a proper installation.
OUTLET FILTER
1
In order to replace the outlet lter (12) pick up the vacuum
cleaner handle, then press the fastenings on the cover of the
outlet lter and slide out the cover out of the vacuum cleaner.
2
Remove the outlet lter frame out of the vacuum cleaner.
3
Remove the outlet lter out of the frame fastenings.
If the outlet lter (12) is dirty, it may be rinsed with running
water. Remember to dry the lter, before its reinstallation.
ATTENTION! Due to safety reasons, it is vital never to
install a damp outlet lter.
4
Carefully put the new/rinsed lter onto all frame
fastenings.
C
D
E