User Manual
18 Manual del usuario V 12/17
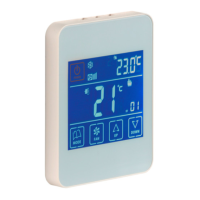
E Buttons and indicators (fig. 3)
Fig. 3 ZEBRA timer-thermostat buttons and indicators
FUse
Configuration
Configuration by an accredited installer must be completed
before using the ZEBRA thermostat, as explained at the
end of this manual.
Turning the system on
The zoning system can only be turned on using the
MASTER thermostat, which is normally installed in the
most used site:
1 Press the “POWER” button.
2 Select the operating mode by pressing the “MODE”
button repeatedly. The operating mode is displayed by
the indicators at the top.
3 Select the fan speed by pressing the “FAN” button. The
corresponding indicator will show the selected speed by
bars (slow, medium, fast).
4 Select the setpoint temperature using the “UP” and
“DOWN” buttons. The setpoint temperature is indicated
at the top right.
Conditioning the zones
Carry out the following steps on the thermostat in each
zone:
1 Press the “POWER” button to switch on the thermostat
in the zone.
2 Select the setpoint temperature for the zone (“UP” /
“DOWN” buttons).
POWER
UP DOWNFANMODE
ID
1
5
6
8
9
10
11
12
13
14
15
16
7
3
2
4
1 On/off “POWER” button
2 Fan speed indicator
3 Operating mode indicators (cold, heat, fan, cooling floor, radiant floor,
dehumidifier)
4 Day of the week and setpoint temperature indicators
5 Display alternating between time and setpoint temperature
6 Manual temperature setting indicator
7 Temperature setting indicator according to weekly programming
8 Timeslot indicator
9 Zone indicator
10 Ambient temperature indicator
11 Keypad lock indicator
12 Ambient temperature display
13 “MODE” button for selecting operating mode (cold/ heat/ fan/
dehumidifier/ cooling floor/ radiant floor)
14 “FAN” button for selecting fan speed
15 “UP” button for raising the setpoint temperature
16 “DOWN” for lowering the setpoint temperature
POWER
UP DOWNFANMODE
ID
Fig. 4
POWER
UP DOWNFANMODE
ID
Fig. 5