Digital Recorders / Seite 5
Attention! By doing this you will
delete all les from the SD-Card!
Only do this after you’ve checked
whether there’s nothing on there
that you still need and haven’t
saved yet!
STEP 2: TURNING ON THE DEVICE AND FORMATTING
THE SD-CARD
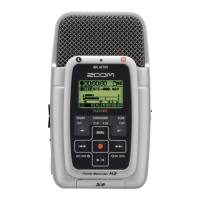
All the way down on the left side of the device you will nd the “On/Off”
switch. Press it for 1-2 seconds until the display lights up.
If this is your rst time turning on the recorder, we would advise you to
format the SD-Card in order to delete old recordings made by the people
who used it before you.
On the right side of the device you’ll nd the “Menu” button. Press this
and use the small wheel above it to scroll through the list until you nd the
item “SD-card”.
Press the wheel to conrm your selection. This will bring you to the next
menu, where you’ll choose the item “format”. Press the wheel again to
conrm and once more to answer “Yes” to the Pop-Up asking “Are you
sure?”. Now the entire memory of the SD-Card has been wiped.
STEP 3: CHECKING THE SETTINGS
Storage Location: Press the button on the left side under the display mar-
ked “Folder”. Select “Folder 1” by
scrolling with the small wheel on the
right side of the device and con-
rm your selection by pressing the
wheel.

 Loading...