Do you have a question about the Zoom U-44 and is the answer not in the manual?
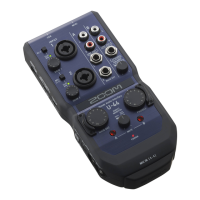
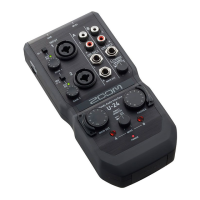
Details the U-44's mic preamps, +48V phantom power, Hi-Z input, and mic capsule compatibility.
Lists warnings and cautions for safe operation, including handling, power, and batteries.
Covers interference, cleaning, temperature, breakdown, and copyright notices.
Provides steps for downloading and installing the U-44 driver on Windows.
Outlines the steps to connect the U-44 to a computer via USB for audio interface operation.
Details connecting the U-44 to an iPad using specific adapters and power sources.
Explains connecting guitars, bass, keyboards, and using the Hi-Z input.
Details connecting mics and activating +48V phantom power.
Guides on checking input status and adjusting gain levels to prevent clipping.
Explains using direct monitoring to hear input signals without latency by adjusting the balance knob.
Details adjusting the balance between computer playback signals 1-2 and 3-4 for outputs.
Provides solutions for problems with device selection and USB connectivity.
Offers fixes for problems preventing playback or recording.
| XLR in | Yes |
|---|---|
| Interface | TRS/XLR |
| Audio (L/R) out | 2 |
| Headphone outputs | 1 |
| USB 2.0 ports quantity | USB 2.0 ports have a data transmission speed of 480 Mbps, and are backwards compatible with USB 1.1 ports. You can connect all kinds of peripheral devices to them. |
| Sample rate | 96 kHz |
| Audio quality | 24 bit |
| Frequency range | 20 - 40000 Hz |
| Weight | 310 g |
|---|---|
| Dimensions (WxDxH) | 92.3 x 198.8 x 42.7 mm |