Do you have a question about the ZOSI C306 PRO and is the answer not in the manual?
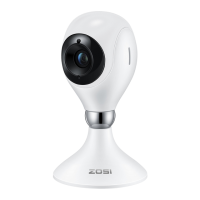
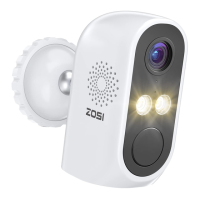
Identifies key physical parts of the camera, including lens, LEDs, and ports.
Explains the function of network indicators, lights, and operational buttons on the camera.
Describes placing the camera on any flat surface like tables or floors.
Details the steps for mounting the camera using the wall mount hardware and screws.
Advises fully charging the battery before use and warns against disassembling the device.
Covers avoiding obstructions, strong light, and unsuitable environmental factors.
Details safe placement away from children, vehicles, and sources of wireless interference.
This document outlines the features, installation, and pairing process for a camera system, likely a security or surveillance camera, designed to work with a Network Video Recorder (NVR). The camera is presented as a versatile device suitable for various monitoring needs, emphasizing ease of installation and user-friendly operation.
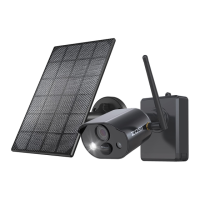
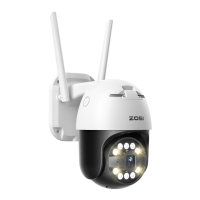
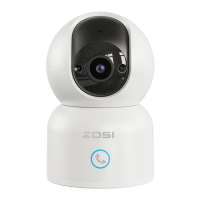
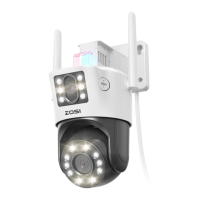
The core function of this device is to capture video and potentially audio for surveillance purposes. It is designed to be paired with an NVR, which acts as the central recording and management unit for multiple cameras. The camera itself is equipped with several key components that enable its monitoring capabilities. These include an HD lens for clear image capture, infrared LEDs for night vision or low-light conditions, and a PIR (Passive Infrared) sensor for motion detection. An antenna suggests wireless communication with the NVR, providing flexibility in placement without the need for extensive cabling. The presence of a microphone indicates audio capture, adding another layer to its surveillance capabilities. A loudspeaker is also included, which could be used for two-way audio communication or for issuing alerts. The device also features a power switch for control and a Micro USB port, likely for charging or power supply.
The camera's network indicators provide visual feedback on its operational status. A blue light indicates that the camera is either paired with the NVR or has been woken up, suggesting an energy-saving mode when not actively in use. A slowly flashing red light signifies that the camera is in a waiting state, specifically waiting to be paired with the NVR. When both blue and red lights are off, the camera is in standby mode, conserving power. These indicators are crucial for users to quickly assess the camera's status without needing to access the NVR interface.
The camera is designed for flexible deployment, offering two primary installation methods: flat surface placement and wall mounting. For flat surfaces, it can be placed on a table, chair, or floor, making it suitable for temporary setups or locations where drilling is not preferred. For more permanent or elevated surveillance, wall mounting is supported. The wall mount process involves drilling five holes according to the mounting base's position, securing the base with screws, and then locking the camera base onto the hook of the mounting base. A safety set screw is then installed and tightened to ensure the camera is securely fixed.
Adjustability is a key usage feature. After installation, the camera's angle can be adjusted using an included screwdriver to loosen and tighten an adjustment screw. This allows users to fine-tune the camera's field of view to cover the desired area effectively. The camera's power button is straightforward, requiring a long press of one second to power on or power off the device, simplifying basic operation.
Pairing the camera with the NVR is a critical step for its operation. The process is designed to be relatively simple: the camera needs to be placed near the NVR (within 30-100cm). While powered on, the user presses and holds the reset button for 3-5 seconds until a voice prompt is heard. Following this, the NVR system interface is accessed, and the camera is used to scan a QR code (likely displayed on the NVR screen, representing the phone port number) for pairing. A subsequent voice prompt from the camera confirms successful pairing, indicating that the camera is now ready to communicate with and be managed by the NVR. This QR code scanning method streamlines the pairing process, reducing manual input errors.
While the document explicitly states that the device is not equipped with user-disassemblable or maintainable parts, it does provide crucial guidelines for proper installation and usage that contribute to the device's longevity and optimal performance, effectively serving as "maintenance" through prevention.
One of the primary maintenance-related instructions is to fully charge the camera battery before its first use. This ensures the camera operates with optimal power from the outset. The document also provides several "installation precautions" that are vital for the camera's long-term health and functionality. Users are advised not to disassemble the device, reinforcing the idea that internal components are not user-serviceable.
Environmental considerations are emphasized to prevent damage and ensure proper operation. The camera should not be installed in locations where objects might cover or obscure it, as this could impede its view or ventilation. Similarly, installation near air conditioning outlets or humidifier outlets is discouraged, likely to protect the electronics from extreme temperature fluctuations or moisture. The document also warns against installing the camera in direct strong light or near reflective objects (like sunlight, lights, glass, mirrors) that could cause strong light refraction, which might degrade image quality or damage the lens over time.
To ensure the PIR sensor functions correctly, it is recommended to adjust the camera's PIR angle to be greater than 10 degrees from detecting objects. This helps prevent false alarms and ensures accurate motion detection. Furthermore, to avoid wireless interference, the camera should be installed at least 3.3 feet (1 meter) away from other wireless devices, such as WiFi routers and cell phones. This precaution helps maintain a stable connection between the camera and the NVR.
Finally, the document includes links to "Installation Video" and "System Operation Video," which serve as valuable resources for users. These videos can guide users through the setup and operation, helping them correctly install and use the device, thereby preventing common errors that could lead to malfunction or reduced lifespan. These resources act as a form of user-empowered maintenance, ensuring the device is handled and operated as intended by the manufacturer.
| Night Vision | Up to 80ft |
|---|---|
| Audio | Two-way audio |
| Connectivity | Wi-Fi |
| Weatherproof | IP66 |
| Lens | 3.6mm |
| Motion Detection | Yes |
| Resolution | 1080P (1920x1080) |
| Storage | MicroSD card up to 128GB |
| Operating Temperature | -4°F to 122°F (-20°C to 50°C) |
| Remote Access | Yes, via ZOSI Smart app |