EasyManua.ls Logo

3 Day Blinds ROLLER SHADE - User Manual

Default Icon
8 pages
Print Icon
To Next Page IconTo Next Page
Loading...
|
Cassettes and Side Channels1
GETTING STARTED
Steel Tape Measure
Power Drill and
Drill Bits
Level
(for outside mount)
Pencil
Flathead & Phillips
Screwdriver
Included in your order is all the hardware necessary for a
normal installation. Depending on the mounting surface,
fasteners other than the screws provided may be required.
Wall board and plaster require the use of anchors such as
expansion or toggle bolts. Bricks, tile and stone need special
plugs and drill bits. Wood should always be pre-drilled to
avoid splitting.
Professional installation is also available in most areas,
call 800-800-3329.
A few simple tools are required:
ROLLER SHADE
Continuous Cord Loop and Link System
with Cassette
Continuous Cord Loop with Side Channels
STANDARD HARDWARE
Inside Mount Cassette with
Predrilled Hole Locations
CASSETTE INFORMATION
The cassettes you received with your product are REQUIRED
for proper installation. Screws should be installed at each
end and any additional screws will need to be evenly spaced
between the two end predrilled holes.
Awl (or tool for
starting a screw hole)
Outside Mount Cassette with
Predrilled Hole Locations
Tension Pulley and
Bracket with Screws
OPTIONAL HARDWARE
Extension Bracket SpacersHold Down Bracket
SCREW PLACEMENT
2" 2"Space Evenly Space Evenly
NOTE: Measure and mark all predrilled locations
before installing.
Measure 2" in from the ends of the headrail and mark
the holes location on the mounting surface.
Space additional screws evenly between the end holes.
Adjust the cassette projection to accommodate
obstructions to the bottom rail, such as window cranks or
handles, using the spacer blocks provided.
Before installing the cassette directly to the sill or wall you
must fi rst remove the fascia and the shade from the cassette.
To remove the fascia, push down on the face of the fascia
and pull the inner edge shown and swing out to disengage
from the end plate on each side.
Next remove the shade from the cassette by retracting the pin
on the idle side using the dial and turning it counter-clockwise,
then pull the shade away from the control side bracket.
Question and Answer IconNeed help?

Do you have a question about the 3 Day Blinds ROLLER SHADE and is the answer not in the manual?

Summary

Getting Started

Cassette Information

Screw Placement

Instructions for placing screws in the cassette for proper installation, including spacing.

Inside Mount Installation

Shade Installation into Cassette

Steps to reassemble the shade back into the cassette after cassette installation.

Attaching Fascia and End Caps

Reattaching the fascia and end caps to the cassette after shade installation.

Outside Mount Installation

Shade Installation into Cassette

Steps to reassemble the shade back into the cassette after cassette installation.

Attaching Fascia and End Caps

Reattaching the fascia and end caps to the cassette after shade installation.

Tensioner Installation

Mounting Options for Tensioner

Guidance on various options for mounting the cord tensioner based on installation type.

Shade Operation

Shade Removal

Disassembly Steps

Sequential steps for removing end caps, fascia, shade, and cassette screws.

Installing Shades with Side Channels

Side Channel Installation Steps

Detailed steps for installing side channels, including guide ears, caps, and securing.

Installing Shades with Link System and Cassette

Link System Assembly

Steps for connecting cassette ends, attaching shades, and securing end covers.

Optional Accessories

Extension Brackets

Information on using extension brackets to project shades from the mounting surface.

Hold Down Brackets

Instructions for installing hold down brackets, primarily for doors or motor homes.

Spacers

Information on using spacers for mounting shades with projected molding.

Safety Warning

Child Safety Precautions

Critical warning about strangulation hazards from cords and bead chains and how to prevent them.

Overview

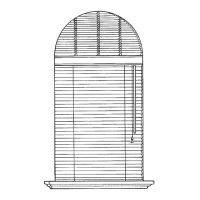
This document describes the installation, operation, and maintenance of a Roller Shade with a Continuous Cord Loop and Link System, with or without Side Channels.

Function Description

The roller shade system provides light control and privacy for windows. It operates using a continuous cord loop mechanism, allowing for smooth raising and lowering of the shade. The "Link System" suggests the ability to connect multiple shades, likely for wider windows or a unified aesthetic. Optional side channels enhance light blockage and privacy by guiding the shade fabric along the window frame. The "Cassette" refers to the headrail enclosure that houses the shade mechanism, providing a clean, finished look.

Important Technical Specifications

General Hardware:

  • Mounting Surfaces: The system is designed for various mounting surfaces. Standard screws are provided, but anchors (expansion or toggle bolts) are required for wallboard and plaster. Special plugs and drill bits are needed for brick, tile, and stone. Wood surfaces require pre-drilling to prevent splitting.
  • Cassette Installation: The cassettes are essential for proper installation. Screws must be installed at each end and evenly spaced between predrilled holes.
  • Screw Placement: Mark holes 2" in from the ends of the headrail. Additional screws should be evenly spaced.
  • Cassette Projection: Spacer blocks are provided to adjust the cassette projection, accommodating obstructions like window cranks or handles.

Tensioner Installation (Safety Device):

  • Purpose: The Cord Tensioner is a safety device that makes the pull cord less accessible to children, preventing strangulation hazards. It must be mounted for the window covering to operate correctly.
  • Mounting:
    • Inside Mount (without anchor): Locate as close to the window as possible, ensuring it doesn't interfere with shade operation.
    • Inside Mount (with anchor): Uses a mounting bracket for secure installation.
    • Outside Mount: Locate as close to the window as possible, ensuring it doesn't interfere with shade operation.
    • Outside Mount with Side Channels: Must be affixed to the side channel. A pilot hole (10mm or slightly more than 3/8" from the edge) is required in the metal side channel face.
  • Fasteners: Wall anchors are needed if mounting screws won't be secured into a wood stud. Sheet metal screws are used for metal surfaces after pre-drilling.
  • Placement: Install in a location that minimizes accessibility to children and pets and does not interfere with operation. Only supplied tensioners and hardware should be used.

Extension Brackets (Optional):

  • Projection: Project the shade up to 3" from the mounting surface.
  • Mounting Surface: Requires a flat vertical mounting surface of at least 7/8".
  • Installation: Attach to the wall using nuts, bolts, and washers. Mount per "Outside Mount" instructions, ensuring all brackets are level and project the same distance. Screws should be installed diagonally for maximum stability.

Spacers (Optional):

  • Thickness: 3/8" thick.
  • Purpose: Allow the shade to be mounted flush with the outside edge of standard window molding, particularly for windows with projected molding.

Usage Features

Basic Operation:

  • Raising the Shade: Pull down on the front of the cord loop.
  • Lowering the Shade: Pull down on the back of the cord loop.
  • Testing: After installation, test the shade to ensure it operates correctly.

Installation Process:

  • Tools Required: Steel tape measure, pencil, level, power drill and drill bits, flathead & Phillips screwdriver, awl (or tool for starting a screw hole).
  • Pre-installation: Measure and mark all predrilled locations.
  • Cassette Preparation:
    • Remove the fascia by pushing down on its face, pulling the inner edge, and swinging it out from the end plate.
    • Remove the shade by retracting the pin on the idle side (turning the dial counter-clockwise) and pulling the shade away from the control side bracket.
  • Inside Mount:
    • Align cassette tops with the window opening top.
    • Attach with screws through predrilled holes.
    • Adjust placement to accommodate obstructions.
    • Use a carpenter's level to ensure the cassette is level and aligned.
  • Outside Mount:
    • Attach the back of each installation cassette with one screw per predrilled hole.
    • Use a carpenter's level to ensure the cassette is level and aligned.
  • Shade Reassembly into Cassette:
    • Insert the control side first, ensuring the mechanism is turned as it was when removed and the chain guard is turned up.
    • Push the idle pin in and slowly insert the shade into the groove until the pin snaps into place.
    • Reattach the CCL guide to the end plate, ensuring it snaps into place.
  • Fascia Reattachment:
    • Insert the round or square fascia onto the cassette back groove.
    • Rotate it down to clip into position on the right and left sides (a click will be heard).
  • End Caps Attachment:
    • Align the square or round end caps.
    • Slide them onto the end plates of the cassette (a click will be heard).
  • Side Channels Installation (Optional):
    • Install side guide ears flush with the outside of the endplates.
    • Ensure side guide locks are inserted before installing the face of the side channels.
    • Add top and bottom caps to the side channel pieces.
    • Lower the shade slightly to insert the fabric into the caps guide.
    • Locate the top cap to the side guide ear.
    • Lift out the fabric and bottom rail to insert them into the side guides.
    • Snap the face of the side channel into place.
    • Use a flathead screwdriver to rotate the locks clockwise to secure the side guides.
    • Slide channels up to touch the bottom of the cassette.
    • Use a level to ensure vertical alignment, then fasten with screws through pre-drilled holes.
    • Test the shade and check vertical/parallel alignment of side channels.
  • Link System Installation (for multiple shades):
    • Slide the control end of the first shade in first.
    • Retract the idle pin to clip into the idler side.
    • Rotate the center side of the first shade into the box back.
    • Retract the pin to engage into the center link bracket and tighten the grub screw.
    • Align and slide end covers onto the end plates (a click will be heard).
    • Insert the second shade into the center link bracket and clip the idler into the idler bracket.
    • Insert the round or square cover onto the cassette back and rotate it down to clip into position.

Maintenance Features

Cleaning:

  • The document does not explicitly detail cleaning instructions for the shade fabric or components. However, general maintenance for roller shades typically involves dusting with a soft cloth or vacuuming with a brush attachment. Spot cleaning with a mild detergent and water may be suitable for fabric, depending on the material.

Troubleshooting/Removal:

  • Shade Removal (for maintenance or replacement):
    • Remove end caps by sliding them off.
    • Remove the fascia by pushing down on its face, pulling the inner edge, and swinging it out from the end plate.
    • Remove the shade from the cassette by retracting the pin on the idle side (turning the dial counter-clockwise) and pulling it away from the control side bracket.
    • Remove the screws holding the cassette to the sill/wall, remembering to support the cassette.

Safety:

  • Cord Tensioner: The Cord Tensioner is a critical safety feature to prevent strangulation hazards for young children and pets. It must be properly installed and maintained.
  • Child Safety Warning: Emphasizes keeping cords and bead chains out of reach of children and moving cribs/playpens away from windows with corded blinds.

Professional Installation:

  • Professional installation services are available in most areas. Contact 800-800-3329 for assistance.

This comprehensive guide ensures users can effectively install, operate, and maintain their roller shades, with a strong emphasis on safety and proper assembly.

3 Day Blinds ROLLER SHADE Specifications

General IconGeneral
Brand3 Day Blinds
ModelROLLER SHADE
CategoryWindow Blinds
LanguageEnglish

Related product manuals