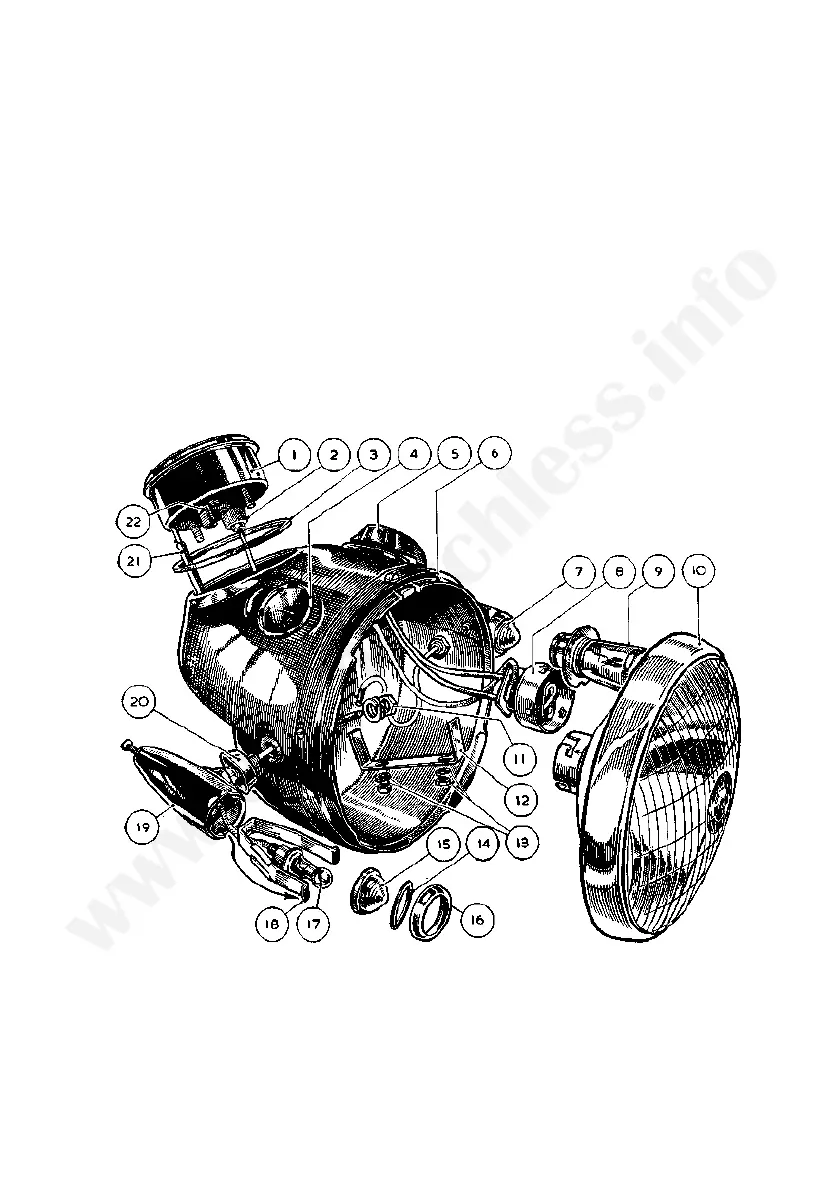
To remove headlamp rim and light unit
Slacken the screw on the top of the lamp body at the front, pull the rim outward from the
top and, as the front comes away, lower slightly to disengage the bottom tag from the
lamp shell. Twist the back cap in an anti-clockwise direction and pull it off, the bulb can
then be removed. . The light unit is secured to the rim by means of spring clips.
These can be disengaged from the turned up inner edge of the rim by pressing with a
screwdriver blade and, at the same time, working away from the edge.
To replace the headlamp rim and light unit
Lay the light unit in the rim so that the location block on the unit back engages with
the forked bracket on the rim.
Replace, by springing in, the spring clips so that they are evenly spaced around the rim.
To replace the back cap engage the projections on the inside of the back cap with
the slots in the holder, press on and secure by twisting it to the right.
Engage bottom tag on lamp rim with the small slit in the shell and gently force the top
of the rim back Into the shell, after which re-tighten the locking screw on the top of the
lamp body.
Access to the pilot lamps interior for bulb removal is obtained by removing the screw
at the rear end and gently pulling forward on the glass rim.
1
2
3
4
5
6
7
8
9
10
11
SPEEDOMETER.
SPEEDOMETER, LAMP.
SPEEDOMETER, SEALING RING.
AMMETER.
LAMPS, CONTROL SWITCH.
HEADLAMP SHELL.
PILOT LAMP.
LAMP CONNECTOR.
HEADLAMP BULB.
GLASS, REFLECTOR AND BULB HOLDER,
SEALED UNIT.
NUT A N D WASHER, FIXING PILOT LAMP.
12
13
14
15
16
17
18
19
20
21
22
SPEEDOMETER SECURING BRACKET.
NUT A ND WASHER FOR 12.
PILOT LAMP SEALING RING.
PILOT LAMP GLASS.
PILOT LAMP RIM.
PILOT LAMP BULB.
PILOT LAMP SECURING CLIP.
PILOT LAMP SHELL.
PILOT LAMP RUBBER SEAL.
SPEEDOMETER TRIP RESET KNOB.
DRIVING CABLE CONNECTOR UNION.
Illustration 34
 Loading...