Do you have a question about the AAXA Technologies M6 and is the answer not in the manual?
Please use this product as instructed. Misuse may cause injury or death.
Do not pierce or puncture the battery with sharp objects, do not heat, do not wet it.
Prolonged use at high volume may impair hearing. High volume during driving may cause distractions.
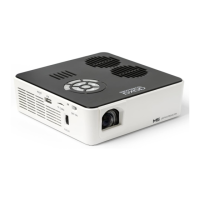
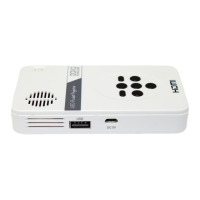
Identifies the DC Port, Digital Input, Headphone Out, AV Port, VGA Port, Infrared Receiver, Power Button, Power Switch, TF Card slot, Focus Adjustment, and USB Port.
Details the functions of the remote control buttons like Power, Menu, Navigation, Volume, and Media Player controls.
Explains the projector's directional pad, OK button, Input, On/Off, and Exit/Back functions.
Pressing remote power puts it in standby; side switch is needed for full power off.
Lists and shows images of the Remote, Power Adapter, A/V Cable, and Carrying Case.
Mentions that additional accessories are available for purchase at www.aaxatech.com.
Step-by-step instructions for connecting the power cord and turning on the projector.
How to put the projector into standby mode using the power button.
Instructions on how to fully turn off the projector using the power switch.
Instructions to spin the focus wheel until the image becomes clear.
Provides a chart showing throw distance in inches versus diagonal screen size in inches.
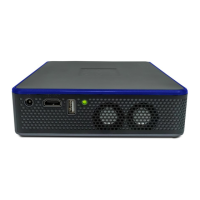
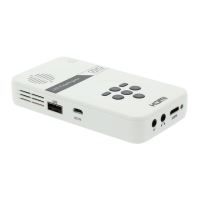
Diagram showing the location of TF Card, USB Stick, Composite Cable, VGA, and Headphones/Speakers ports.
Steps 1-3 describe connecting the VGA cable and selecting the 'Inputs' and 'VGA' icons in the menu.
Step 4 explains enabling VGA on the computer and consulting the owner's manual.
Steps 5-6 cover pressing Windows+P and adjusting screen resolution for optimal display.
Steps 1-3 describe connecting the Digital Input cable and selecting 'Inputs' then 'Digital Input' in the menu.
Step 4 explains enabling digital video output on the computer.
Steps 5-6 cover pressing Windows+P and adjusting screen resolution for optimal display.
Steps 1-2 describe connecting the 3.5mm Composite AV Cable to the projector and the composite end to the device.
Step 3 describes selecting 'INPUT' and then 'RCA' in the menu.
Step 4 mentions turning on the multimedia device and lists compatible devices.
Steps 1-2 describe connecting the Digital Input cable to the projector and the device.
Step 3 describes selecting 'INPUT' and then 'Digital Video' in the menu.
Step 4 mentions turning on the multimedia device and selecting resolution.
Step 1: Connect speakers/headphones to the projector's audio port.
Step 2: Ensure the projector and headphones are powered on.
Step 3: Place headphones on and enjoy; caution about prolonged high volume use.
Instructions on how to slide the TF card into the slot until it clicks.
How to navigate to media content via the main menu and select the TF card.
Mentions Microsoft Office and PDF are not supported; suggests converting to JPEG for slideshows.
How to select the type of file and the TF Card icon to access files.
Describes how the M6 displays TF card folders and files and how to navigate them.
Instructions on how to slide the USB drive into the USB port until it cannot go any further.
How to insert the USB drive and choose the USB Drive icon from the main menu to access files.
Mentions Microsoft Office and PDF are not supported; suggests converting to JPEG for slideshows.
How to select the type of file and the USB Drive icon to access files.
Describes how the M6 displays USB drive folders and files and how to navigate them.
Explains the Main Menu function for playing videos, pictures, music, and text from connected devices.
Details how to use directional buttons, OK, Back, and Menu buttons for navigation.
Steps to select the 'Video' icon, choose storage media, and select the video file.
How to highlight a file and wait for a preview to appear on the screen.
How to adjust volume using projector buttons or remote control.
How to access the video playback menu using the 'OK' button.
How to use directional buttons or remote to navigate options like Pause, FB, FF, Prev, Next, Stop, Aspect.
Use 'OK' and 'Back' buttons on the projector to open/hide the playback menu.
Steps to select USB/TF Card, navigate, highlight, and set repeat to 'Repeat 1'.
Steps to select 'video', navigate, highlight file, wait, and view preview.
Steps to select the 'Photo' icon, choose storage media, and select the photo file.
How to highlight a file and wait for a preview to appear on the screen.
Further controls for viewing pictures are in the Photo Submenu, accessed via the 'OK' button.
How to access the photo playback menu using the 'OK' button.
How to use directional buttons or remote to navigate options like Pause, Prev, Next, Stop, Repeat N, Msc Off, Playlist.
Use 'OK' and 'Back' buttons on the projector to open/hide the playback menu.
Steps for selecting USB/TF card, navigating, confirming, and starting the slideshow.
How to manually control slideshow by stopping and flipping through pictures.
Steps to select the 'Music' icon, choose storage media, and select the music file.
How to highlight a file and wait for a preview of the audio to show.
How to adjust volume and navigate playback menu using projector or remote.
Use 'OK' and 'Back' buttons on the projector to open/hide the music playback menu.
Steps to select USB/TF Card, navigate, highlight, and set repeat to 'Repeat 1'.
Steps to create a folder on the media device and transfer songs for a playlist.
Steps to select the 'Text' icon, choose storage media, and select the text file.
How to navigate through pages using directional buttons on the pad or remote.
Accessed by selecting 'Setting' on the Main Menu; has four submenus for customization.
Options include Picture Mode, Color Mode, Slideshow Time, Projection, Aspect Ratio, Upgrade.
Options include Sound Mode, Balance, Auto Volume, Surround Sound.
Brightness modes (Eco, Standard, Bright) and Option settings (OSD Language, Factory Default).
Changes picture mode and adjusts color temperature from warm to cool.
Sets slideshow timing and flips the projected image.
Changes aspect ratio and allows firmware upgrades via USB.
Changes sound mode and adjusts sound balance manually.
Enables automatic volume control and supports surround sound.
Changes OSD language and sets duration for selected OSD language.
Restores the projector to its original factory settings.
Displays the current software version in use.
Describes the three power modes: Bright, Standard, and Eco.
Details Bright (highest fan speed), Standard (normal), and Eco (battery saving, 90 min runtime).
Covers projector out of focus and offset from plane/angle issues.
Addresses enabling video output, connecting as an external monitor, and resolution.
Covers no power and power button not held long enough issues.
Addresses video source connection and incorrect file extension/codec.
Details brightness, resolution, contrast, aspect ratio, projection lens, image size, and lamp life.
Lists Video In (Composite, VGA, HDMI), Audio Output (speaker, jack), TF Card, and USB specifications.
Includes dimensions, weight, and supported file formats (MP3, WMA, JPG, AVI, etc.).
Provides AAXA Technologies Inc. address, phone number (714) 957-1999, and email info@aaxatech.com.
| Native aspect ratio | 16:9 |
|---|---|
| Projection distance | 0.5 - 4.9 m |
| Projection technology | LED |
| Contrast ratio (typical) | 2000:1 |
| Screen size compatibility | 12 - 200 \ |
| Projector native resolution | 1080p (1920x1080) |
| Service life of light source | 30000 h |
| Focus | Manual |
| Offset | 100 % |
| Throw ratio | 1.1 |
| Focal length range | - mm |
| 3D | No |
| Full HD | Yes |
| Supported video modes | 1080p |
| Analog signal format system | - |
| HDMI connector type | Full-size |
| USB 2.0 ports quantity | USB 2.0 ports have a data transmission speed of 480 Mbps, and are backwards compatible with USB 1.1 ports. You can connect all kinds of peripheral devices to them. |
| Component video (YPbPr/YCbCr) in | 0 |
| Compatible memory cards | MicroSD (TransFlash) |
| Noise level | - dB |
| Certification | CE, FCC Class A |
| RMS rated power | 2 W |
| Number of built-in speakers | 2 |
| Placement | Desktop |
| Product type | Standard throw projector |
| Product color | Black, White |
| Market positioning | Home cinema |
| Power source | AC/Battery |
| Battery life (max) | 1.5 h |
| Power consumption (standby) | - W |
| Power consumption (typical) | 75 W |
| Cables included | AV |
| Width | 177.8 mm |
|---|---|
| Height | 53.3 mm |
| Weight | 1333 g |