Aztec 600 | Piston assembly | Single- and multi-stream colorimetric analyzers | SI/ANAINST/001-EN 7
Referring to Fig. 4.6:
8. Remove 2 screws K and remove measurement cell top
cover L.
Referring to Fig. 4.7:
9. Disconnect motor wiring plug M.
Referring to Fig. 4.8:
10. Remove 4 screws N and remove motor and sample tube
O from the lower half of the measuring cell.
Referring to Fig. 4.9:
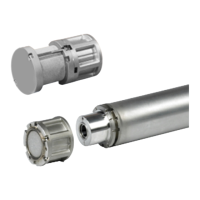
11. Slide sample tube P off piston assembly Q. Discard the
sample tube.
12. Loosen retaining grub screw R and unscrew piston
assembly Q from piston shaft S, clean the piston
assembly using DI water and return it to the factory.
4.4 Fitting the piston assembly
Referring to Fig. 4.10:
1. Lightly lubricate new O-ring T and piston seal U with
the silicon grease from the piston kit.
2. Fit the O-ring and piston seal to new piston base V.
3. Insert the piston base, complete with seal and O-ring, into
the new piston top W and secure loosely with new piston
cone adjusting screw X and spring washer Y.
4. Insert new piston assembly Q into the top of new sample
tube P and, holding the piston firmly, tighten piston cone
adjusting screw X until a continuous seal is achieved
between piston seal U and sample tube P.
5. Remove the piston assembly from the sample tube and
refit it to piston shaft S. Fit and tighten new retaining grub
screw R.
6. Remove O-ring Z from the base of the motor mounting
plate and discard.
7. Fit new O-ring Z ensuring it is located correctly in the
groove in the base of the motor mounting plate.
8. Fit the sample tube over the piston assembly and slide it up
until it contacts O-ring Z .
Fig. 4.6 Removing the measurement cell top cover
Fig. 4.7 Disconnecting the motor
Fig. 4.8 Removing the motor and sample tube
Fig. 4.9 Removing the piston
IMPORTANT (NOTE)
Do not tighten the piston cone adjusting screw
at this stage.
Fig. 4.10 Fitting the piston assembly
 Loading...